Introduction
This manual provides detailed instructions for the installation, operation, and maintenance of your GIGABYTE X870I AORUS PRO ICE AMD AM5 Mini-ITX Motherboard. Please read this manual thoroughly before proceeding with installation to ensure proper setup and optimal performance.

Figure 1: GIGABYTE X870I AORUS PRO ICE Motherboard and packaging.
Setup
1. CPU Installation (AMD AM5 Socket)
The GIGABYTE X870I AORUS PRO ICE motherboard supports AMD Ryzen 9000, 8000, and 7000 Series Processors. Ensure your CPU is compatible with the AM5 (LGA 1718) socket.
- Locate the AM5 CPU socket on the motherboard.
- Gently lift the load lever and open the CPU socket cover.
- Align the triangular mark on the CPU with the corresponding mark on the socket. Carefully place the CPU into the socket without applying force.
- Close the CPU socket cover and push down the load lever until it locks into place.

Figure 2: Close-up view of the AMD AM5 CPU socket, ready for processor installation.
2. Memory Installation (DDR5 DIMMs)
This motherboard features 2 DIMM slots supporting DDR5 memory with AMD EXPO support.
- Open the clips at both ends of the DIMM slot.
- Align the notch on the DDR5 memory module with the notch on the DIMM slot.
- Insert the memory module firmly into the slot until the clips snap into place.

Figure 3: Top-down view highlighting the DDR5 DIMM slots on the motherboard.
3. M.2 SSD Installation
The motherboard includes 2 M.2 slots with PCIe 5.0 support and M.2 EZ-Latch for tool-less installation.
- Locate the M.2 slot(s) and remove any protective film or heatsink covers.
- Insert the M.2 SSD into the slot at an angle.
- Push down the M.2 SSD and secure it using the M.2 EZ-Latch mechanism.
4. Graphics Card Installation
The motherboard features a PCIe 5.0 x16 slot with PCIe EZ-Latch for easy graphics card removal.
- Open the PCIe EZ-Latch on the PCIe x16 slot.
- Align your graphics card with the PCIe x16 slot and press firmly until it clicks into place.
- Ensure the PCIe EZ-Latch is securely closed.
5. Power Connections
Connect the main 24-pin ATX power connector and the 8-pin CPU power connector from your power supply to the motherboard.
6. Rear I/O Connections
The rear I/O panel provides various connectivity options:
- USB Ports: Multiple USB 2.0, USB 3.2 Gen 1, USB 3.2 Gen 2, and USB4 Type-C ports.
- Video Outputs: HDMI and DisplayPort.
- Networking: 2.5GbE LAN and WIFI7 with Wi-Fi EZ-Plug.
- Audio: Line Out, Mic In, and SPDIF Out.
- Other: Q-Flash Plus Button, Clear CMOS Button.
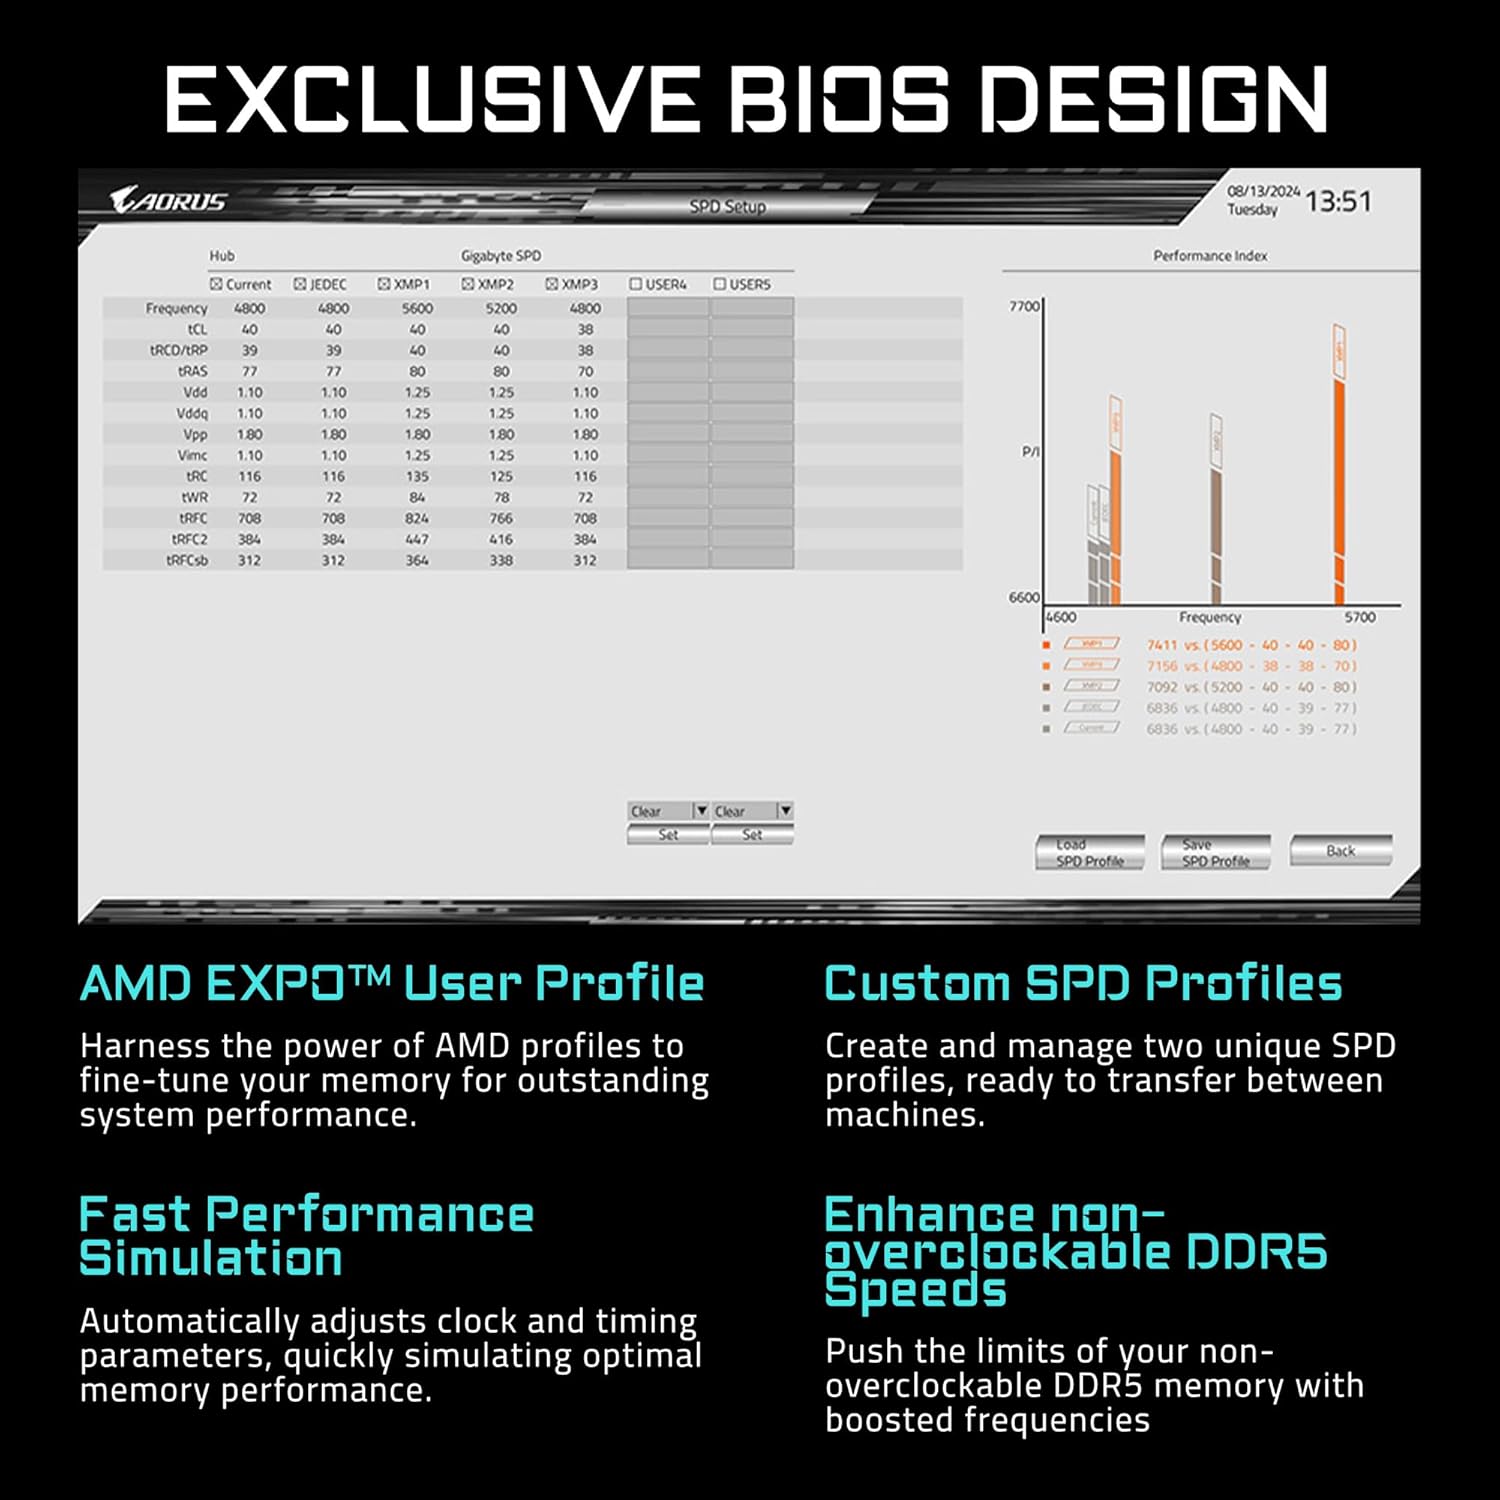
Figure 4: Detailed view of the rear I/O panel, showing all available ports.

Figure 5: Component diagram of the motherboard, illustrating port locations and features.
Operating Instructions
1. BIOS/UEFI Configuration
Access the BIOS/UEFI settings by pressing the DEL key during system startup. Here you can configure various system settings, including boot order, memory profiles, and fan speeds.
2. Memory Overclocking (AMD EXPO)
To enable enhanced memory performance, navigate to the BIOS/UEFI settings and activate the AMD EXPO profile for your DDR5 memory modules. This will automatically configure optimal timings and frequencies.
3. Networking
Utilize the integrated WIFI7 for high-speed wireless connectivity or the 2.5GbE LAN port for a stable wired connection. Ensure the Wi-Fi EZ-Plug antenna is properly connected for optimal wireless signal strength.
Video 1: Official GIGABYTE X870 Motherboard Overview. This video provides a general overview of the GIGABYTE X870 series motherboards, highlighting key features and design elements relevant to the X870I AORUS PRO ICE model.
Maintenance
1. BIOS Updates
Regularly updating your BIOS is crucial for system stability, compatibility, and performance. The GIGABYTE X870I AORUS PRO ICE supports Q-Flash Plus, allowing you to update the BIOS without installing a CPU, memory, or graphics card.
- Download the latest BIOS file from the official GIGABYTE website.
- Rename the downloaded BIOS file to GIGABYTE.bin (or as specified in the BIOS update instructions) and save it to the root directory of a USB flash drive (FAT32 formatted).
- Insert the USB flash drive into the designated Q-Flash Plus USB port on the rear I/O panel.
- With the system powered off but connected to the power supply, press the Q-Flash Plus button. The LED will flash, indicating the update process has begun.
- Wait for the LED to stop flashing, indicating the update is complete.
2. Cleaning
Periodically clean your motherboard and PC components to prevent dust buildup, which can lead to overheating and performance issues. Use compressed air and anti-static brushes for cleaning.
Troubleshooting
1. EZ-Debug Zone
The motherboard features an EZ-Debug Zone with LED indicators that can help diagnose boot issues. Refer to the motherboard's user manual for specific LED codes and their meanings.
2. Common Issues
- No Display: Ensure all power cables are connected, graphics card is seated correctly, and monitor input is selected.
- System Instability: Check memory seating, CPU cooler installation, and ensure BIOS is up to date.
- Slow Boot Times: Enable AMD EXPO for memory and ensure fast boot options are configured in BIOS.
Specifications
| Feature | Specification |
|---|---|
| Brand | GIGABYTE |
| Model Name | X870I AORUS PRO ICE |
| CPU Socket | AM5 (LGA 1718) |
| Compatible Processors | AMD Ryzen 9000 / Ryzen 8000 / Ryzen 7000 Series |
| RAM Memory Technology | DDR5 |
| Memory Slots | 2 x DIMMs with AMD EXPO Support |
| PCIe Slots | 1 x PCIe 5.0 x16 |
| M.2 Slots | 2 x M.2 (PCIe 5.0) |
| LAN | 2.5GbE LAN |
| Wireless Connectivity | WIFI7 |
| USB-C Ports | Front and Rear USB-C |
| Power Design | 8+2+1, 110A Smart Power Stage |
| Form Factor | Mini-ITX |
Warranty and Support
The GIGABYTE X870I AORUS PRO ICE Motherboard comes with a 5-Year Warranty. For technical support, driver downloads, or further assistance, please visit the official GIGABYTE website or contact their customer service.
Official GIGABYTE Support: www.gigabyte.com


