1. Introduction
The Nitecore E4K is a high-performance, compact Everyday Carry (EDC) flashlight designed for versatility and power. It features four CREE XP-L2 V6 LEDs, delivering a maximum output of 4400 lumens and a beam distance of up to 211 meters. This manual provides detailed instructions for the proper use, maintenance, and care of your Nitecore E4K flashlight.

Image 1.1: The Nitecore E4K flashlight, showing its compact design, USB-C charging cable, and included battery organizer.
2. Package Contents
Please inspect the package contents upon receipt to ensure all items are present:
- Nitecore E4K Flashlight (NL2150HPR battery pre-installed)
- USB-C Charging Cable
- Two-way Metal Pocket Clip
- Holster
- Lanyard
- LumenTac Storage Case

Image 2.1: All items included in the Nitecore E4K package.
3. Product Features
- Powerful Output: Utilizes 4 x CREE XP-L2 V6 LEDs for a maximum output of 4400 lumens.
- Compact Design: Weighs 2.82 ounces and measures less than 5 inches, ideal for everyday carry.
- USB-C Rechargeable: Integrated USB-C charging port on the battery for convenient recharging.
- User-Friendly Interface: Single side switch controls five brightness levels and three special modes.
- Advanced Temperature Regulation (ATR): Automatically adjusts output to prevent overheating.
- Durable Construction: Constructed from anodized aluminum with an IP68 waterproof rating (2 meters submersible) and 1-meter impact resistance.
- Tail Stand Capability: Allows the flashlight to stand upright for hands-free illumination.
- Precision Digital Optics Technology (PDOT): Ensures optimal reflector performance.

Image 3.1: Key design elements of the Nitecore E4K, including knurling for grip, cooling fins for heat dissipation, and tail stand capability.
4. Specifications
| Feature | Detail |
|---|---|
| Max Output | 4400 Lumens |
| Max Beam Distance | 211 meters |
| Max Peak Beam Intensity | 11100 cd |
| LEDs | 4 x CREE XP-L2 V6 LEDs |
| Battery Type | 1 x 21700 Li-ion (NL2150HPR included) |
| Charging Port | USB-C (on battery) |
| Dimensions | Length: 117.56 mm (4.63"), Head Diameter: 28.6 mm (1.13"), Tail Diameter: 28.1 mm (1.11") |
| Weight | 80 g (2.82 oz) (without battery) |
| Impact Resistance | 1 meter |
| Waterproof Rating | IP68 (2 meters submersible) |
| Material | Aero grade aluminum alloy with HA III military grade hard-anodized finish |

Image 4.1: Physical dimensions and weight of the Nitecore E4K flashlight.

Image 4.2: Detailed technical specifications for the Nitecore E4K across various modes.
5. Battery Installation and Charging
5.1 Battery Installation
- Unscrew the tail cap counter-clockwise.
- Insert the included Nitecore NL2150HPR 21700 Li-ion battery with the positive (+) terminal facing the head of the flashlight.
- Screw the tail cap back on clockwise until it is securely tightened.
Note:
- Ensure the battery is inserted correctly to prevent damage from reverse polarity.
- The flashlight may not function if the tail cap is not fully tightened.
5.2 Charging the Battery
The Nitecore E4K utilizes a specialized NL2150HPR 21700 battery with an integrated USB-C charging port. This allows for convenient charging without needing an external charger.
- Unscrew the tail cap and remove the NL2150HPR battery.
- Locate the USB-C charging port on the side of the battery.
- Connect the provided USB-C charging cable to the battery's port and plug the other end into a USB power source (e.g., phone charger, computer USB port).
- During charging, a red indicator light on the battery will illuminate. It will turn green when charging is complete.
Charging Status Indicators:
- Red Light: Charging in progress.
- Green Light: Charging complete.

Image 5.1: The Nitecore E4K battery being charged via its integrated USB-C port.
6. Operating Instructions
The Nitecore E4K features a single side switch for all operations. Familiarize yourself with the following actions:
6.1 General Operation
- Turn On: When the light is off, press and hold the side switch for approximately 1 second to turn it on.
- Turn Off: When the light is on, press and hold the side switch for approximately 1 second to turn it off.
- Brightness Adjustment: When the light is on, short press the side switch to cycle through brightness levels: Ultralow → Low → Mid → High → Turbo. The flashlight has mode memory and will turn on at the last used brightness level (excluding Turbo and special modes).
6.2 Direct Access Modes
- Direct to Ultralow: When the light is off, double-press the side switch to directly access Ultralow mode.
- Momentary Turbo: When the light is on, press and hold the side switch to access Turbo mode. Release the switch to return to the previous brightness level.
6.3 Special Modes (Strobe, SOS, Beacon)
- Access Special Modes: When the light is on or off, triple-press the side switch to enter Strobe mode.
- Cycle Special Modes: While in Strobe mode, short press the side switch to cycle through Strobe → Beacon → SOS.
- Exit Special Modes: Press and hold the side switch for approximately 1 second to turn off the flashlight, or short press to return to the previously memorized brightness level (if entered from an 'on' state).
6.4 User Modes (Daily Mode / Tactical Mode)
The E4K offers two user modes: Daily Mode (default) and Tactical Mode. To switch between modes:
- Ensure the flashlight is off.
- Unscrew the tail cap slightly.
- Press and hold the side switch while simultaneously tightening the tail cap.
- The flashlight will flash once to indicate Daily Mode or twice to indicate Tactical Mode. Release the switch after the desired mode is indicated.
Mode Differences:
- Daily Mode: Triple-press from off directly accesses Turbo.
- Tactical Mode: Triple-press from off directly accesses Strobe.
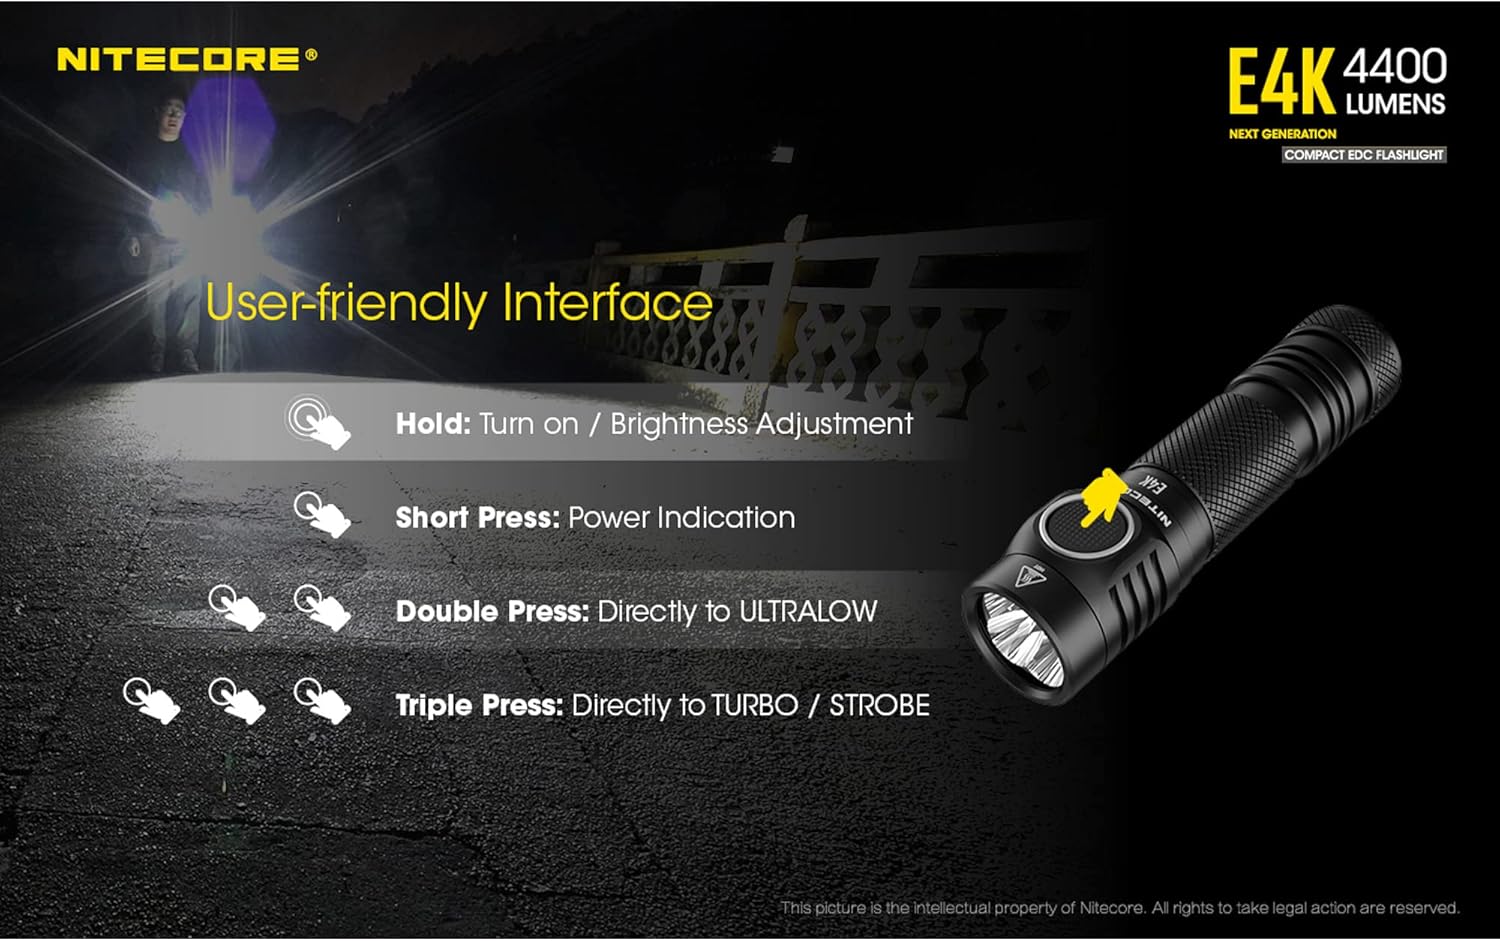
Image 6.1: Visual guide to the Nitecore E4K's user interface and button functions.
7. Battery Level Indication
The E4K provides two methods to check the battery level:
7.1 Detailed Voltage Readout
When the tail cap is loose and then tightened, the blue indicator light under the side switch will flash to show the battery voltage (accurate to ±0.1V). For example, three flashes followed by a pause and then two flashes indicates 3.2V.
7.2 Quick Power Indication
When the flashlight is off, short press the side switch. The blue indicator light will flash to indicate the remaining battery power:
- 3 Flashes: Battery power above 50%.
- 2 Flashes: Battery power between 10% and 50%.
- 1 Flash: Battery power below 10%.

Image 7.1: The blue indicator light on the side switch displays battery level.
8. Advanced Temperature Regulation (ATR)
The Nitecore E4K incorporates an Advanced Temperature Regulation (ATR) module. This technology automatically adjusts the flashlight's output based on its working condition and ambient environment to maintain optimal performance and prevent overheating. This ensures the longevity of the flashlight and the safety of the battery.
9. Maintenance
- Cleaning: Clean the flashlight body with a soft, damp cloth. For stubborn dirt, a mild soap solution can be used. Avoid harsh chemicals or abrasive materials.
- Lubrication: Lubricate the O-rings and threads regularly with silicone grease to maintain waterproof sealing.
- Battery Care: Store the battery in a cool, dry place. Recharge the battery every 3 months if not in regular use to prolong its lifespan.
- Contact Points: Keep all electrical contact points clean. If the flashlight does not turn on or respond, clean the battery contacts and the flashlight's contact points with an alcohol swab.
10. Troubleshooting
- Flashlight does not turn on:
- Ensure the battery is inserted correctly with the positive (+) terminal facing the head.
- Confirm the tail cap is fully tightened.
- Check if the battery is charged.
- Clean battery contacts and flashlight contact points.
- Output decreases or flashlight gets hot quickly:
- This is normal behavior for high-output flashlights, especially in Turbo mode, due to the ATR system. The flashlight reduces output to prevent overheating.
- Ensure adequate airflow around the flashlight during prolonged high-output use.
- Water ingress:
- Check if O-rings are properly seated and lubricated.
- Ensure the tail cap is fully tightened.
11. Warranty Information
Nitecore products are covered by a manufacturer's warranty. For detailed warranty terms and conditions, please refer to the official Nitecore website or contact your local distributor. Please retain your purchase receipt for warranty service.


