
1. Introduction
Thank you for choosing the NISSEI RX-503 Cross-Needle SWR and Wattmeter. This device is designed for accurate measurement of forward power, reflected power, and Standing Wave Ratio (SWR) across a wide frequency range, making it an essential tool for amateur radio enthusiasts and professionals. This manual provides detailed instructions for the proper setup, operation, and maintenance of your RX-503 meter.
2. Safety Information
Please read and understand all safety instructions before operating the device. Failure to do so may result in injury or damage to the equipment.
- Power Source: Ensure the device is connected to a stable power source if using the backlight function. The meter itself does not require external power for basic SWR/power measurement.
- RF Exposure: Always be aware of RF exposure guidelines when transmitting.
- Connections: Ensure all coaxial cable connections are secure and appropriate for the power levels being measured. Loose connections can cause arcing and damage.
- Environment: Operate the device in a dry environment, away from moisture, extreme temperatures, and direct sunlight.
- Servicing: Do not attempt to open or service the unit yourself. Refer all servicing to qualified personnel.
3. Product Overview
The NISSEI RX-503 is a compact and precise cross-needle SWR and wattmeter. It features a clear analog display for simultaneous reading of forward power, reflected power, and SWR. The unit is designed for ease of use and reliability.
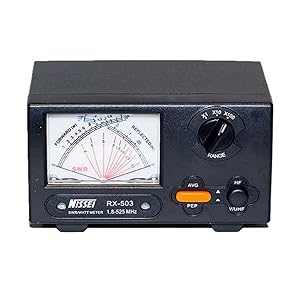
Figure 3.1: Front view of the NISSEI RX-503 SWR and Wattmeter, showing the cross-needle display, range selector, and function buttons.
Key Components:
- Cross-Needle Display: Provides simultaneous readings of forward power, reflected power, and SWR.
- Range Selector: Allows selection of different power measurement ranges (e.g., x1, x10, x100).
- Frequency Band Selector: Switches between HF, VHF, and UHF bands for accurate measurement.
- PEP/AVG Button: Selects between Peak Envelope Power (PEP) and Average power readings.
- DC 13.8V Input: For optional backlight illumination.
- Antenna and Transceiver Connectors: SO-239 type connectors for connecting your radio and antenna.

Figure 3.2: Rear view of the NISSEI RX-503, showing the antenna and transceiver connectors, and the DC power input for backlight.
4. Features
The NISSEI RX-503 offers a range of features for precise RF power and SWR measurement:
- Cross-Needle Display: Allows simultaneous reading of Forward Power, Reflected Power, and SWR.
- Wide Frequency Coverage: Operates across 1.8 MHz to 525 MHz, covering HF, VHF, and UHF bands.
- Power Measurement Range: Capable of measuring power from 0 to 200 Watts.
- Minimum Power Measurement: Accurate readings starting from 1-3 Watts.
- Peak Envelope Power (PEP) Reading: Essential for Single Sideband (SSB) transmissions.
- Illuminated Display: For improved visibility in low-light conditions (requires external 13.8V DC power).
- Compact and Robust Design: Durable construction suitable for various operating environments.
5. Setup
Follow these steps to properly set up your NISSEI RX-503 SWR and Wattmeter:
- Placement: Place the RX-503 on a stable, flat surface near your transceiver and antenna system.
- Connect Transceiver: Connect a coaxial cable from the antenna output of your transceiver to the "TX" connector on the rear of the RX-503.
- Connect Antenna: Connect a coaxial cable from your antenna (or antenna tuner) to the "ANT" connector on the rear of the RX-503.
- Power for Backlight (Optional): If you wish to use the display backlight, connect a 13.8V DC power supply to the DC input jack on the rear of the unit. Ensure correct polarity.
- Initial Settings:
- Set the Frequency Band Selector to the appropriate band (HF, VHF, or UHF) for your operation.
- Set the Power Range Selector to a suitable range (e.g., x100 for higher power, x1 for lower power). Start with a higher range if unsure to avoid damaging the meter.
- Select AVG or PEP mode as required for your measurement.
Your NISSEI RX-503 is now ready for operation.
6. Operating Instructions
Operating the RX-503 is straightforward. The cross-needle display allows for simultaneous reading of all relevant parameters.
- Power On Transceiver: Turn on your radio equipment.
- Select Frequency Band: Ensure the RX-503's frequency band selector matches your operating frequency (HF, VHF, or UHF).
- Select Power Range: Choose the appropriate power range (x1, x10, x100) using the selector knob. For example, if your radio outputs 100W, select the x100 range.
- Select Measurement Mode: Press the PEP/AVG button to select between Peak Envelope Power (for SSB) or Average Power (for FM, CW, AM).
- Transmit Briefly: Key your transceiver briefly at a low power setting (if possible) or with a short transmission. Observe the needles on the display.
- Readings:
- The needle pointing to the right indicates Forward Power.
- The needle pointing to the left indicates Reflected Power.
- The point where the two needles intersect indicates the SWR (Standing Wave Ratio) on the curved scale. An SWR of 1:1 is ideal.
- Adjusting Power Range: If the needles are too low or pegging the meter, adjust the power range selector accordingly. Always start with a higher range and decrease if necessary.
- Antenna Tuning: Use the SWR reading to tune your antenna or antenna tuner for the lowest possible SWR, ideally below 1.5:1 for efficient power transfer.
Note: For accurate PEP readings, ensure your transmission is modulated (e.g., speaking into the microphone for SSB).
7. Maintenance
The NISSEI RX-503 is designed for reliable operation with minimal maintenance. Follow these guidelines to ensure its longevity:
- Cleaning: Wipe the unit with a soft, dry cloth. Do not use abrasive cleaners or solvents.
- Storage: Store the meter in a cool, dry place when not in use. Protect it from dust and physical impact.
- Connections: Periodically check all coaxial connections for tightness and corrosion.
- Avoid Overpowering: Do not exceed the maximum power rating of the meter (200W) to prevent damage.
8. Troubleshooting
If you encounter issues with your RX-503, refer to the following common problems and solutions:
| Problem | Possible Cause | Solution |
|---|---|---|
| No needle movement when transmitting. |
|
|
| SWR reading is very high. |
|
|
| Backlight not working. |
|
|
If the problem persists after trying these solutions, please contact NISSEI customer support.
9. Specifications
Technical specifications for the NISSEI RX-503 SWR and Wattmeter:
- Model: RX-503
- Frequency Range: 1.8 - 525 MHz
- Power Measurement Range: 0 - 200 W
- Minimum Power Measurement: 1 - 3 W
- Measurement Modes: Average Power, Peak Envelope Power (PEP)
- Impedance: 50 Ohms
- Connectors: SO-239 (UHF Female)
- Insertion Loss: Less than 0.1 dB
- Power Source for Backlight: 13.8V DC (optional)
- Dimensions (W x H x D): Approximately 14 x 8.4 x 12.2 cm (5.5 x 3.3 x 4.8 inches)
- Weight: Approximately 900 grams (1.98 lbs)
- Certifications: CE
- Origin: Taiwan
10. Warranty and Support
NISSEI products are manufactured to high-quality standards. For warranty information and technical support, please refer to the documentation provided with your purchase or visit the official NISSEI website. Keep your proof of purchase for warranty claims.
For further assistance, please contact your local dealer or NISSEI customer service.


