
NETUM NT-8003
NETUM NT-8003 80mm Wireless Bluetooth Thermal Receipt Printer User Manual
Model: NT-8003
1. Introduction
This manual provides comprehensive instructions for the setup, operation, and maintenance of your NETUM NT-8003 80mm Wireless Bluetooth Thermal Receipt Printer. Please read this manual carefully before using the printer to ensure proper functionality and to prevent damage.
The NETUM NT-8003 is a portable thermal receipt printer designed for various applications, including retail, restaurants, and mobile sales, offering connectivity via Bluetooth and USB.
2. Package Contents
Verify that all items are present in the package:
- NETUM NT-8003 Thermal Printer
- Rechargeable Lithium-ion Battery (7.4V DV / 2000mA)
- USB Cable
- Power Adapter (external 9V / 1.5-2A)
- Thermal Paper Roll (sample)
- User Manual (this document)

Image: The NETUM NT-8003 thermal printer, showing its compact design and control panel.
3. Safety Precautions
- Do not expose the printer to water or moisture.
- Avoid dropping or subjecting the printer to strong impacts.
- Use only the specified power adapter and battery.
- Do not attempt to disassemble or repair the printer yourself. Contact customer support for assistance.
- Keep out of reach of children.
- Important Note: Remove the insulating tape from the battery before first use.
4. Setup
4.1 Battery Installation and Charging
- Open the battery compartment cover on the back of the printer.
- Insert the rechargeable lithium-ion battery, ensuring correct polarity.
- Close the battery compartment cover.
- Connect the power adapter to the printer's charging port and plug it into a power outlet. The "CHARGE" indicator light will illuminate.
- Charge the printer fully before first use. A full charge typically takes several hours.
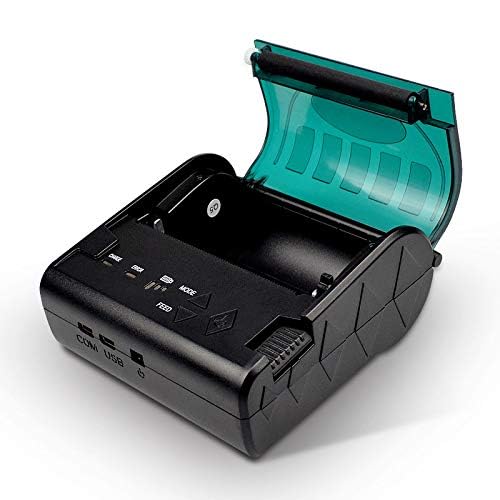
Image: The NETUM NT-8003 printer with its battery removed, illustrating the battery compartment.
4.2 Paper Roll Installation
- Press the cover open button to open the paper compartment cover.
- Insert a new 80mm thermal paper roll into the compartment, ensuring the paper feeds from the bottom and the leading edge is straight.
- Pull a small amount of paper out past the cutting edge.
- Close the paper compartment cover firmly until it clicks into place.
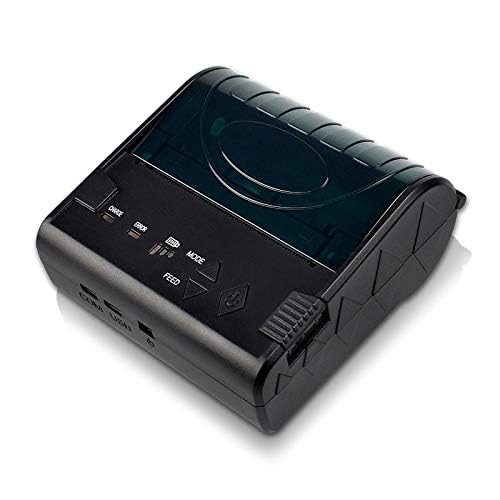
Image: The NETUM NT-8003 printer with its top cover open, ready for paper roll installation.
5. Operating Instructions
5.1 Power On/Off
- To power on: Press and hold the power button (Power Symbol) until the indicator lights illuminate.
- To power off: Press and hold the power button until the indicator lights turn off.
5.2 Bluetooth Connection (Android/iOS)
The printer cannot be directly detected by the built-in Bluetooth function of Apple/Android devices. To connect and use the printer, you must use a compatible application for searching and connecting.
- Ensure the printer is powered on and within range of your device.
- Download a compatible POS printing application (e.g., "POS-Printer V1.0" or similar) from your device's app store.
- Open the application and navigate to its settings or printer connection section.
- Search for available Bluetooth devices within the application.
- Select "NT-8003" or a similar name from the list of found devices.
- If prompted for a PIN, enter "0000" or "1234".
- Once connected, the application will indicate a successful connection, and you can proceed with printing.

Image: Visual guide demonstrating the process of connecting the printer via a mobile application, highlighting that direct Bluetooth pairing is not supported for printing.
5.3 USB Connection (PC/Windows/Linux)
- Connect the printer to your computer using the provided USB cable.
- Install the appropriate printer drivers for your operating system (Windows/Linux). Drivers are typically provided on a CD or available for download from the NETUM website.
- Once drivers are installed, the printer should appear in your system's printer list.
- You can now print directly from compatible software on your computer.
5.4 Printing
After successful connection via Bluetooth or USB, you can initiate printing from your application or software. Ensure the paper roll is correctly installed and the printer has sufficient battery charge.
- Feed Button: Press the "FEED" button to advance the paper manually.
- Mode Button: The "MODE" button may be used for self-test printing or changing printer settings, depending on the firmware version. Refer to specific application instructions for advanced settings.
6. Maintenance
6.1 Cleaning the Print Head
Regular cleaning of the thermal print head ensures optimal print quality and extends the printer's lifespan.
- Turn off the printer and disconnect the power adapter.
- Open the paper compartment cover.
- Use a cotton swab lightly dampened with isopropyl alcohol to gently wipe the thermal print head (the dark strip inside the cover).
- Allow the print head to dry completely before closing the cover and powering on the printer.
6.2 Cleaning the Roller
Clean the rubber roller to prevent paper jams and ensure smooth feeding.
- Turn off the printer and disconnect the power adapter.
- Open the paper compartment cover.
- Use a soft, lint-free cloth lightly dampened with water to wipe the rubber roller.
- Allow it to dry completely before closing the cover.
6.3 Battery Care
- Charge the battery regularly, even if the printer is not in use, to maintain battery health.
- Avoid fully discharging the battery frequently.
- Store the printer in a cool, dry place when not in use for extended periods.
7. Troubleshooting
| Problem | Possible Cause | Solution |
|---|---|---|
| Printer does not power on. | Low battery or no power. | Charge the battery or connect the power adapter. Ensure insulating tape is removed from the battery. |
| No print output. | No paper, paper jam, or print head issue. | Check paper roll. Clear any paper jams. Clean the print head. |
| Poor print quality. | Dirty print head or low battery. | Clean the print head. Ensure the battery is sufficiently charged. Use high-quality thermal paper. |
| Cannot connect via Bluetooth. | Incorrect connection method, app issue, or printer not discoverable. | Ensure you are connecting via a compatible printing application, not directly through device settings. Restart both printer and device. Check app permissions. |
| Printer not recognized by PC via USB. | Missing or incorrect drivers. | Install the correct USB drivers for your operating system. Try a different USB port or cable. |
8. Specifications
| Feature | Detail |
|---|---|
| Printing Method | Thermal Line Printing |
| Print Speed | 90mm/sec |
| Resolution | 8 dots/mm (203 DPI) |
| Paper Width | 80 ± 1 mm |
| Paper Roll Diameter | 83 mm |
| Paper Thickness | 0.06-0.08 mm |
| Interfaces | USB, Bluetooth 2.0 (4.0) |
| Command Set | ESC / POS / STAR compatible |
| Battery | 7.4V DV / 2000mA Rechargeable Lithium-ion |
| External Charger | 9V / 1.5-2A |
| Operating Systems | Windows 7, Android, iOS, Linux |
| Dimensions | 12 x 11 x 8 cm |
| Weight | 322 grams |
| Reliability | Print Head Life: 100 km |
9. Warranty and Support
NETUM products are designed for reliability and performance. This product comes with a warranty period of at least 12 months from the date of purchase.
For warranty claims, technical support, or service inquiries, please contact NETUM customer support through your retailer or the official NETUM website. Please have your purchase receipt and product model number (NT-8003) available when contacting support.
Certifications: CE, FCC, CCC, ROHS, ISO9001:2008
Related documentsNT-8003


Ask a question about this manual
Ask about setup, troubleshooting, compatibility, parts, safety, or missing instructions. Manuals+ will review the question and use this page’s manual context to help answer it.