1. Important Safety Instructions
Please read all instructions carefully before operating the appliance and retain them for future reference. Failure to follow these instructions may result in electric shock, fire, or serious injury.
- Ensure the power supply voltage matches the rating label on the dehumidifier.
- Do not operate the dehumidifier with a damaged cord or plug. If the cord is damaged, it must be replaced by the manufacturer, its service agent, or similarly qualified persons to avoid a hazard.
- Do not immerse the appliance, cord, or plug in water or other liquids.
- Keep the appliance away from children and pets. This appliance is not intended for use by persons (including children) with reduced physical, sensory or mental capabilities, or lack of experience and knowledge, unless they have been given supervision or instruction concerning use of the appliance by a person responsible for their safety.
- Always unplug the dehumidifier before cleaning, servicing, or moving it.
- Do not block air inlets or outlets. Maintain at least 20 cm clearance from walls and other objects.
- Do not use the appliance in areas where flammable liquids or gases are stored.
- Ensure the water tank is correctly installed before operation to prevent water leakage.
- Use only on a flat, stable surface to prevent tipping.
2. Product Overview
The EuropAce Dehumidifier (16L) is designed to efficiently remove excess moisture from your indoor environment, improving air quality and comfort. It features a compact and slim design, digital humidity control, and a multi-stage air purification system.
Key Features:
- Efficient Moisture Control: Removes up to 16 liters of moisture per day.
- Versatile Room Coverage: Effective in areas up to 35m².
- Comprehensive Air Purification: Includes pre-filter, silver ion, HEPA, and carbon filter.
- User-Friendly Interface: LCD touch panel with digital humidity control.
- Multiple Operating Modes: Dehumidifier, Laundry Dry, Turbo, and CO modes.
- Convenient Drainage: 5-liter water tank with continuous drainage option.
- Mobility: Equipped with castors and handles for easy movement.

Figure 1: Front view of the EuropAce Dehumidifier (16L). This image shows the appliance's sleek white casing, the control panel on top with indicator lights, and the EuropAce logo.
3. Setup and Installation
3.1 Unpacking
- Carefully remove the dehumidifier from its packaging.
- Remove all packing materials, including any tape or protective films.
- Inspect the appliance for any signs of damage. If damaged, do not operate and contact customer support.
3.2 Placement
- Place the dehumidifier on a firm, level surface capable of supporting its weight when the water tank is full.
- Ensure there is at least 20 cm (8 inches) of clear space around the air inlet and outlet grilles to allow for proper airflow.
- Avoid placing the unit near heat sources, in direct sunlight, or in areas exposed to splashing water.
- The unit is portable, featuring castors and handles for easy relocation.
3.3 Power Connection
Plug the power cord into a grounded electrical outlet. Ensure the outlet meets the electrical requirements specified on the product label.
3.4 Water Drainage Options
The dehumidifier offers two drainage methods:
- Manual Drainage (Water Tank): The unit collects condensed water in its internal 5-liter water tank. When the tank is full, the unit will automatically stop operating, and an indicator will illuminate. Carefully remove the tank, empty the water, and reinsert it securely to resume operation.
- Continuous Drainage: For extended operation without manual emptying, connect a suitable drainage hose (not included) to the continuous drainage port on the back of the unit. Ensure the hose is sloped downwards to allow gravity to drain the water into a floor drain or larger container.
4. Operating Instructions
The dehumidifier features an intuitive LCD touch panel for easy control.
4.1 Power On/Off
Press the Power button on the control panel to turn the unit on or off.
4.2 Setting Desired Humidity Level
- Press the Humidity button to cycle through desired humidity levels (e.g., 30% RH to 80% RH).
- The unit will operate until the ambient humidity reaches the set level, then cycle on and off to maintain it.
4.3 Operating Modes
Press the Mode button to select from the following:
- Dehumidifier Mode: Standard operation to reduce room humidity to the set level.
- Laundry Dry Mode: Designed to quickly dry clothes by operating at a high fan speed and continuous dehumidification.
- Turbo Mode: Provides maximum dehumidification power for rapid moisture removal.
- CO Mode: An additional operating mode, likely related to air quality or specific air purification functions. Consult the full product documentation for detailed information on its operation.
4.4 Fan Speed
Press the Fan Speed button to switch between High and Low fan speeds.
4.5 Timer Function
Press the Timer button to set an auto-off timer for up to 8 hours. Each press increases the timer by one hour.
4.6 Ionizer
Activate the ionizer function to help purify the air by releasing negative ions. Refer to the control panel for the specific ionizer button.
4.7 Automatic Defrosting
The unit is equipped with an automatic defrosting function. If frost builds up on the evaporator coils, the unit will temporarily stop dehumidifying and run the fan to melt the frost. This is normal operation.
4.8 Full Tank Indicator and Auto-Stop
When the water tank is full, the dehumidifier will automatically shut off, and a "Full Tank" indicator light will illuminate. Empty the water tank and reinsert it correctly to resume operation.
5. Maintenance
Regular maintenance ensures optimal performance and extends the lifespan of your dehumidifier.
5.1 Cleaning the Air Filters
The dehumidifier features a 3-step air purification system: pre-filter, silver ion, and HEPA + carbon filter. These filters should be cleaned regularly, typically every two weeks, or more often depending on air quality.
- Turn off and unplug the dehumidifier.
- Locate and remove the filter assembly (refer to your unit's specific design for access).
- Pre-filter: Wash with warm, soapy water, rinse thoroughly, and allow to air dry completely before reinstallation.
- Silver Ion, HEPA + Carbon Filter: These filters are typically not washable and should be replaced periodically (e.g., every 6-12 months) depending on usage. Refer to the product packaging or contact customer support for replacement filters. Do not attempt to wash these filters.
- Reinstall the dry filters and close the filter cover securely.
5.2 Cleaning the Water Tank
Clean the water tank regularly to prevent mold and mildew growth.
- Turn off and unplug the dehumidifier.
- Remove the water tank.
- Wash the tank with mild detergent and warm water. Rinse thoroughly.
- Dry the tank completely before reinserting it into the unit.
5.3 Exterior Cleaning
Wipe the exterior of the dehumidifier with a soft, damp cloth. Do not use abrasive cleaners or solvents.
5.4 Storage
If storing the unit for an extended period:
- Ensure the water tank is empty and clean.
- Clean all filters.
- Unplug the power cord and coil it neatly.
- Cover the unit with a plastic bag or cloth to protect it from dust.
- Store in a cool, dry place.
6. Troubleshooting
Before contacting customer support, please refer to the following troubleshooting guide for common issues.
| Problem | Possible Cause | Solution |
|---|---|---|
| Dehumidifier does not turn on. | No power supply; Power cord not plugged in; Water tank full or incorrectly installed. | Check power outlet; Ensure power cord is securely plugged in; Empty and correctly reinsert water tank. |
| No water collected or insufficient dehumidification. | Humidity setting too high; Room temperature too low; Air filter clogged; Air inlets/outlets blocked; Room size too large. | Lower desired humidity setting; Ensure room temperature is above 5°C (41°F); Clean or replace air filter; Clear obstructions around unit; Consider if unit capacity matches room size. |
| Unit is noisy. | Unit not on a level surface; Air filter clogged; Fan obstruction. | Place unit on a flat, stable surface; Clean air filter; Check for any foreign objects obstructing the fan. |
| Water leakage. | Water tank not properly installed; Continuous drainage hose loose or blocked. | Ensure water tank is securely in place; Check continuous drainage hose connection and ensure it's not kinked or blocked. |
7. Specifications
- Model Name: EuropAce Dehumidifier (16L)
- Moisture Removal Capacity: 16 Liters/day
- Water Tank Volume: 5 Liters
- Recommended Room Coverage: Up to 35m²
- Product Dimensions (D x W x H): 19.2 cm x 30.8 cm x 49 cm
- Wattage: 180 watts
- Number of Fan Speeds: 2 (High/Low)
- Special Features: Digital Display, Portable, Ionizer, Automatic Defrosting, Full Tank Auto-Stop
- Included Components: 1 x Dehumidifier
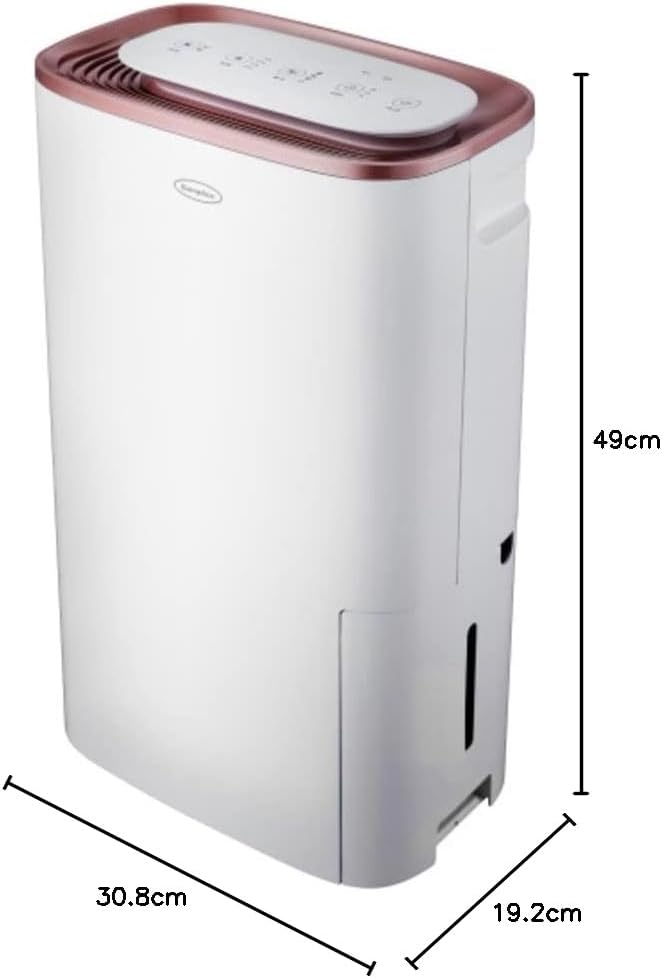
Figure 2: Side view of the EuropAce Dehumidifier (16L) illustrating its dimensions: 19.2 cm depth, 30.8 cm width, and 49 cm height. The image highlights the compact form factor of the unit.
8. Warranty and Customer Support
This EuropAce Dehumidifier (16L) comes with a Limited Guarantee. Please refer to the warranty card included with your purchase for specific terms and conditions, including the duration and coverage details.
For technical assistance, service, or to inquire about replacement parts (such as filters), please contact EuropAce customer support. Contact information can typically be found on the product packaging, the official EuropAce website, or your purchase receipt.
When contacting support, please have your product model name (EuropAce Dehumidifier (16L)) and purchase date readily available.


