Introduction
This user manual provides detailed instructions for the safe and efficient operation, maintenance, and troubleshooting of your VANNECT D51845 Electric Paint Sprayer. Please read this manual thoroughly before first use to ensure optimal performance and to prevent damage to the unit or injury to yourself.

Image: The VANNECT D51845 Electric Paint Sprayer, showcasing its red and black body, white paint container, and various accessories like nozzles and cleaning tools.
Important Safety Instructions
WARNING: Failure to follow these instructions may result in electric shock, fire, and/or serious injury.
- Always wear appropriate personal protective equipment (PPE) including safety glasses, gloves, and a respirator when operating the paint sprayer.
- Ensure the work area is well-ventilated to prevent the buildup of flammable vapors.
- Keep children and bystanders away while operating the paint sprayer.
- Do not spray near open flames, pilot lights, or other ignition sources.
- Never immerse the motor unit in water or other liquids.
- Disconnect the power plug from the power source before cleaning, servicing, or when not in use.
- Use only manufacturer-recommended accessories and replacement parts.
- Do not modify the sprayer or its components.
- Always check the paint sprayer for damaged parts before each use.
- Ensure the power cord is not damaged or pinched.
Package Contents
Upon unpacking, please verify that all items listed below are present and undamaged:
- Paint Gun Unit (Motor and Spray Gun Assembly)
- 1000ml Paint Container
- 4 Nozzles (1.5mm, 1.8mm, 2.2mm, 2.6mm)
- Air Filter
- Power Cord (Integrated)
- Cleaning Brush
- Viscosity Measuring Cup
Product Overview
Familiarize yourself with the components of your paint sprayer:

Image: An exploded view of the paint sprayer gun, showing its detachable components: 1. Union Nut, 2. Air Cap, 3. Spray Jet Width Adjusting Lever, 4. Nozzle, and 5. 1000ml Container.
- Union Nut: Secures the air cap and nozzle.
- Air Cap: Directs the air flow and helps shape the spray pattern.
- Spray Jet Width Adjusting Lever: Allows selection of different spray patterns (circular, horizontal, vertical).
- Nozzle: Determines the paint flow rate and spray fineness.
- 1000ml Container: Holds the paint material.
- Flow Control Knob: Adjusts the paint output volume.
- Trigger: Activates the sprayer.
- Motor Unit: Houses the electric motor and air pump.
Setup
- Prepare the Work Area: Ensure the area is clean, well-ventilated, and free from dust and debris. Cover any surfaces not to be painted.
- Prepare the Paint Material:
Most paints require thinning for optimal spraying. Use the included viscosity measuring cup to determine the correct consistency. Fill the cup with paint and time how long it takes for the paint to flow out. Refer to your paint manufacturer's instructions for recommended viscosity. Add appropriate thinner (water for latex, mineral spirits for oil-based) gradually, stirring well, until the desired viscosity is achieved.
- Fill the Container: Unscrew the 1000ml container from the spray gun. Pour the prepared paint material into the container. Do not overfill. Securely reattach the container to the spray gun.
- Select and Install Nozzle:
Choose the appropriate nozzle size based on your paint material and desired finish:
- 1.5mm - 2.2mm nozzles: Ideal for thin paints like sealers, varnishes, stains, and lacquers.
- 2.6mm nozzle: Suitable for thicker paints such as latex, chalk paint, and primers.
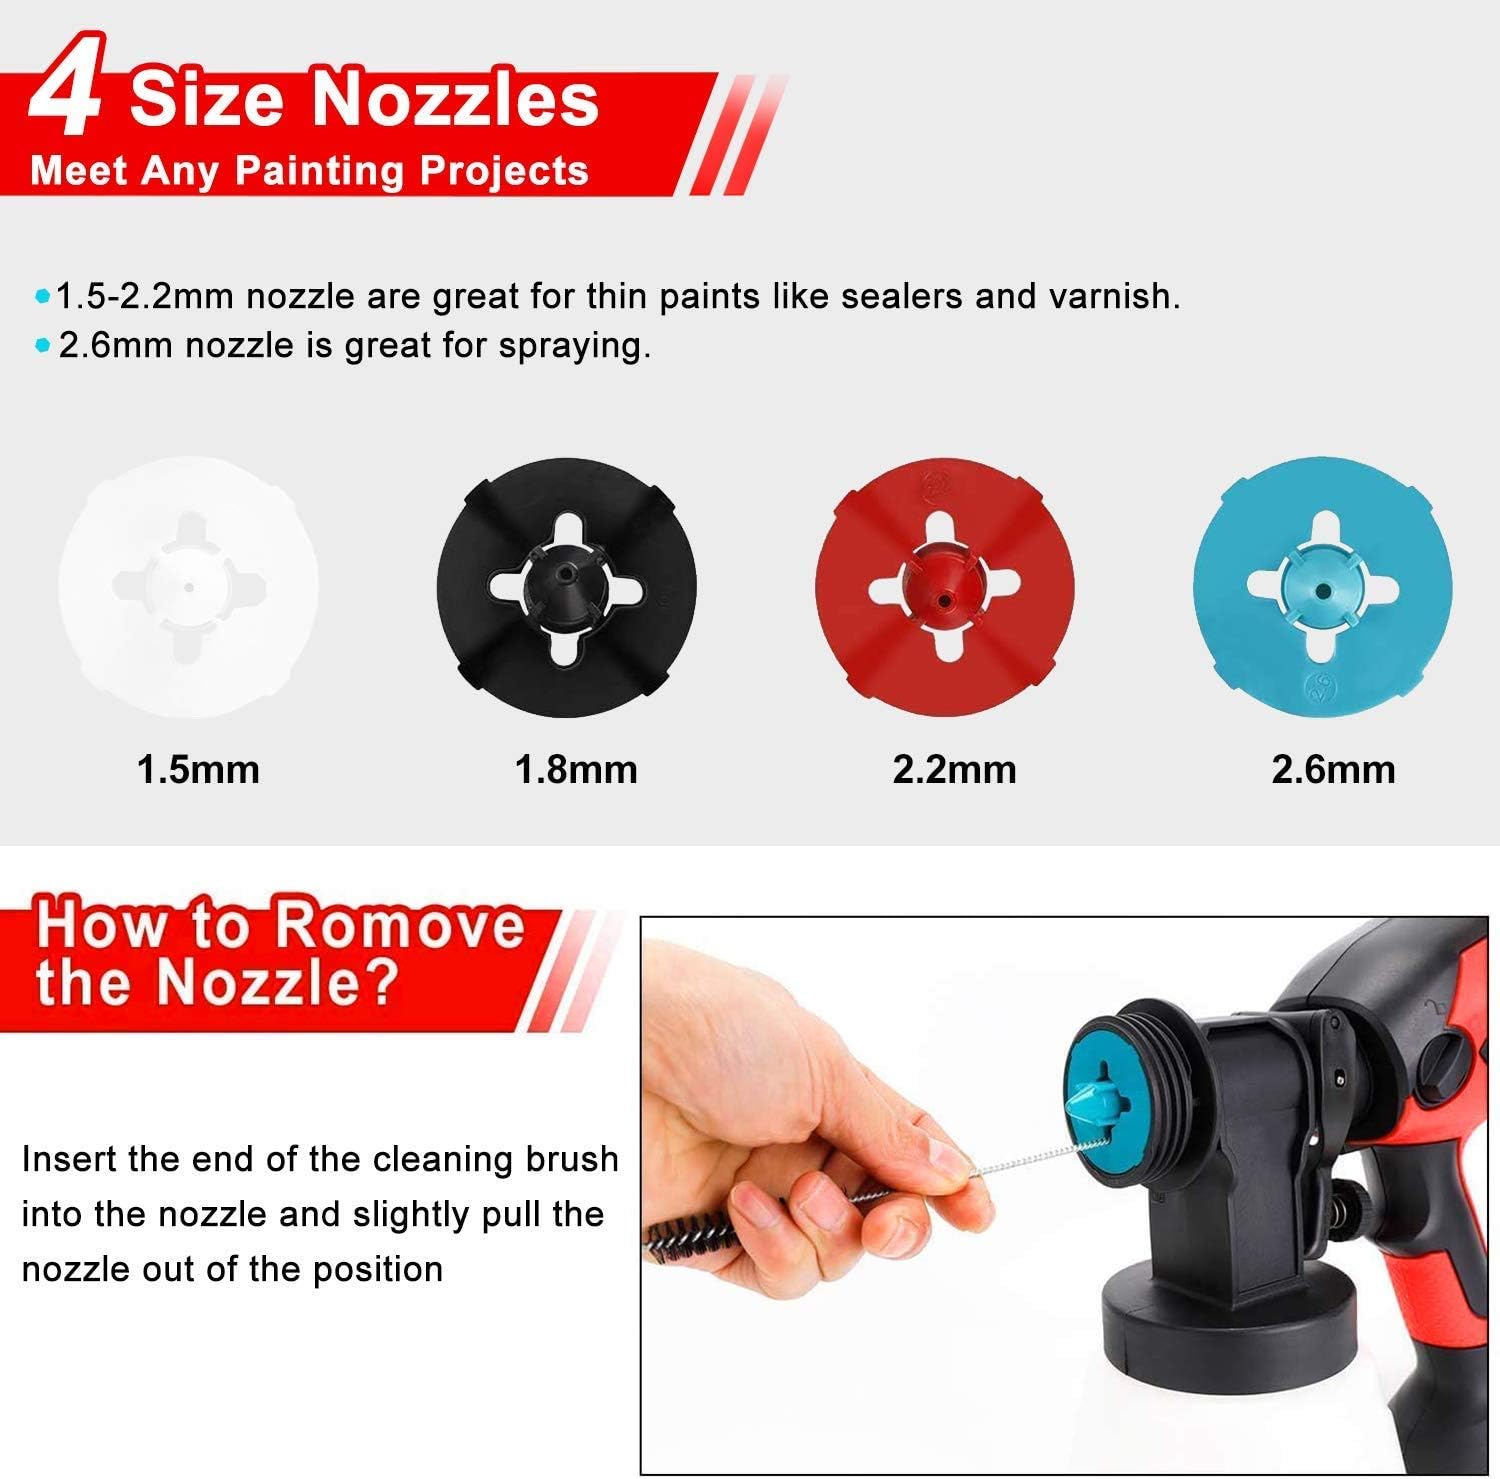
Image: Displays four nozzle sizes (1.5mm, 1.8mm, 2.2mm, 2.6mm) and an illustration demonstrating how to remove a nozzle using the cleaning brush.
To install, ensure the nozzle is clean and properly seated in the air cap. Secure the union nut firmly.
- Adjust Spray Pattern: Rotate the air cap to select one of three spray patterns:
- Circular (45°): For small areas or detailed work.
- Horizontal (90°): For horizontal surfaces or wide coverage.
- Vertical (180°): For vertical surfaces or tall objects.
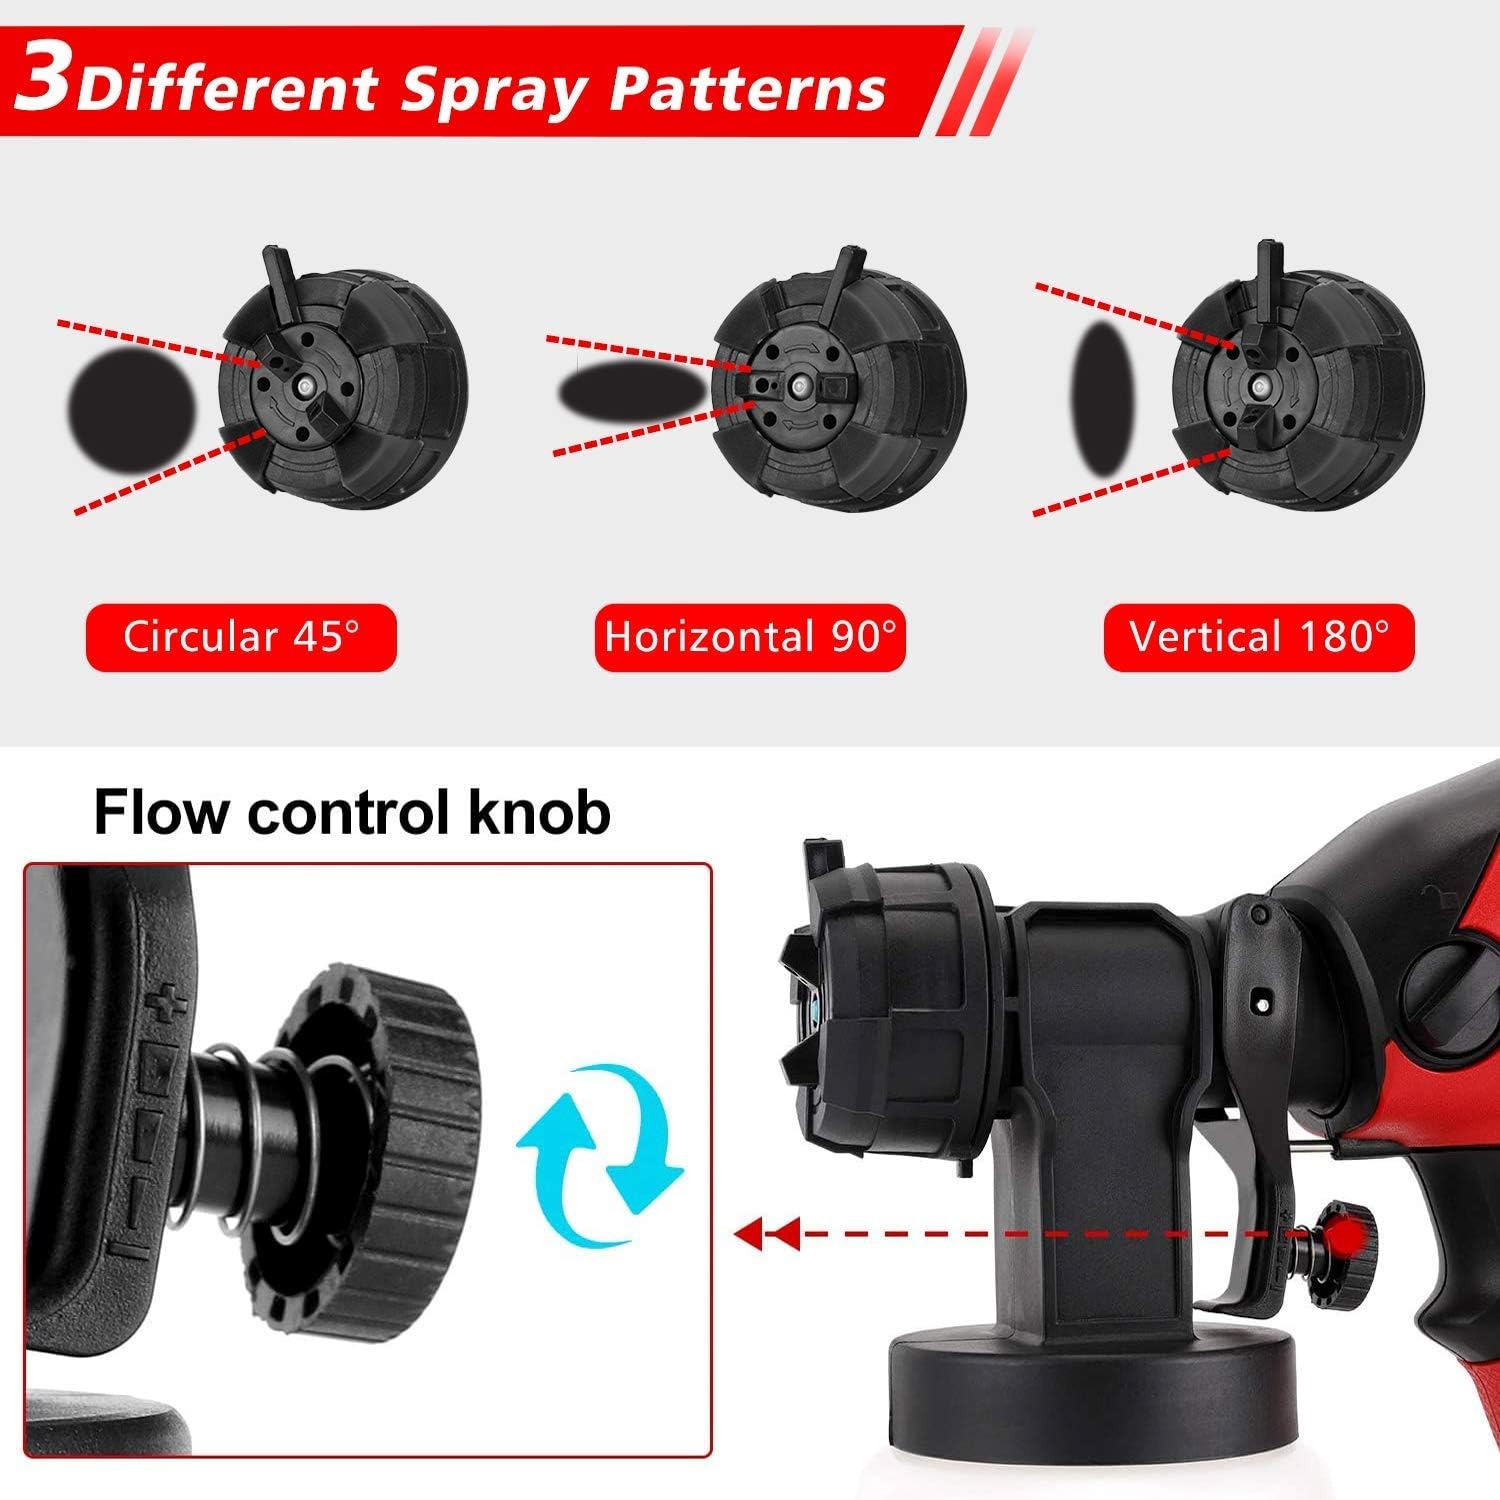
Image: Illustrates the three available spray patterns (circular, horizontal, vertical) and highlights the flow control knob for adjusting paint output.
- Adjust Flow Control: Turn the flow control knob on the trigger to adjust the paint output volume. Start with a lower setting and increase as needed.
Operating Instructions
- Connect Power: Plug the power cord into a grounded electrical outlet. The sprayer features a 6.6 ft extra long cord for increased accessibility.
- Test Spray: Before spraying your actual project, test the spray pattern and flow on a piece of scrap material (cardboard, wood). Adjust the flow control knob and spray pattern until you achieve the desired result.
- Spraying Technique:
- Hold the sprayer approximately 6-12 inches (15-30 cm) from the surface, perpendicular to the surface.
- Move the sprayer in smooth, even strokes, overlapping each pass by about 50%.
- Maintain a consistent speed to ensure an even coat.
- Release the trigger at the end of each stroke to avoid paint buildup.
- For best results, apply multiple thin coats rather than one thick coat.

Image: A person using the VANNECT paint sprayer to apply paint to a wall, demonstrating the sprayer's reach with its 6.6 ft extra long cord.

Image: A close-up of a hand holding the paint sprayer, applying paint to wooden planks, illustrating its use for various surfaces.

Image: A person in protective gear spraying a wooden door with the paint sprayer, showing its application for larger home projects.
- Breaks: If taking a short break, place the sprayer on a flat surface to prevent tipping. For longer breaks, clean the nozzle and air cap to prevent drying.
Maintenance and Cleaning
Proper cleaning after each use is crucial for the longevity and performance of your paint sprayer.
- Empty Container: Disconnect the power. Unscrew the paint container and pour any remaining paint back into its original can.
- Initial Rinse: Fill the container with appropriate cleaning solution (water for latex, mineral spirits for oil-based). Reattach the container and spray the cleaning solution into a waste container until the spray runs clear.
- Disassemble and Clean:
- Unscrew the union nut and remove the air cap and nozzle.
- Thoroughly clean all disassembled parts (container, suction tube, nozzle, air cap, union nut) with the appropriate cleaning solution and the included cleaning brush.
- Pay special attention to the nozzle and air cap holes to ensure they are free of paint residue.
- Use the cleaning needle to clear any blockages in the nozzle.
- Clean Motor Unit: Wipe down the exterior of the motor unit with a damp cloth. Do not immerse the motor unit in liquid.
- Air Filter: Regularly check and clean the air filter located on the motor unit. Replace if heavily soiled or damaged.
- Dry and Store: Ensure all parts are completely dry before reassembling. Store the paint sprayer in a clean, dry place, away from direct sunlight and extreme temperatures.
Troubleshooting
| Problem | Possible Cause | Solution |
|---|---|---|
| No spray or weak spray |
|
|
| Uneven spray pattern |
|
|
| Paint leaking |
|
|
| Motor runs but no paint sprays |
|
|
Specifications
| Feature | Detail |
|---|---|
| Brand | VANNECT |
| Model Name | D51845 |
| Power Source | Electric |
| Wattage | 700 Watt |
| Material | Plastic |
| Color | Multicolor (Red/Black) |
| Nozzle Sizes | 1.5mm, 1.8mm, 2.2mm, 2.6mm |
| Container Volume | 1000ml |
| Item Weight | 3.96 pounds |
| Package Dimensions | 11.81 x 9.57 x 5.83 inches |
| Special Features | Lightweight, Detachable Gun for Easy Cleaning, 6.6 Ft Extra Long Cord |
Warranty and Support
For warranty information, technical support, or to inquire about replacement parts, please contact VANNECT customer service directly. Refer to the product packaging or the manufacturer's official website for the most up-to-date contact details.
Always provide your product model number (D51845) and purchase date when contacting support.


