Introduction
Thank you for choosing the Walfront TM919A-3 Digital Programmable 7-Day Timer. This device is designed for precise control of electrical equipment, allowing you to set up to 16 ON/OFF programs daily across a 7-day cycle. Its clear LCD display and easy-to-use interface make it suitable for various applications, from home automation to industrial control. Please read this manual thoroughly before installation and operation to ensure safe and correct usage.
Safety Information
Warning: Electrical installation should only be performed by qualified personnel. Always disconnect power before installing or servicing the timer to prevent electric shock or equipment damage. Ensure all wiring complies with local electrical codes and regulations. Do not exceed the specified current rating of 16A.
- Ensure the power supply matches the timer's voltage (24V DC).
- Do not immerse the device in water or expose it to excessive moisture.
- Keep out of reach of children.
- Do not attempt to disassemble or repair the unit yourself. Contact qualified service personnel.
Product Features
- LCD Display: Digital LCD display with LED indicator for clear and intuitive readings.
- Easy Installation: Designed for 35mm DIN rail mounting, suitable for various electrical panels.
- Programmable Settings: Up to 16 ON/OFF programs per day, with 15 weekly combinations. Manual ON/OFF control also available.
- Countdown Function: Features a countdown timer up to 24 hours before switching OFF.
- Memory Backup: Equipped with a replaceable CR2032 battery to save programmed settings during power outages.
- Time Range: 1 minute to 168 hours.
- Clock Display: Supports 12-hour and 24-hour formats.
Package Contents
- 1 x Walfront TM919A-3 Digital Programmable Timer
- 1 x Instruction Manual
Setup
1. Battery Installation/Replacement
The timer includes a replaceable CR2032 battery for memory backup. If the display is blank or programs are not retained after a power cut, the battery may need replacement.
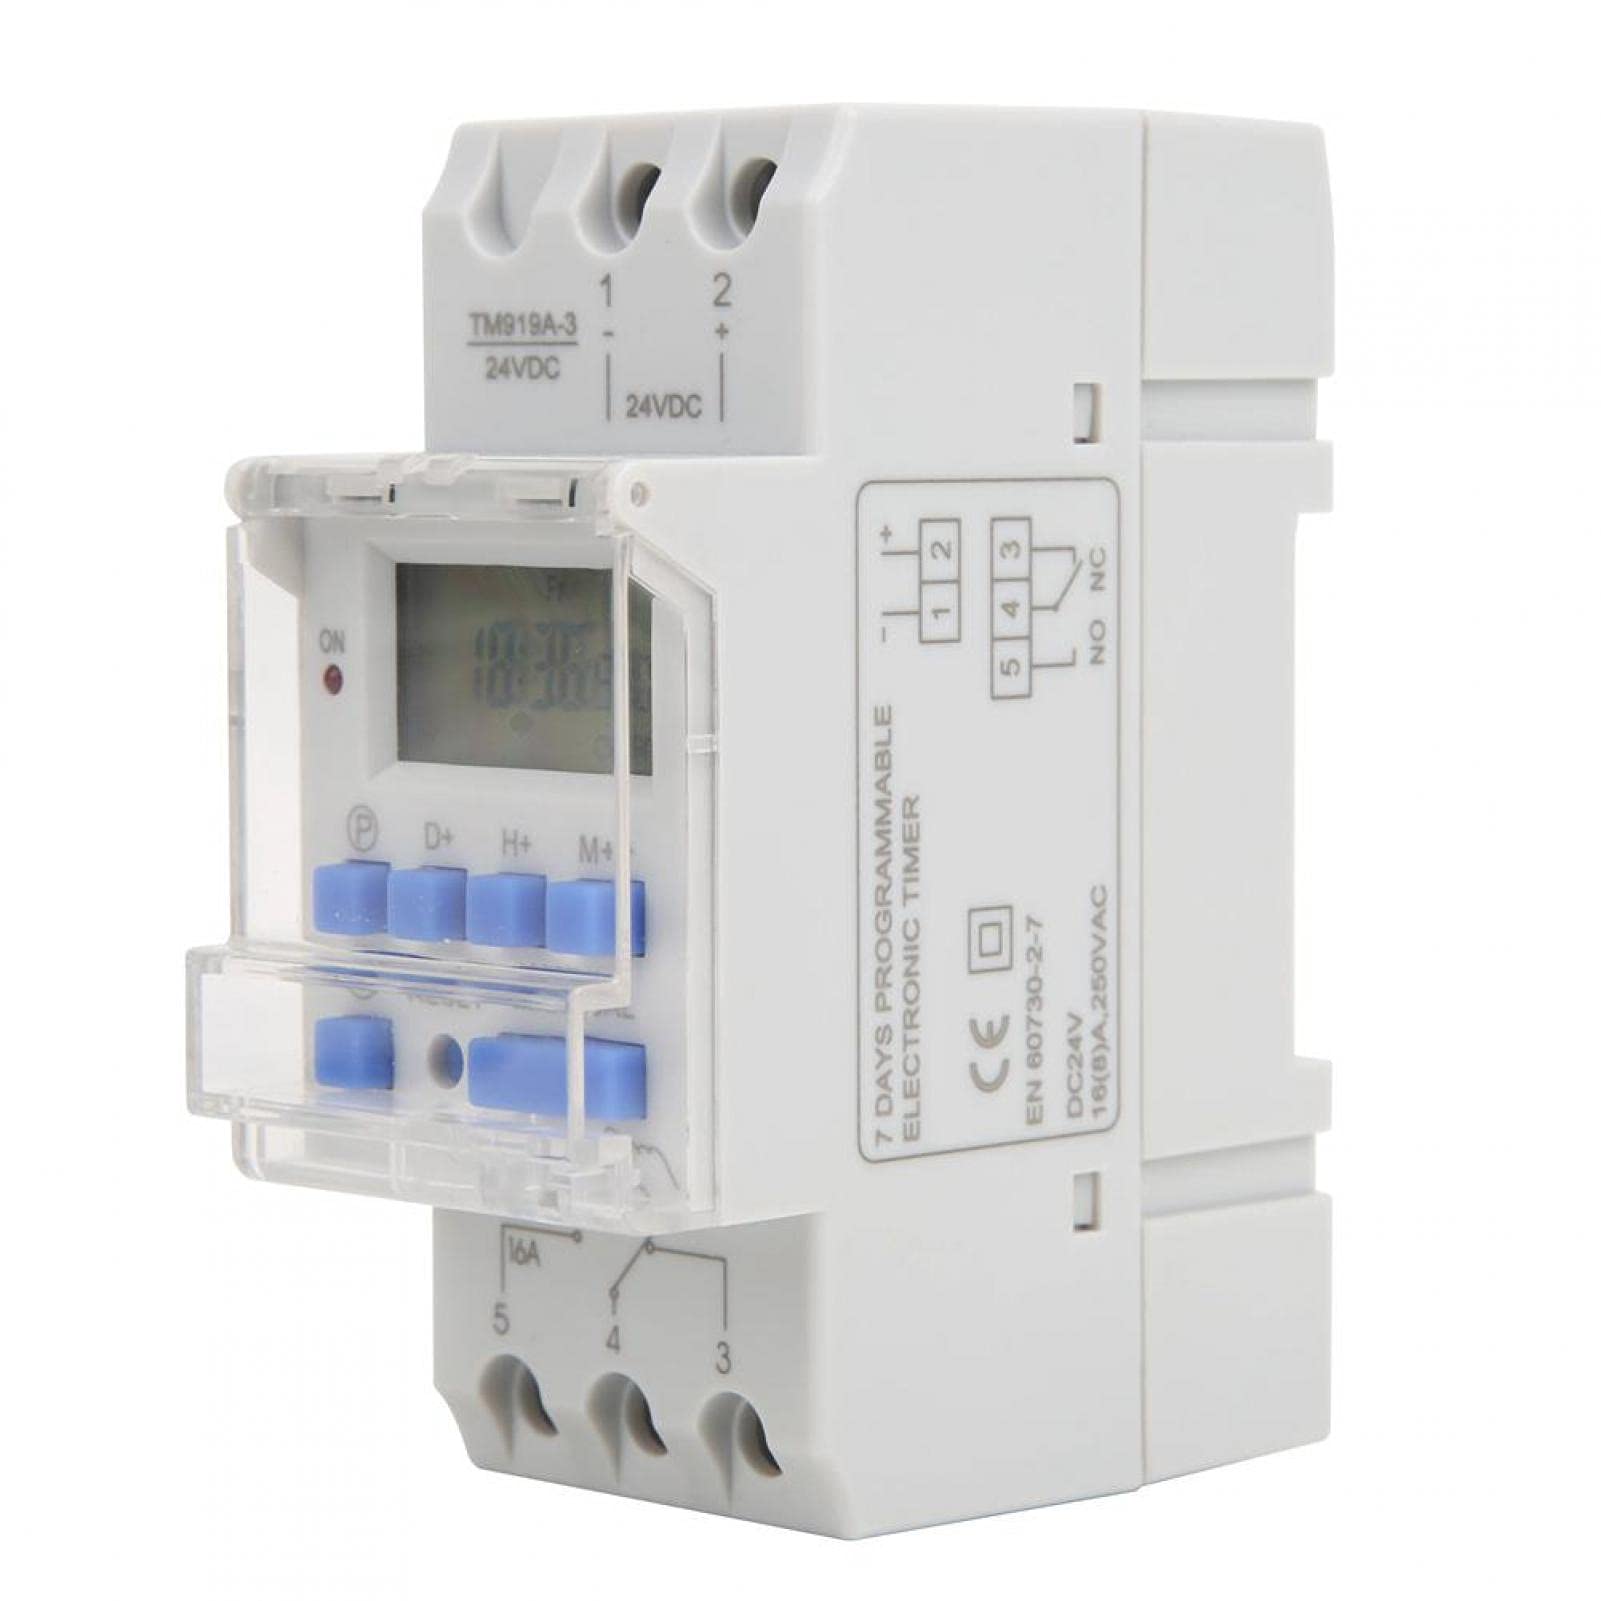
Image: Walfront TM919A-3 timer with an arrow pointing to the replaceable CR2032 battery compartment on the side.
- Locate the battery compartment on the side of the timer.
- Carefully open the compartment.
- Remove the old CR2032 battery and insert a new one, ensuring correct polarity.
- Close the compartment securely.
2. DIN Rail Mounting
The timer is designed for standard 35mm DIN rail mounting. Simply clip the timer onto the DIN rail in your electrical panel.
3. Wiring Instructions
Important: Ensure power is disconnected before wiring. Refer to the diagrams below for correct wiring. The TM919A-3 model operates on 24V DC.

Image: Simple wiring diagram for connecting the timer directly to a load (e.g., a light bulb). Terminals 1 and 2 are for 24V DC input, and terminals 3, 4, 5 are for the switch output.

Image: Advanced wiring diagram showing the timer connected to an external contactor (ABB AX-09-30-10) for controlling higher power loads. The timer's output controls the contactor coil, which then switches the main load.
- Connect the 24V DC power supply to terminals 1 (+) and 2 (-).
- Terminals 3, 4, and 5 are the switch output. Terminal 4 is the common (COM), Terminal 3 is normally closed (NC), and Terminal 5 is normally open (NO).
- Connect your load (e.g., light, pump) to the appropriate output terminals based on whether you need it to be ON or OFF when the timer is active. For most applications, connect the load between terminal 5 (NO) and the power supply.
- For high-power loads, use an external contactor as shown in the advanced wiring diagram.
Operating Instructions
1. Initial Power On and Reset
Upon initial power-up or after battery replacement, the display may be blank. Press the RESET button (usually a small recessed button requiring a pointed object) to clear all settings and initialize the timer.

Image: Front view of the Walfront TM919A-3 timer, highlighting the LCD and control buttons (P, D+, H+, M+, RESET, MANUAL).
2. Setting Current Time and Day
- Press the P button (Program) once. The display will show the current time setting.
- Press the D+ button to set the current day of the week.
- Press the H+ button to set the current hour.
- Press the M+ button to set the current minute.
- Press the P button again to exit time setting mode and return to the normal clock display.
3. Programming ON/OFF Cycles
The timer supports up to 16 ON/OFF programs. Each program consists of an ON time and an OFF time.
- Press the P button repeatedly until "1 ON" appears on the display. This is the first ON program.
- Press D+ to select the day(s) for this program. You can choose individual days, weekdays, weekends, or all 7 days.
- Press H+ to set the desired hour for the "ON" event.
- Press M+ to set the desired minute for the "ON" event.
- Press P again. "1 OFF" will appear. This is the first OFF program.
- Repeat steps 2-4 to set the day(s), hour, and minute for the "OFF" event.
- Continue pressing P to cycle through "2 ON", "2 OFF", up to "16 ON", "16 OFF". Set all desired programs.
- To exit programming mode, press the P button until the current time is displayed, or wait for approximately 30 seconds for it to automatically exit.
4. Manual Control
Press the MANUAL button to cycle through different operating modes:
- ON: The timer output is continuously ON, overriding all programs.
- AUTO: The timer operates according to the programmed ON/OFF cycles.
- OFF: The timer output is continuously OFF, overriding all programs.
Ensure the timer is set to AUTO mode for programmed operations to function.
5. Countdown Function
The countdown function allows you to set a specific duration after which the timer will switch OFF. This function is typically accessed by holding a specific button or through a dedicated menu. Refer to the specific button layout on your device for activation, usually by pressing a combination of buttons or a dedicated countdown button if available. The maximum countdown is 24 hours.
Maintenance
The Walfront TM919A-3 timer requires minimal maintenance. The primary maintenance task is the replacement of the CR2032 memory backup battery when needed. Regularly check connections for tightness and ensure the unit is free from dust and moisture.
- Cleaning: Wipe the exterior with a soft, dry cloth. Do not use abrasive cleaners or solvents.
- Battery: Replace the CR2032 battery as described in the Setup section if programs are not retained during power outages.
Troubleshooting
- Timer not turning ON/OFF as programmed:
- Check if the timer is in AUTO mode.
- Verify that the ON/OFF programs are set correctly for the desired days and times.
- Ensure the current time and day are set accurately.
- Check all wiring connections for security and correct polarity.
- Display is blank:
- Check if the 24V DC power supply is connected and active.
- Press the RESET button.
- If the power is on but the display is still blank, the unit may be faulty.
- Programs are lost after power outage:
- The internal CR2032 battery may be depleted. Replace the battery as described in the Setup section.
- Timer is ON/OFF continuously, ignoring programs:
- Press the MANUAL button to cycle back to AUTO mode.
Specifications

Image: Dimensions of the Walfront TM919A-3 timer, indicating measurements such as 8.7cm height, 3.5cm width, and 6.5cm depth.
| Feature | Specification |
|---|---|
| Brand | Walfront |
| Model Number | TM919A-3 |
| Material | Plastic |
| Power Supply | 24V DC |
| Current Rating | 16A |
| Time Range | 1 minute ~ 168 hours |
| Programs | 16 ON/OFF per day |
| Power Consumption | <5VA |
| Average Error | <2 seconds/day |
| Operating Temperature | -10 ~ 50 ℃ |
| Humidity | <95% |
| Memory Backup | CR2032 replaceable battery |
| Mounting | 35mm DIN Rail |
| Manufacturer Reference | Walfrontigu1qrv9xk |
| UPC | 738589915582 |
Warranty Information
This product comes with a standard manufacturer's warranty. Please refer to your purchase documentation or contact the retailer for specific warranty terms and conditions. Keep your proof of purchase for any warranty claims.
Support
For technical assistance, troubleshooting not covered in this manual, or inquiries about your Walfront TM919A-3 timer, please contact Walfront customer support or your authorized dealer. You can typically find contact information on the product packaging or the retailer's website.


