1. Introduction
This manual provides detailed instructions for the safe and effective operation, maintenance, and troubleshooting of your RovyVon Aurora A5 G4 Rechargeable Keychain Flashlight. Please read this manual thoroughly before using the product to ensure optimal performance and longevity.

Image 1.1: The RovyVon Aurora A5 G4 Rechargeable Keychain Flashlight, showcasing its compact design and metal button.
2. Product Overview
2.1 Key Features
- 4th Generation Design: Features a metal button for improved tactile feedback and operation.
- Magnetic Pocket Clip and Base: Allows for hands-free use and versatile attachment.
- USB-C Fast Charging: Equipped with a 330 mAh Lithium Polymer battery for efficient recharging.
- Extended Runtime: Moonlight mode provides up to 72 hours of continuous operation.
- Upgraded Sidelights: Includes White Low, White High, Red, and Red Flash (Signal) modes. Red modes are designed for night vision preservation and signaling.
- Memory Mode: Remembers the last used main light mode if left on for more than 3 minutes.
- Compact EDC Design: Small and lightweight, suitable for everyday carry.
- Fluorescent Body: The flashlight body glows in the dark after exposure to light, aiding in location.
2.2 Package Contents
Verify that all items are present in the package:
- RovyVon Aurora A5 G4 Flashlight
- Magnetic Pocket Clip
- Magnetic Detachable Base
- USB-C Port Cover (spare)
- Key Rings (2)
- User Instruction Manual
- Warranty Card

Image 2.1: Included accessories for the Aurora A5 G4, including the magnetic clip, detachable base, USB-C cover, and key rings.
3. Setup
3.1 Charging the Battery
The Aurora A5 G4 is equipped with a built-in 330 mAh Lithium Polymer battery and supports USB-C charging.
- Locate the USB-C charging port on the side of the flashlight.
- Gently open the protective USB-C port cover.
- Connect a USB-C charging cable (not included) to the port and a power source (e.g., USB wall adapter, computer USB port).
- The indicator light will show charging status. Refer to the indicator light section for details.
- Once fully charged, disconnect the cable and securely close the USB-C port cover to protect against dust and moisture.

Image 3.1: Close-up view of the USB-C charging port on the flashlight.
3.2 Attaching the Magnetic Clip and Base
The flashlight comes with a magnetic pocket clip and a magnetic detachable base for enhanced versatility.
- Magnetic Pocket Clip: Slide the clip onto the flashlight body in the desired orientation. This allows for attachment to pockets, belts, or the brim of a cap for hands-free illumination.
- Magnetic Detachable Base: The base can be attached to the tail end of the flashlight, providing a stable magnetic surface for mounting on metallic objects.
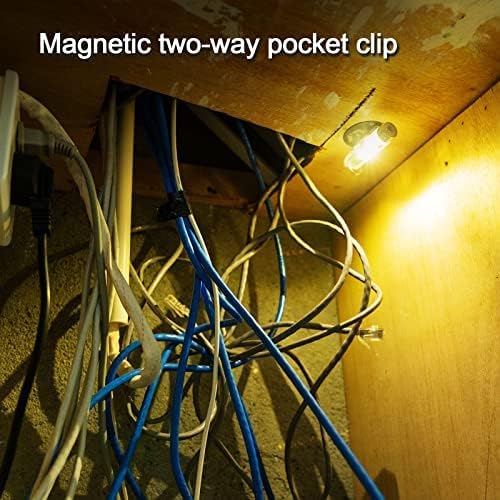
Image 3.2: The flashlight utilizing its magnetic base to attach to a metal surface, providing illumination for a work area.
4. Operating Instructions
4.1 Main Light Operation
The main light features multiple brightness levels.
- Turn On/Off: Double-click the metal button to turn the main light on. Double-click again to turn it off.
- Cycle Modes: While the main light is on, single-click the button to cycle through brightness levels (e.g., Low → Medium → High).
- Momentary On (Turbo): Press and hold the button from the OFF state to activate the highest brightness level (Turbo mode). Release the button to turn off. This mode is temporary and cannot be memorized.
- Memory Mode: If the main light is left on a specific mode for more than 3 minutes, the flashlight will remember this mode. The next time you turn on the main light (double-click), it will activate in the memorized mode.

Image 4.1: A hand demonstrating the momentary on feature by pressing and holding the button, activating the main light.
4.2 Sidelight Operation
The sidelights offer various utility and signaling modes.
- Turn On/Off: Triple-click the metal button to turn the sidelights on. Triple-click again to turn them off.
- Cycle Modes: While the sidelights are on, single-click the button to cycle through modes: White Low → White High → Red → Red Flash (Signal).
- Red Light Functionality: The red light modes are suitable for preserving night vision during activities like map reading or for signaling purposes.

Image 4.2: The flashlight attached to a backpack, emitting a red signal light, useful for visibility or emergencies.

Image 4.3: The natural white sidelight providing illumination for reading a book at close range, designed to be non-dazzling.
4.3 Hands-Free Use
The magnetic clip and base allow for various hands-free applications:
- Cap Light: Attach the flashlight to the brim of a cap using the pocket clip to convert it into a headlamp.
- Magnetic Mount: Use the magnetic base to secure the flashlight to metallic surfaces for stationary lighting.

Image 4.4: A person using the flashlight clipped to their cap, functioning as a hands-free headlamp for reading a map in low light conditions.
5. Maintenance
5.1 General Care
- Keep the flashlight clean and free from dirt and debris. Use a soft, dry cloth for cleaning.
- Avoid dropping the flashlight or subjecting it to strong impacts.
- Ensure the USB-C port cover is securely closed when not charging to prevent dust and moisture ingress.
5.2 Battery Care
- Charge the battery regularly, even if the flashlight is not frequently used, to maintain battery health.
- Avoid fully depleting the battery before recharging.
- Store the flashlight in a cool, dry place when not in use.
5.3 Fluorescent Body
The fluorescent body of the flashlight will glow in the dark after being exposed to light. To maximize the glow effect, expose the flashlight to a bright light source for a few minutes.
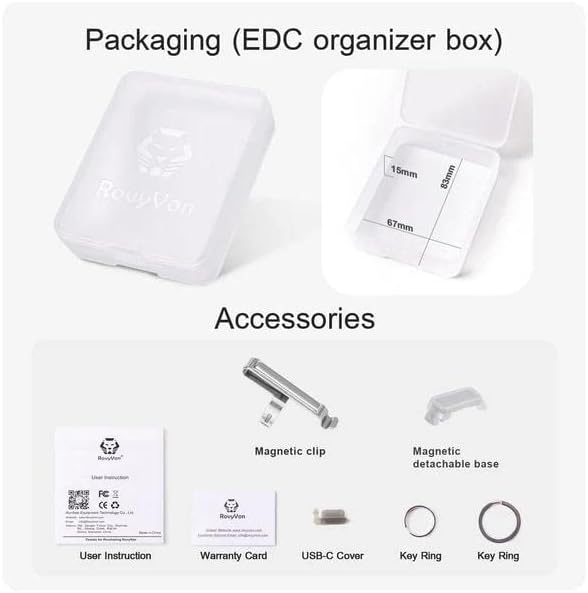
Image 5.1: The flashlight body emitting a green glow in a dark environment, demonstrating its fluorescent properties.
6. Troubleshooting
| Problem | Possible Cause | Solution |
|---|---|---|
| Flashlight does not turn on. | Low battery. | Charge the battery using a USB-C cable. |
| Flashlight gets excessively hot during use. | Prolonged use on highest brightness (Turbo mode). | Reduce brightness level. Turbo mode is designed for short bursts. If overheating persists on lower modes, discontinue use and contact support. |
| Charging indicator not working. | Faulty cable or power source; loose connection. | Try a different USB-C cable or power adapter. Ensure the cable is securely connected. |
| Sidelights not activating. | Incorrect button press sequence. | Ensure you are triple-clicking the button to activate sidelights. |
7. Specifications
| Feature | Detail |
|---|---|
| Model | Aurora A5 G4 |
| Brand | RovyVon |
| Main Light Brightness | Up to 420 Lumens |
| Color Temperature | 5000K (Nominal) |
| Battery Type | 330 mAh Lithium Polymer (LiPo) |
| Charging Port | USB-C |
| Material | Polycarbonate |
| Dimensions (L x W x H) | 2.38" x 0.61" x 0.61" (60.45mm x 15.49mm x 15.49mm) |
| Weight | 2.24 ounces (63.5 grams) |
| Water Resistance Level | Not Water Resistant |
| Special Features | Magnetic, Rechargeable, Red Light, Fluorescent Body |
8. Warranty and Support
8.1 Warranty Information
RovyVon products typically come with a warranty. Please refer to the included Warranty Card in your package for specific terms, conditions, and duration of the warranty for your Aurora A5 G4 flashlight. Retain your proof of purchase for warranty claims.
8.2 Customer Support
For any questions, technical assistance, or support regarding your RovyVon Aurora A5 G4 flashlight, please contact RovyVon customer service. Contact details can usually be found on the official RovyVon website or on the warranty card.


