
1. Introduction
This manual provides detailed instructions for the installation, operation, and maintenance of your GIGABYTE Z590 UD motherboard. Designed for 11th and 10th Gen Intel Core Series Processors, this ATX motherboard features an LGA 1200 socket, Intel Z590 chipset, and supports dual-channel DDR4 memory. Key features include a robust 12+1 Phases Digital VRM Solution, Triple Ultra-Fast NVMe PCIe 4.0/3.0 x4 M.2 slots with Thermal Guard, 2.5GbE LAN, and USB 3.2 Gen2 connectivity. Please read this manual thoroughly before proceeding with installation.

Figure 1: Top-down view of the GIGABYTE Z590 UD motherboard, showcasing the LGA 1200 socket, VRM heatsinks, DIMM slots, and M.2 slots.
2. Setup and Installation
Proper installation is crucial for the stability and performance of your system. Ensure your power supply is disconnected before handling any components.
2.1. CPU Installation
- Locate the LGA 1200 socket on the motherboard.
- Open the CPU socket lever and remove the protective cap.
- Carefully align the triangular mark on your Intel LGA 1200 CPU with the mark on the socket.
- Gently place the CPU into the socket without forcing it.
- Close the socket lever to secure the CPU.
2.2. Memory (RAM) Installation
The motherboard supports Dual Channel Non-ECC Unbuffered DDR4 memory across 4 DIMM slots.
- Open the clips at both ends of the DIMM slots.
- Align the notch on the DDR4 memory module with the key on the DIMM slot.
- Insert the memory module firmly into the slot until the clips snap into place. For dual-channel configuration, refer to the motherboard's specific slot pairing (usually A2/B2 or A1/B1).
2.3. M.2 SSD Installation
The Z590 UD features Triple Ultra-Fast NVMe PCIe 4.0*/3.0 x4 M.2 slots with Thermal Guard. Note that the top M.2 slot (M2A_CPU) only supports 11th Gen Intel CPUs for PCIe 4.0 functionality. With a 10th Gen CPU, this slot will be disabled. Use the other M.2 slots (M2P_SB and M2M_SB) for 10th Gen CPUs.
- Locate an available M.2 slot and remove the screw and standoff.
- Insert the M.2 SSD into the slot at a 30-degree angle.
- Push the SSD down and secure it with the standoff and screw.
- Install the M.2 Thermal Guard heatsink if applicable, ensuring proper contact for heat dissipation.
2.4. Expansion Card Installation
Install your graphics card and other PCIe expansion cards into the appropriate PCIe slots.
- Align the card with the PCIe slot.
- Press down firmly until the card is seated correctly.
- Secure the card with a screw to the chassis.
2.5. Connecting Peripherals and Power
Connect all necessary cables, including the 24-pin ATX power connector, 8-pin CPU power connector, SATA devices, front panel connectors (power switch, reset switch, USB, audio), and case fans. The motherboard features a pre-installed I/O Shield for easy and quick installation of external devices.
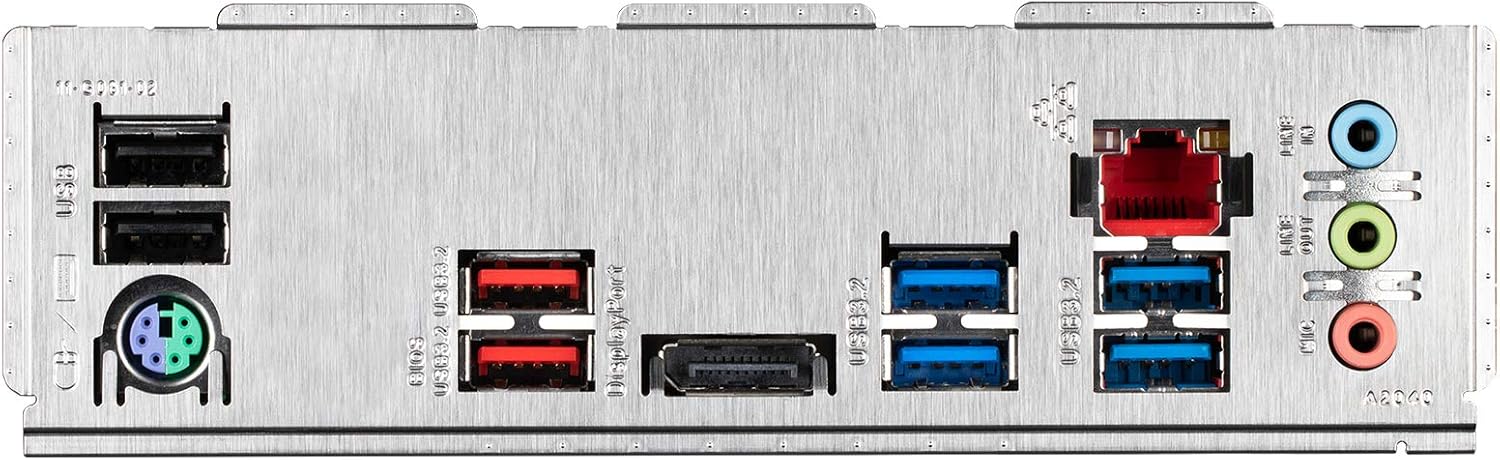
Figure 2: Rear I/O panel of the GIGABYTE Z590 UD motherboard, showing USB ports, LAN port, audio jacks, and PS/2 port.
3. Operating Instructions
3.1. Initial Boot and BIOS Setup
After assembling your system, connect a monitor, keyboard, and mouse. Power on the system.
- To enter the BIOS/UEFI setup, press the DEL key repeatedly during startup.
- In the BIOS, you can configure boot order, system time, fan speeds (Smart Fan 6), and enable/disable various features.
- Save changes and exit the BIOS to boot into your operating system installation media.
3.2. Driver Installation
After installing your operating system, install the necessary drivers for optimal performance. These typically include:
- Chipset drivers
- LAN drivers (for 2.5GbE LAN)
- Audio drivers
- USB drivers
- Graphics drivers (for integrated graphics or discrete GPU)
Drivers can be found on the GIGABYTE official website for your specific motherboard model.
3.3. GIGABYTE Software Utilities
GIGABYTE provides several utilities to enhance your user experience:
- RGB FUSION 2.0: Control the multi-zone addressable LED light show design and support addressable LED & RGB LED strips.
- Smart Fan 6: Monitor multiple temperature sensors and control hybrid fan headers with FAN STOP functionality for optimized cooling and noise levels.
4. Maintenance
4.1. BIOS Updates (Q-Flash Plus)
Regularly updating your BIOS can improve system stability, compatibility, and performance. The Z590 UD supports Q-Flash Plus, allowing you to update the BIOS without installing the CPU, memory, or GPU.
- Download the latest BIOS file from the GIGABYTE website.
- Rename the BIOS file to GIGABYTE.bin and save it to a USB flash drive (FAT32 format).
- Insert the USB flash drive into the designated Q-Flash Plus USB port on the rear I/O panel.
- With the system powered off but connected to the PSU, press the Q-Flash Plus button. The LED will flash, indicating the update process.
- Wait for the LED to stop flashing, indicating the update is complete.
4.2. Driver and Software Updates
Keep your drivers and GIGABYTE utilities updated to ensure optimal performance and security. Check the GIGABYTE website periodically for new versions.
4.3. Physical Cleaning
Dust accumulation can lead to overheating and component failure. Periodically clean your motherboard and PC case using compressed air. Ensure the system is powered off and unplugged before cleaning.
5. Troubleshooting
If you encounter issues, consider the following troubleshooting steps:
- No Power: Ensure all power cables (24-pin ATX, 8-pin CPU) are securely connected. Check the power supply unit (PSU) and wall outlet.
- No Display: Verify that your monitor is connected to the correct graphics output (either integrated or discrete GPU). Reseat the graphics card and RAM modules.
- System Instability/Crashes: Check for proper CPU and GPU cooling. Ensure RAM modules are correctly seated. Update BIOS and drivers.
- M.2 SSD Not Detected (10th Gen CPU): If using a 10th Gen Intel CPU, the top M.2 slot (M2A_CPU) is disabled. Ensure your M.2 SSD is installed in one of the other available M.2 slots (M2P_SB or M2M_SB).
- Peripheral Issues: If USB ports or other peripherals are not functioning, ensure drivers are installed. Try different ports.
- BIOS Reset: If system settings become unstable, you can clear the CMOS by removing the CMOS battery for a few minutes or using the CLR_CMOS jumper (refer to the full manual for location).
For more complex issues, refer to the comprehensive GIGABYTE Z590 UD user manual available on the official GIGABYTE website or contact technical support.
6. Specifications
| Feature | Specification |
|---|---|
| CPU Socket | LGA 1200 |
| Compatible Processors | 11th and 10th Gen Intel Core Series Processors |
| Chipset | Intel Z590 Express Chipset |
| Memory | 4 x DDR4 DIMM sockets, up to 128 GB (32 GB single DIMM capacity), Dual Channel, Non-ECC Unbuffered, Supports up to 4400 MHz (O.C.) |
| Expansion Slots | 1 x PCI Express x16 slot (PCIe 4.0 for 11th Gen CPU, PCIe 3.0 for 10th Gen CPU) 2 x PCI Express x16 slots (PCIe 3.0 x4) 2 x PCI Express x1 slots (PCIe 3.0 x1) |
| Storage Interface | 1 x M.2 connector (Socket 3, M key, type 2260/2280/22110 PCIe 4.0 x4/x2 SSD support) (M2A_CPU - 11th Gen CPU only) 2 x M.2 connectors (Socket 3, M key, type 2260/2280/22110 PCIe 3.0 x4/x2 SSD support) (M2P_SB, M2M_SB) 6 x SATA 6Gb/s connectors |
| USB Ports | Rear: 1 x USB 3.2 Gen 2 Type-A, 1 x USB 3.2 Gen 2 Type-C, 4 x USB 3.2 Gen 1 Type-A, 2 x USB 2.0/1.1 Front: 1 x USB 3.2 Gen 1 header, 2 x USB 2.0/1.1 headers |
| LAN | Realtek 2.5GbE LAN chip (2.5 Gbit/1 Gbit/100 Mbit) |
| Audio | Realtek ALC897 codec, High Definition Audio, 2/4/5.1/7.1-channel |
| Form Factor | ATX Form Factor (30.5cm x 24.4cm) |
| Weight | Approximately 3.32 pounds |
7. Warranty Information
GIGABYTE motherboards are covered by a manufacturer's limited warranty. The duration and terms of the warranty may vary by region and retailer. Please retain your proof of purchase for warranty claims. For specific warranty details, refer to the warranty card included with your product or visit the official GIGABYTE website.
8. Support
For further assistance, technical support, or to download the latest drivers and BIOS updates, please visit the official GIGABYTE support website:
You can also find frequently asked questions (FAQs) and community forums on the support page.


