Introduction
The Yale High Security Motorized Safe is a reliable and high-quality product designed to protect your valuables. It features a laser-cut door, reinforced hinges, and an automatic spring-loaded door opening mechanism. This safe offers advanced security options including biometric fingerprint recognition and a digital keypad with a blue backlit LCD screen for PIN access. This manual will guide you through the installation, operation, and maintenance of your new safe.

Front view of the Yale High Security Motorized Safe, showcasing the digital keypad and fingerprint scanner.
Key Features
- Reliable Security: Steel structure with laser-cut door and 22mm motorized bolts, designed to resist forced entry attempts and ensure maximum protection.
- Biometric and PIN Access: Opens via fingerprint (up to 100 memorizable fingerprints) or a 4-8 digit PIN/master code, for quick and secure access without the need for keys.
- Emergency Functions: Lock with a 6-lever double-bit key and external 9V power supply to ensure opening in case of low battery or emergency.
- Practical Interior: Equipped with an internal LED light that ensures optimal visibility and allows easy access to documents and items even in dimly lit environments.
- Generous Capacity: 38.5 L interior volume, with dimensions of 340 x 350 x 400 mm, ideal for offices and professional environments to protect A4 documents, laptops, cash, and valuables.

The safe with its door open, revealing the spacious interior and internal locking mechanism.
Setup
1. Battery Installation
- Locate the battery compartment, typically on the inside of the safe door.
- Insert 4 x AA alkaline batteries, ensuring correct polarity (+/-). The safe requires 4 AA batteries, which are included.
- Close the battery compartment cover securely.
2. Initial PIN Code Setup
- With the door open, press the internal 'RESET' button (usually a small red button).
- Enter your desired 4-8 digit PIN code on the keypad.
- Press the '#' or 'ENTER' button to confirm. The display will show 'GOOD' or a similar confirmation.
3. Fingerprint Enrollment
- Press the internal 'RESET' button.
- Place your finger on the fingerprint scanner. The safe will prompt you to lift and place your finger multiple times to capture a complete scan.
- Repeat the process for up to 100 fingerprints if desired.
4. Emergency Key Usage
Your safe comes with a 6-lever double-bit emergency key. In case of battery failure or forgotten codes, insert the key into the emergency keyhole, usually hidden behind a cover on the keypad panel, and turn to open the safe manually.

A hand demonstrating the use of the emergency key to open the safe.
Operating the Safe
1. Opening with PIN Code
- Enter your 4-8 digit PIN code on the digital keypad.
- Press the '#' or 'ENTER' button. The motorized bolts will retract, and the door will spring open automatically.
2. Opening with Fingerprint
- Place your enrolled finger firmly on the fingerprint scanner.
- If the fingerprint is recognized, the motorized bolts will retract, and the door will spring open automatically.

A person entering a PIN code on the safe's digital keypad.

A close-up view of a finger pressing a button on the safe's keypad, showing the blue backlit LCD screen.
3. Closing the Safe
Simply push the door firmly shut. The motorized bolts will automatically extend and lock the safe.
Maintenance
1. Battery Replacement
When the batteries are low, the LCD display will indicate a low battery warning. Replace all 4 AA alkaline batteries promptly to ensure continued operation. Refer to the 'Battery Installation' section under Setup for detailed steps.
2. Cleaning
Wipe the exterior of the safe with a soft, damp cloth. Avoid using abrasive cleaners or solvents that could damage the finish or electronic components. Keep the fingerprint scanner clean and free of debris for optimal performance.
Troubleshooting
- Safe does not open with PIN/Fingerprint:
- Check if batteries are low. Replace them or use the external 9V battery power supply.
- Ensure you are entering the correct PIN code.
- For fingerprint access, ensure your finger is clean and placed correctly on the scanner. Try re-enrolling your fingerprint if issues persist.
- Use the emergency key to open the safe if electronic access fails. - Low Battery Warning:
- The LCD display will show a low battery indicator. Immediately replace the 4 AA batteries. - External 9V Battery Usage:
- If the internal batteries are completely drained, connect a 9V battery to the external power port located on the keypad panel. This will provide temporary power to open the safe. Replace the internal AA batteries immediately after opening.

A close-up view of the external 9V battery port on the safe's keypad.

A hand connecting a 9V battery to the external power port for emergency access.
Specifications
| Feature | Detail |
|---|---|
| Manufacturer | Yale |
| Product Dimensions (L x W x H) | 38 x 40 x 34 cm |
| Item Weight | 17 Kilograms |
| Battery(ies) | 4 AA - included |
| Item Model Number | YSFB/400/EB1 |
| Size | Motorized Fingerprint Safe |
| Color | Office |
| Style | High Security |
| Material | Alloy Steel |
| Number of Items | 1 |
| Power Source Type | Automatic, Battery |
| Special Features | Digital Fingerprint, Internal LED Light |
| Included Components | 1 key included, Safe, 4 x AA Alkaline Batteries included |
| Battery Composition | Alkaline |
| Country of Origin | China |
| Lock Type | Key, Biometric, PIN |
| Capacity | 38.5 Liters |
| Mounting Type | Automatic, Battery |
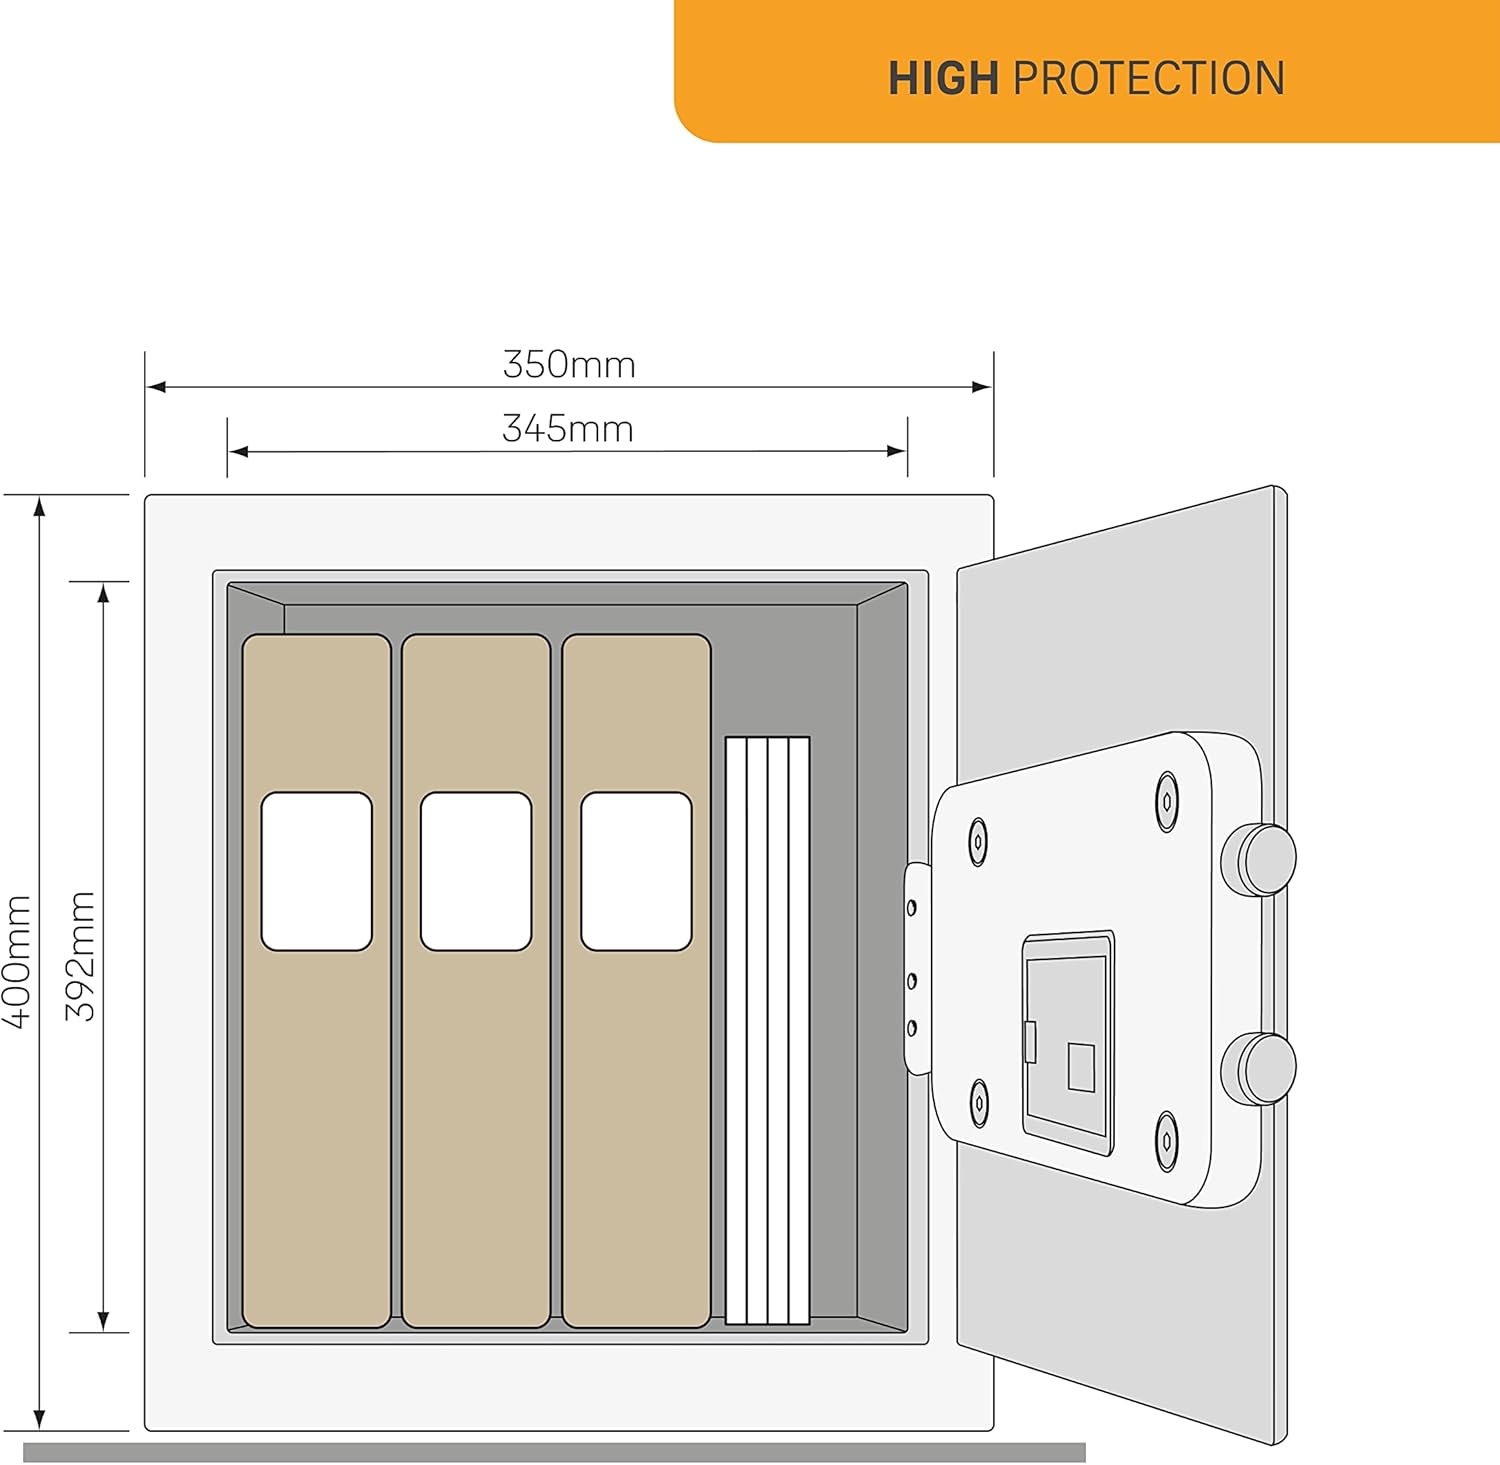
Dimensional diagram of the Yale High Security Motorized Safe.
Warranty and Support
For warranty information and customer support, please refer to the documentation included with your product packaging or visit the official Yale website. Information regarding spare parts availability is currently unavailable.