
EUGAD 0008WL
EUGAD Modular Pet Playpen Instruction Manual
Model: 0008WL
1. Introduction
This manual provides detailed instructions for the assembly, operation, and maintenance of your EUGAD Modular Pet Playpen. Designed for various small animals such as rabbits, guinea pigs, hamsters, bunnies, and puppies, this versatile enclosure offers a safe and customizable space for your pets. Please read this manual thoroughly before assembly and use to ensure proper setup and long-term enjoyment of your product.
2. Safety Information
Please observe the following safety guidelines to prevent injury to pets or users and damage to the product:
- Ensure all connectors are securely fastened during assembly to maintain stability.
- Regularly inspect the playpen for any loose parts or damage. Do not use if damaged.
- The wire spacing is 1.5 cm. Ensure this is suitable for your pet's size to prevent them from getting stuck or escaping.
- For animals with strong jumping ability, consider increasing the height of the enclosure (at least 70cm recommended) or adding a top cover.
- Place the playpen on a flat, stable surface. Use the provided anti-slip pads to prevent movement and protect flooring.
- Keep small children away from the assembly area and supervise them when near the assembled playpen.
- This product is designed for indoor use.
3. Package Contents
Verify that all components are present before beginning assembly:
| Item | Description | Quantity |
|---|---|---|
| Wire Panels (35x35cm) | Standard grid panels for enclosure walls. | 23 pcs |
| Wire Panel with Door (35x35cm) | Grid panel with integrated small door (22x23cm). | 1 pc |
| Plastic Connectors | Multi-directional connectors for joining panels. | 36 pcs |
| Cable Ties | For additional stability and securing panels. | 36 pcs |
| Anti-slip Pads | Adhesive pads to prevent movement and protect floors. | 12 pcs |
| Wooden Hammer | Tool for securing panels into connectors. | 1 pc |

Figure 3.1: Included components for assembly.
4. Assembly Instructions
The modular design allows for various configurations. Follow these steps for a standard rectangular setup. Refer to the images for visual guidance.
4.1 Prepare Components
- Unpack all components and verify against the package contents list.
- Attach the anti-slip pads to the bottom of the plastic connectors that will be in contact with the floor. Peel off the adhesive backing and firmly press the pad onto the flat side of the connector.

Figure 4.1: Applying anti-slip pads to connectors.
4.2 Connect Panels
- Begin by connecting two wire panels using a plastic connector. Insert the corners of the panels firmly into the slots of the connector.
- Continue adding panels and connectors to form the base shape of your desired enclosure. Ensure each panel clicks securely into the connector.
- Use the provided wooden hammer to gently tap the panels into the connectors if they are stiff, ensuring a tight and stable fit.
- Integrate the panel with the door at your desired entry point.

Figure 4.2: Example of a completed playpen assembly.
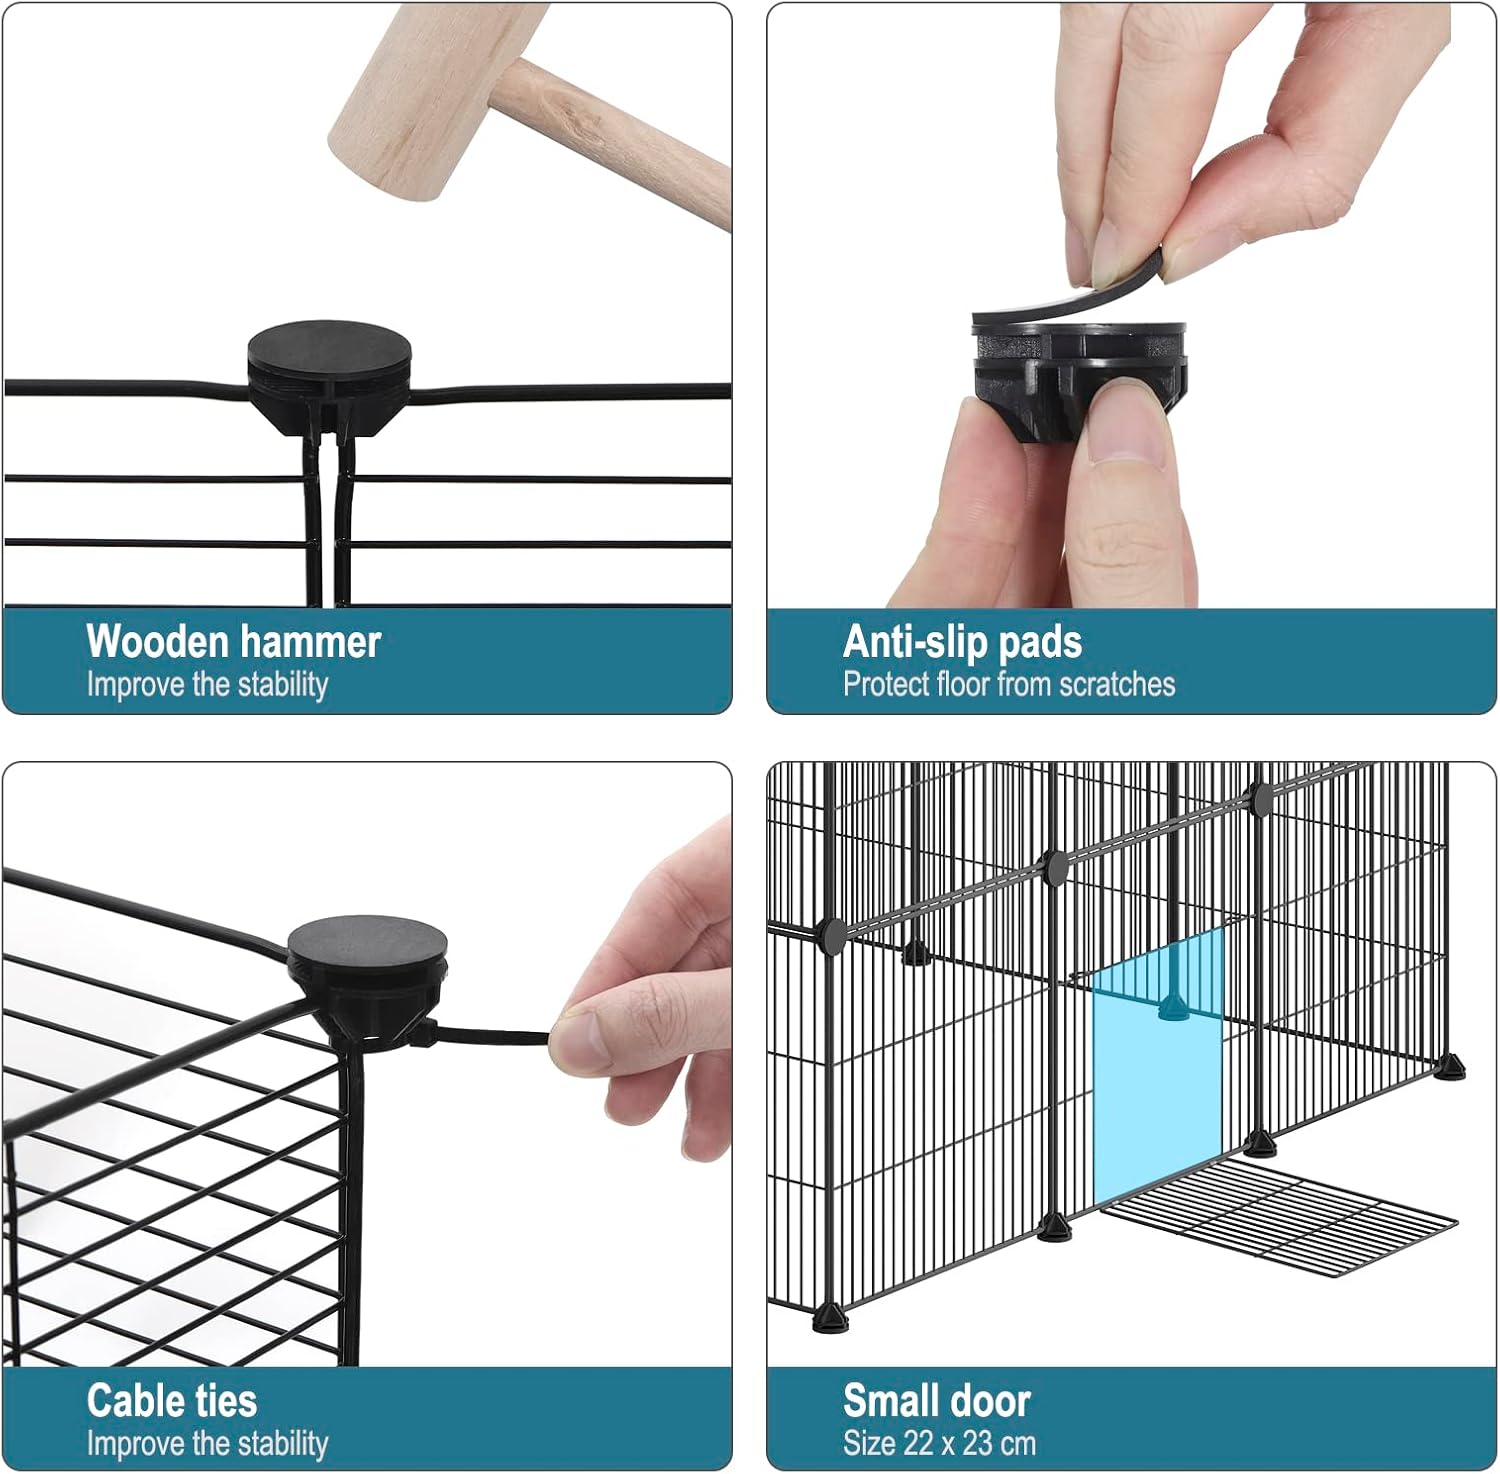
Figure 4.3: Details of assembly tools and features.
4.3 Secure with Cable Ties
- Once the main structure is assembled, use the cable ties to further secure adjacent wire panels. This significantly improves the overall stability of the playpen.
- Thread the cable ties through the wires of two adjoining panels and tighten them. Trim any excess tie length.
4.4 Custom Configurations
The modular design allows for various shapes and sizes. You can build multi-level enclosures or adjust the dimensions to fit your space. Remember to ensure adequate height for your pet to prevent escapes.

Figure 4.4: Examples of flexible and free combinations.
5. Operating Instructions
Using your EUGAD Modular Pet Playpen is straightforward:
- Placement: Position the assembled playpen in a suitable indoor area, ensuring it is on a flat and stable surface.
- Pet Entry/Exit: Use the integrated door for easy access for your pet. Ensure the door is securely closed when your pet is inside.
- Supervision: Always supervise your pet, especially during initial use, to ensure they are comfortable and cannot escape.
- Accessories: The playpen can accommodate various pet accessories such as bedding, food bowls, water dispensers, and toys.

Figure 5.1: Playpen in use within a home environment.
6. Maintenance
Proper maintenance will extend the life of your pet playpen:
- Cleaning: Wipe down the metal panels and plastic connectors with a damp cloth and mild, pet-safe cleaner as needed. Avoid abrasive cleaners.
- Inspection: Periodically check all connections and cable ties to ensure they remain secure. Re-tighten or replace if necessary.
- Storage: If disassembling for storage, clean all parts thoroughly and store them in a dry place to prevent rust or damage.
7. Troubleshooting
Common issues and their solutions:
| Problem | Possible Cause | Solution |
|---|---|---|
| Playpen is wobbly or unstable. | Panels not fully inserted into connectors; insufficient cable ties. | Ensure all panel corners are fully seated in connectors (use hammer if needed). Add more cable ties at connection points for increased rigidity. |
| Pet is escaping. | Enclosure height is too low for the pet; door not secured. | Increase the height of the playpen by adding more panel layers. Ensure the door is properly latched. Consider adding a top cover for jumpers. |
| Connectors are difficult to use. | Tight fit is intentional for stability. | Use the provided wooden hammer to gently tap panels into place. Apply steady, even pressure. |
8. Specifications
| Feature | Detail |
|---|---|
| Model Number | 0008WL |
| Overall Dimensions (Standard Setup) | 142 cm (L) x 72 cm (W) x 72 cm (H) |
| Panel Dimensions | 35 cm x 35 cm |
| Wire Spacing | 1.5 cm |
| Door Dimensions | 22 cm x 23 cm |
| Weight | Approximately 6.6 kg |
| Material | Metal, Acrylonitrile Butadiene Styrene (ABS) |
| Color | Black |
| Recommended Use | Indoor use for rabbits, guinea pigs, hamsters, bunnies, puppies, hedgehogs, ferrets. |

Figure 8.1: Product dimensions overview.
9. Warranty and Support
For warranty information, product support, or to purchase replacement parts, please contact EUGAD customer service through the retailer where you purchased the product or visit the official EUGAD store online. Please have your model number (0008WL) ready when contacting support.
EUGAD Store: Visit EUGAD Store on Amazon
Ask a question about this manual
Ask about setup, troubleshooting, compatibility, parts, safety, or missing instructions. Manuals+ will review the question and use this page’s manual context to help answer it.