1. Introduction
The SUNKKO 737G is a professional spot welding machine designed for precise welding of nickel strips, particularly suitable for assembling small battery packs such as those using 18650 or 14500 lithium batteries. It features a combination of a fixed welding head and a foot switch for versatile operation, along with an LCD display for clear monitoring of pulse and current settings.
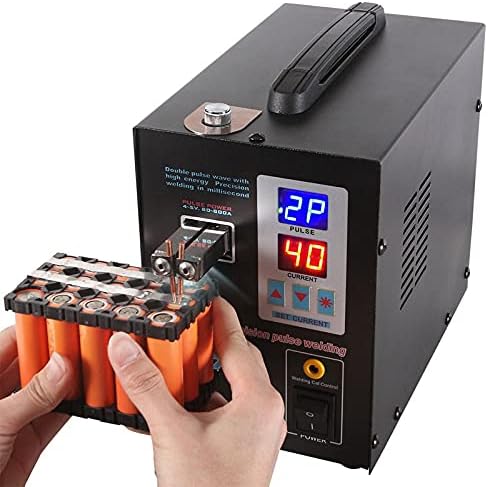
Image 1.1: The SUNKKO 737G Professional Spot Welder, showing its compact design and digital display.
2. Safety Information
- Always wear appropriate personal protective equipment (PPE), including safety glasses, when operating the spot welder.
- Ensure the work area is well-ventilated and free from flammable materials.
- Do not operate the machine with wet hands or in damp conditions.
- Ensure the power supply matches the machine's requirements (AC 220V, 50Hz).
- Never touch the welding tips or work piece during operation.
- Disconnect power before performing any maintenance or changing parts.
- Keep out of reach of children.
3. Package Contents
Verify that all items listed below are included in your package:
- 1 x 737G Main Machine
- 1 x Foot Pedal
- 4 x Copper Welding Rods (2 pairs)
- 1 x Battery Fixture (for 6 batteries)
- 2 x Fuses
- 1 x Hexagon Wrench
- 30 x 0.15 x 5 x 100 mm Nickel Plated Strips (sample)

Image 3.1: Overview of the standard parts included with the SUNKKO 737G spot welder, showing the main unit, foot pedal, welding rods, battery fixture, and accessories.
4. Setup
4.1 Power Connection
- Ensure the power switch on the front panel is in the 'OFF' position.
- Connect the power cord to the machine's power input and then to a suitable AC 220V, 50Hz power outlet.
4.2 Welding Rod Installation
- Insert the copper welding rods into the fixed welding head slots.
- Use the provided hexagon wrench to tighten the screws, securing the rods firmly in place. Ensure the tips are aligned and clean.
4.3 Foot Pedal Connection
- Locate the foot pedal input port on the machine.
- Plug the foot pedal cable securely into the port. The foot pedal provides an alternative method for triggering the weld.
4.4 Battery Fixture Usage
The included battery fixture is designed to hold 18650 batteries securely during the welding process, ensuring consistent alignment and contact. Place your batteries into the fixture before positioning the nickel strip for welding.
5. Operating Instructions
5.1 Powering On/Off
Flip the 'POWER' switch on the front panel to the 'ON' position to power on the machine. The LCD display will illuminate. To power off, flip the switch back to 'OFF'.
5.2 Understanding the LCD Display
The 737G features two digital displays:
- PULSE Display: Shows the number of welding pulses (e.g., 1P for single pulse, 2P for double pulse).
- CURRENT Display: Shows the welding current level (0-99).
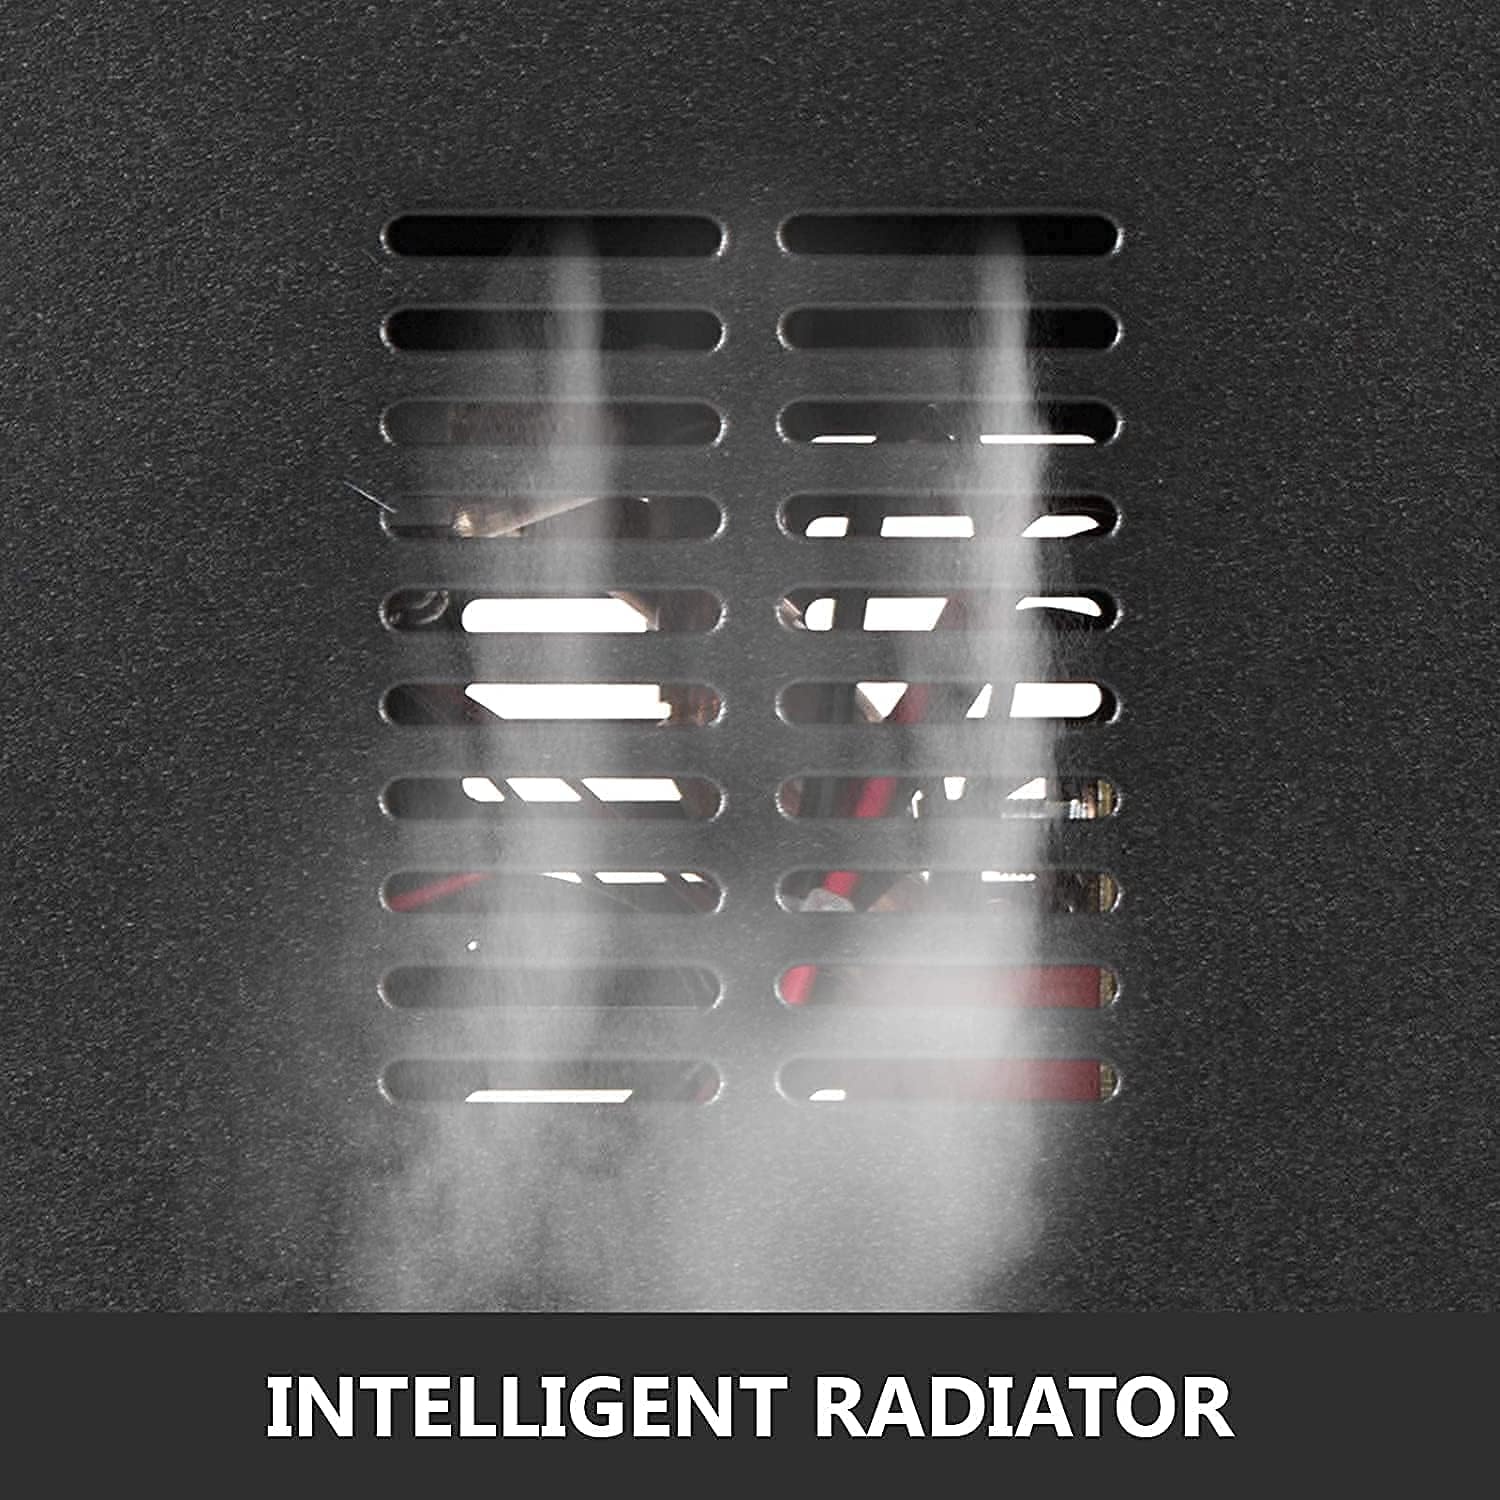
Image 5.1: The distinct LCD panel of the SUNKKO 737G, clearly displaying pulse and current settings for precise control.
5.3 Adjusting Pulse and Current Settings
Use the 'SET CURRENT' buttons (up/down arrows) to adjust the welding current level from 0 to 99. The pulse mode (1P or 2P) can be selected to suit different welding requirements. A higher current setting generally results in a stronger weld.
5.4 Welding Process
The 737G supports two welding modes: fixed head (push-up) welding and foot pedal controlled welding.
Fixed Head (Push-Up) Welding:
- Place the nickel strip onto the battery terminal.
- Position the fixed welding head directly over the desired welding point, ensuring both welding tips make firm contact with the nickel strip and the battery terminal.
- Apply gentle downward pressure on the welding head. The machine will automatically trigger the weld when sufficient contact pressure is detected. The LED light on the fixed welding tips will assist in precise positioning.
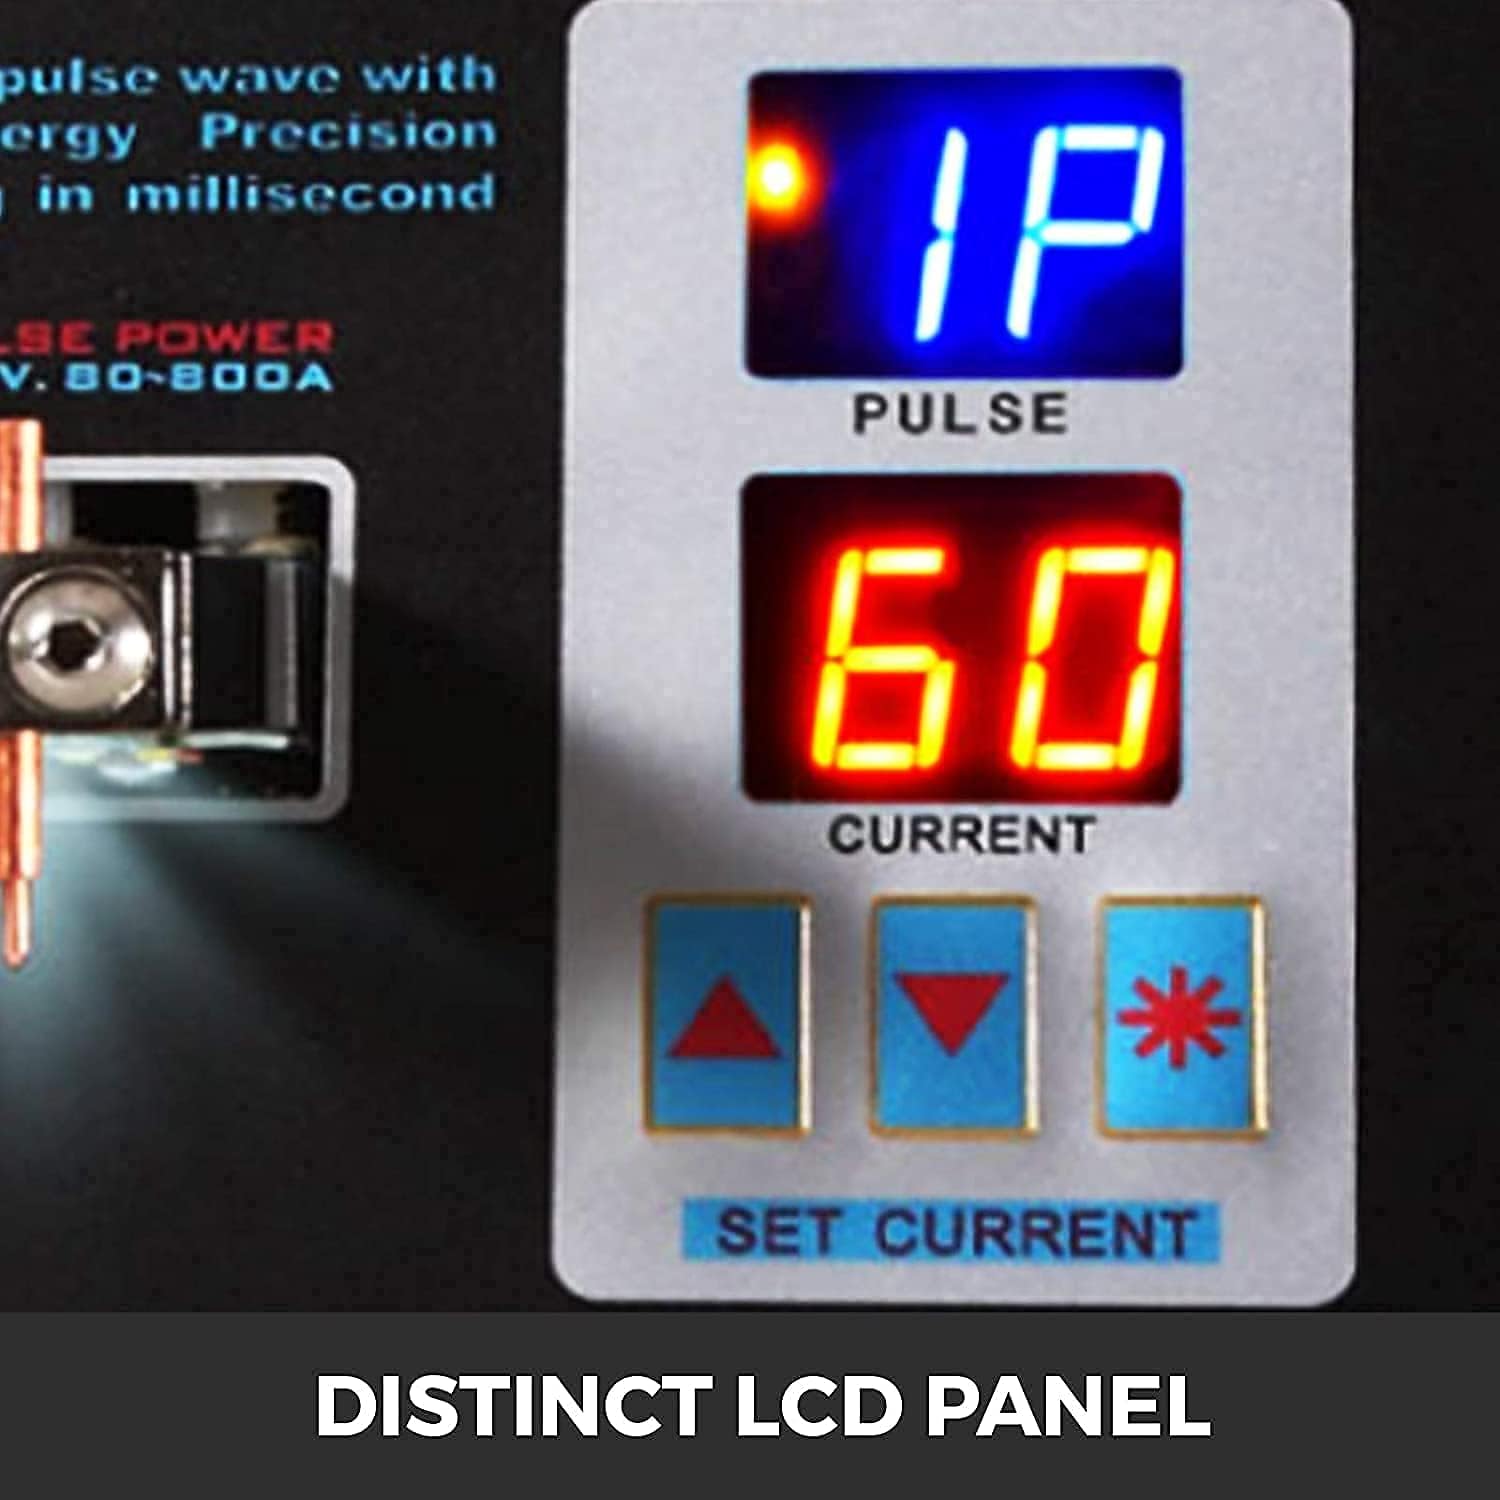
Image 5.2: Demonstrating the push-up welding method with the SUNKKO 737G, where pressure on the fixed head initiates the weld.
Foot Pedal Controlled Welding:
- Place the nickel strip onto the battery terminal.
- Position the fixed welding head over the desired welding point, ensuring both welding tips make firm contact.
- Press the foot pedal to trigger the weld. Release the pedal once the weld is complete.

Image 5.3: A close-up view of the welding process, showing the precise contact of the welding tips on a nickel strip and battery.
5.5 Nickel Strip Thickness
The SUNKKO 737G is designed to weld nickel strips with a thickness range of 0.05mm to 0.2mm. Adjust the current settings according to the thickness of the nickel strip for optimal welding results.
5.6 Compatible Battery Types
This spot welder is compatible with 18650 lithium batteries and 14500 lithium batteries. The included battery fixture is specifically designed for 18650 cells.
6. Maintenance
6.1 Cleaning Welding Tips
Regularly inspect and clean the welding tips. Carbon buildup or oxidation can affect welding performance. Use fine-grit sandpaper or a specialized tip cleaner to remove any residue. Replace worn or damaged tips promptly.
6.2 Fuse Replacement
If the machine fails to power on or operate, check the fuse. Disconnect the power cord, locate the fuse holder, and replace the fuse with a new one of the same rating (two spare fuses are included). If the new fuse blows immediately, consult the troubleshooting section or contact support.
6.3 General Care
Keep the machine clean and free from dust and debris. Store it in a dry environment. The unit features an intelligent radiator for heat dissipation; ensure the vents are not obstructed during operation.

Image 6.1: Close-up of the intelligent radiator on the SUNKKO 737G, designed for efficient heat dissipation during operation.
7. Troubleshooting
- Machine does not power on: Check the power cord connection, ensure the power switch is ON, and inspect the fuse.
- Weak or inconsistent welds:
- Increase the current setting.
- Ensure welding tips are clean and sharp.
- Verify firm contact between tips, nickel strip, and battery terminal.
- Check for proper alignment of the nickel strip.
- Excessive sparking or burning:
- Decrease the current setting.
- Ensure welding tips are not overly worn or pointed.
- Verify the nickel strip thickness is within the recommended range.
- Machine trips circuit breaker: This can indicate an overload or internal fault. Ensure the power supply is stable and meets the machine's requirements. If the issue persists, discontinue use and contact customer support.
8. Specifications
| Parameter | Value |
|---|---|
| Model | 737G |
| Power Supply | AC 220V, 50Hz |
| Time of 1 Pulse | 0.5 - 5 ms (Variable) |
| Time of 2 Pulse | 1 - 10 ms (Variable) |
| Primary Current | 2A - 15A |
| Weldable Nickel Strip Thickness | 0.05 - 0.2 mm |
| Item Weight | 5.02 kg |
| Package Dimensions | 35.3 x 26.8 x 18.5 cm |
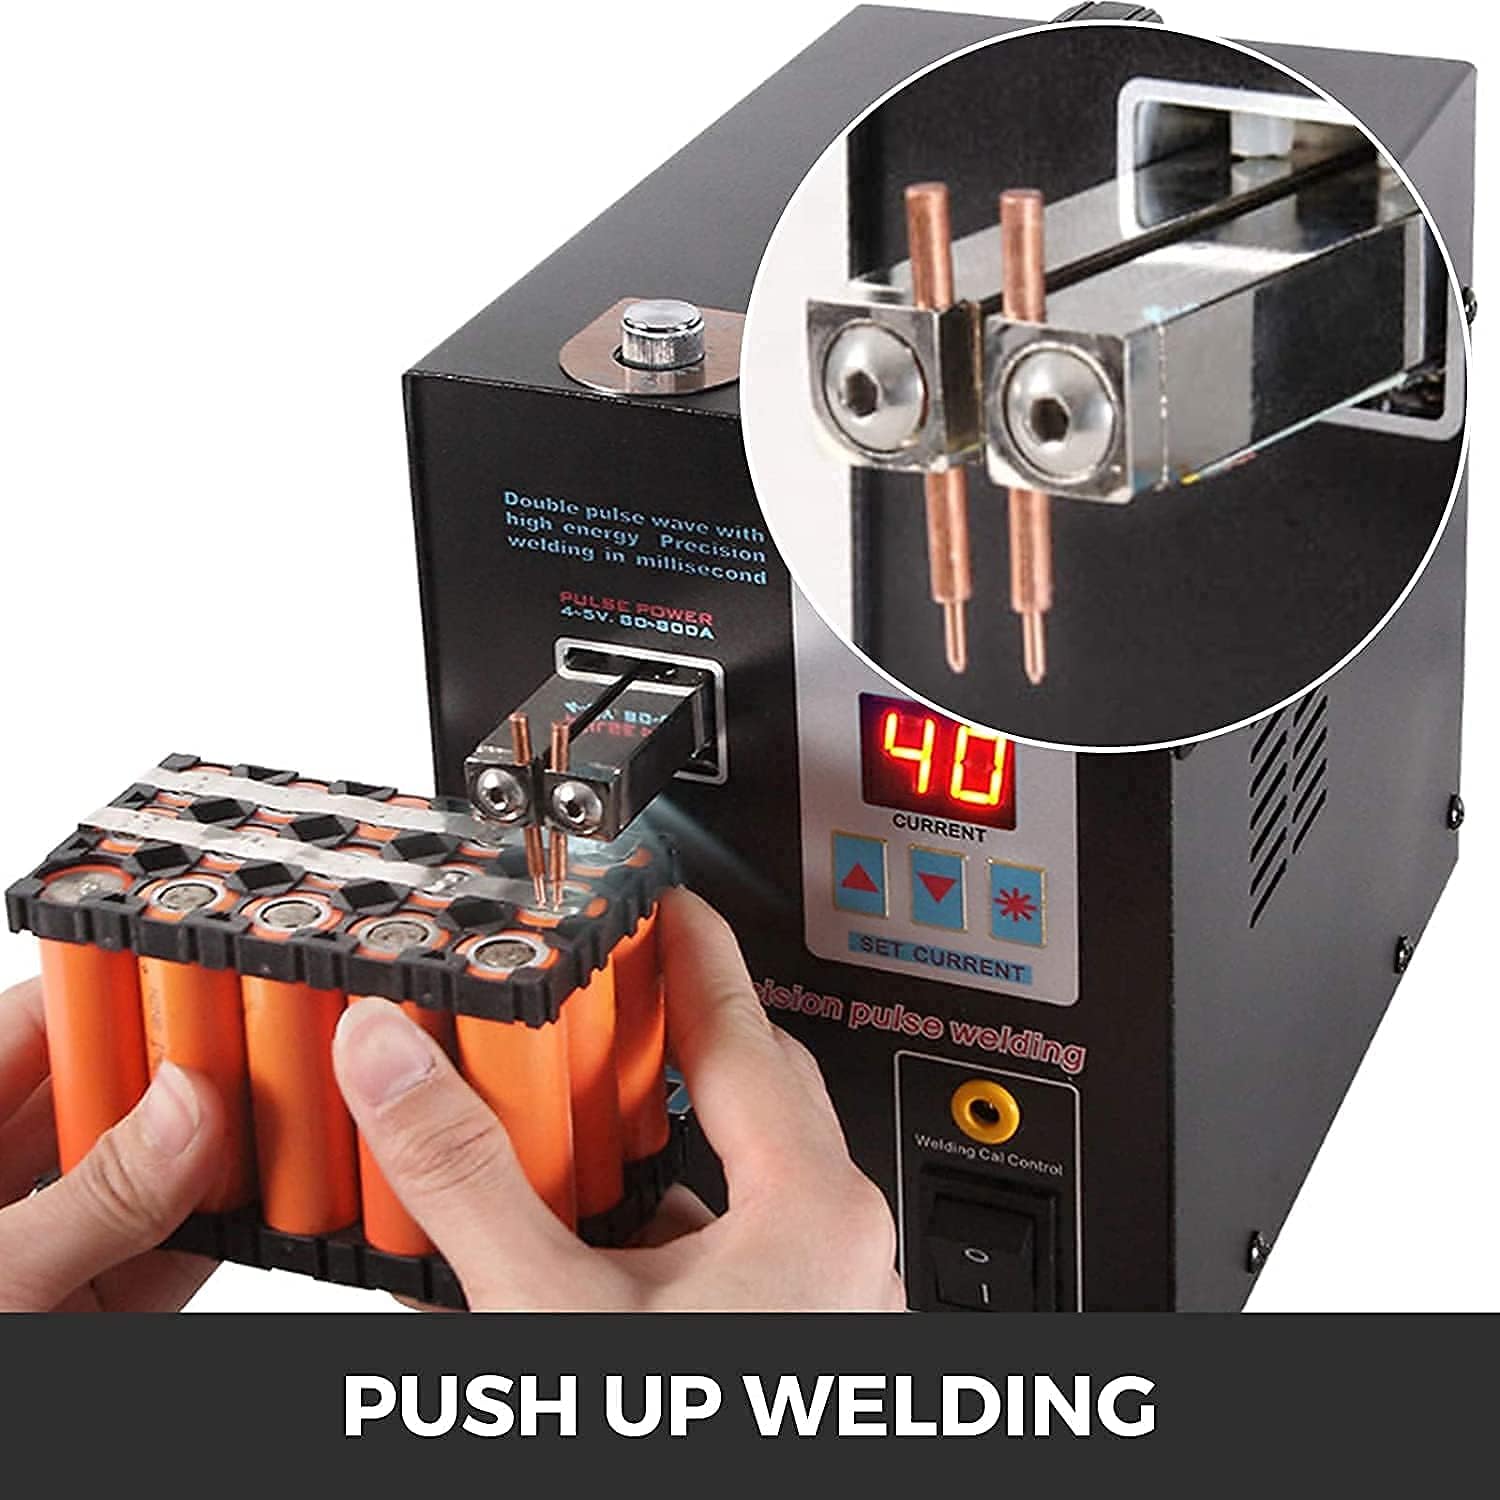
Image 8.1: Dimensions of the SUNKKO 737G spot welder, illustrating its compact size.
9. Warranty and Support
For warranty information or technical support, please contact the manufacturer or your point of purchase. Keep your purchase receipt as proof of purchase.
10. Additional Information
No official product videos from the seller were found to be included in this manual.

Image 10.1: A multi-panel view of the SUNKKO 737G, highlighting various features and components.

Image 10.2: The SUNKKO 737G demonstrating its compact and portable design, suitable for various workspaces.


