
Nilight 90107D
Nilight 90107D 4 Gang Rocker Switch Panel User Manual
Model: 90107D | Brand: Nilight
1. Product Overview
The Nilight 90107D 4 Gang Rocker Switch Panel is a pre-wired, waterproof solution designed for controlling various electrical appliances in 12V and 24V vehicles. It integrates four ON/OFF rocker switches, a 12V cigarette lighter socket, and a dual USB charger port, providing comprehensive power and control capabilities.
Key features include:
- Waterproof Design: Equipped with a special rubber seal cap, splash-proof panel, and anti-seepage rubber ring for reliable performance in marine or wet environments.
- Multi-Functionality: Features four rocker switches for controlling accessories, a 12V cigarette lighter socket, and a dual USB charger (5V 1A and 5V 2.1A) for charging mobile devices.
- Flexible Design: Heavy-duty ABS plastic face panel and all-in-one design allow for DIY customization and control of various vehicle electrical appliances.
- Multilayer Protection: Built-in 2 x 15A fuses protect your devices from short circuits and overloading.

Front view of the Nilight 4 Gang Rocker Switch Panel, showcasing the four switches, USB charger, and 12V power socket.
2. What's in the Box
Your Nilight 90107D 4 Gang Rocker Switch Panel package includes the following components:
- 1 x Pre-wired 4 Gang Switch Panel
- 1 x Rubber Seal Ring
- 1 x DIY Sticker Sheet (for switch labels)
- 1 x Wiring Diagram
- 6 x Mounting Screws

All components included in the package: the pre-wired switch panel, mounting screws, DIY sticker sheet, and rubber seal ring.
3. Setup and Installation
The Nilight 90107D switch panel is pre-wired for ease of installation. Follow these steps for proper setup:
3.1 Wiring Connections
The panel comes with pre-attached wiring. Ensure all connections are secure before use. The red wire is for positive (+) battery connection, and the black wire is for negative (-) battery connection.

Rear view of the switch panel, illustrating the pre-wired connections and integrated 15A fuses.
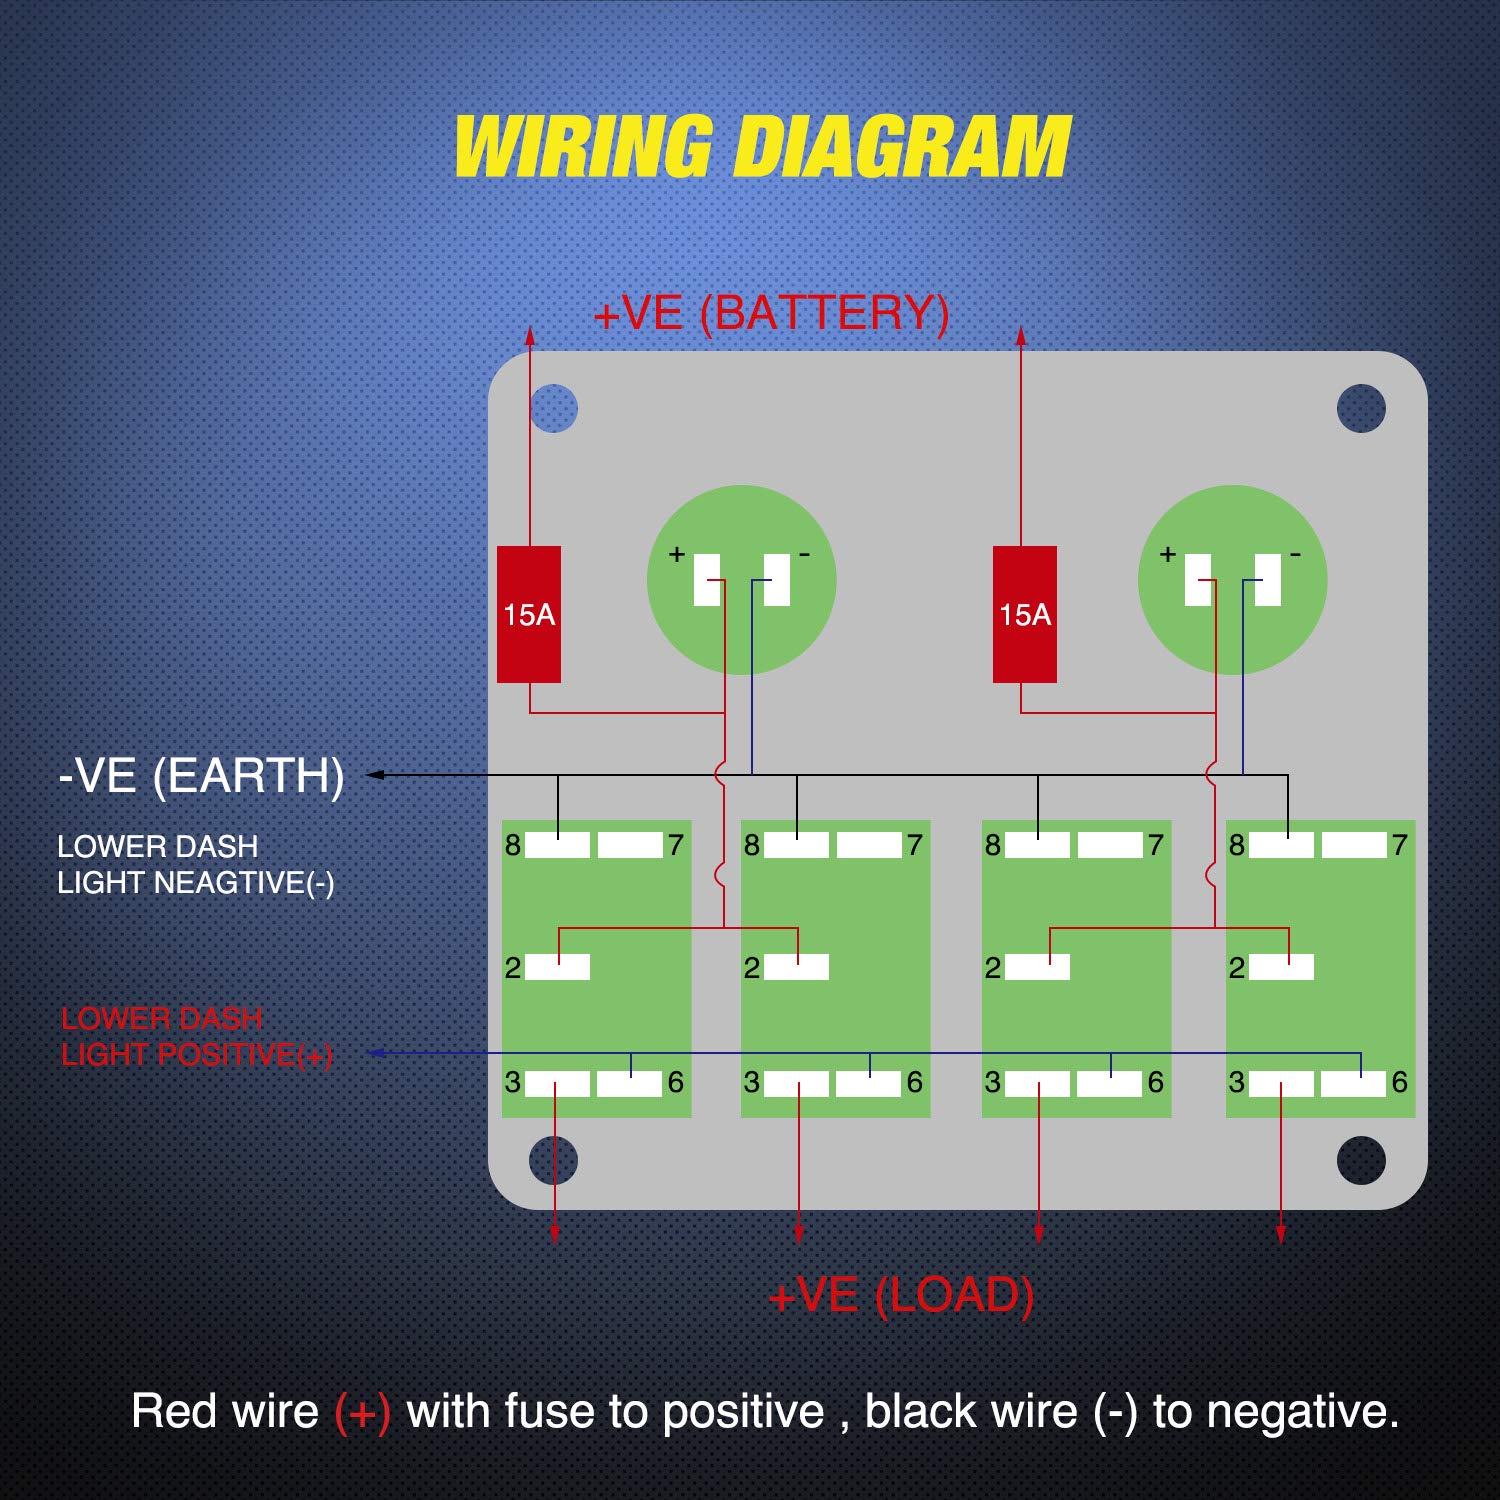
Detailed wiring diagram for connecting the switch panel to a 12V/24V power source and loads. Red wire (+) connects to battery positive, black wire (-) connects to battery negative.
3.2 Connecting External Devices
Each rocker switch has terminals for connecting your desired electrical devices (e.g., lights, pumps, fans). Connect the positive wire of your device to Pin#3 on the switch. The negative wire of your device should be connected to the battery negative.
Video demonstrating how to wire external lights to the Nilight Rocker Switch Panel, showing connections to battery positive, negative, and device positive terminals.
3.3 Customizing Switch Labels
Use the provided DIY sticker sheet to label your switches according to the connected devices. The stickers are designed to glow in the dark for easy identification.

The included Night Glow DIY Sticker sheet provides various icons for customizing your switch functions.
3.4 Component Removal and Reinstallation
The switch panel allows for easy removal and reinstallation of individual switches and sockets. Jumper wires can be disconnected by pressing down the clips. Sockets can be unscrewed, and switches can be pushed out from the front for maintenance or customization.
Video showcasing the multi-functionality of the switch panel, including how to remove and reinsert individual switches and sockets, and demonstrating the charging capabilities.

Illustration of how to easily disconnect the pre-wired terminals from the switches by pressing down on the clips.
4. Operating Instructions
Once installed, operating the Nilight 90107D switch panel is straightforward:
- Rocker Switches: Press the top part of the rocker switch to turn the connected device ON. Press the bottom part to turn it OFF. The switches feature an illuminated indicator when active.
- 12V Cigarette Lighter Socket: Open the rubber cap and insert your 12V compatible device's plug.
- USB Charger Ports: Open the rubber cap and connect your USB charging cable to either the 5V 1A or 5V 2.1A port to charge your mobile devices.

The switch panel seamlessly integrated into a vehicle's interior, demonstrating its practical application.
5. Maintenance
To ensure the longevity and optimal performance of your Nilight switch panel, consider the following maintenance tips:
- Cleaning: Regularly wipe the panel surface with a soft, damp cloth to remove dust and grime. Avoid abrasive cleaners or solvents.
- Fuse Inspection: The panel includes two 15A fuses for protection. Periodically inspect these fuses for any signs of damage or blowing. If a fuse is blown, replace it with a fuse of the same rating (15A).
- Connection Check: Periodically check all wiring connections to ensure they remain tight and free from corrosion, especially in high-vibration environments.
- Rubber Seals: Ensure the rubber seal caps for the USB and 12V sockets are properly seated when not in use to maintain waterproof integrity.
6. Troubleshooting
If you encounter issues with your Nilight 90107D switch panel, refer to the following common troubleshooting steps:
- Device Not Turning On:
- Check the switch position. Ensure it is fully engaged in the ON position.
- Verify the power source. Ensure the battery connections (red and black wires) are secure and the battery has sufficient charge.
- Inspect the fuses. Check the two 15A fuses on the panel's wiring. Replace if blown.
- Confirm device wiring. Ensure the positive wire of your device is correctly connected to Pin#3 of the switch and the negative wire to battery negative.
- USB Charger or 12V Socket Not Working:
- Check the main power connection to the panel.
- Ensure the device being charged is compatible with the output voltage/current.
- Verify the integrity of the charging cable or device plug.
- Lower Light on Switch Not Illuminating:
- The lower light on the switch is designed to be constantly on when the blue wire is connected to the battery positive (+). This helps locate the switch in the dark. If it's not on, check the connection of the blue wire to the battery positive.
7. Specifications
| Product Dimensions | 3.94 x 1.97 x 1.97 inches |
| Item Model Number | 90107D |
| Manufacturer | Nilight |
| Operation Mode | ON-OFF |
| Current Rating | 20 Amps |
| Operating Voltage | 12 Volts (DC) |
| Contact Type | Normally Closed |
| Connector Type | Clamp |
| Terminal | Pre-wired |
| Circuit Type | 4-way |
| Mounting Type | Panel Mount |

Detailed dimensions of the switch panel for installation planning.
8. Warranty and Support
The Nilight 90107D 4 Gang Rocker Switch Panel comes with a 2-year warranty, ensuring peace of mind regarding product quality and performance.
For further assistance, technical support, or warranty claims, please visit the official Nilight store or contact their customer service directly. You can find more information and products at the Nilight Store on Amazon.
9. Wide Application
This versatile switch panel is suitable for a wide range of 12V and 24V vehicles and applications, including:
- Cars
- RVs and Campers
- Trucks and Jeeps
- Trailers
- Motorcycles
- Boats and Marine Vessels
- Buses

Examples of vehicles and applications suitable for the Nilight 4 Gang Rocker Switch Panel.
Ask a question about this manual
Ask about setup, troubleshooting, compatibility, parts, safety, or missing instructions. Manuals+ will review the question and use this page’s manual context to help answer it.