1. Product Overview
The Samsung SR650 Series business monitor is designed for enhanced productivity and visual clarity. It features an advanced IPS panel for vivid colors and wide viewing angles, a virtually bezel-less design for seamless multi-monitor setups, and versatile connectivity options. This monitor also incorporates eye comfort technologies and energy-saving features to optimize your work environment.

Figure 1: Front view of the Samsung 24-inch SR650 Series Monitor.
2. Setup Guide
2.1 Unpacking and Assembly
Carefully remove all components from the packaging. The monitor comes with a base and stand arm that require assembly before use. Follow these steps:
- Attach the stand arm to the base by aligning the components and securing them.
- Align the assembled stand with the mounting points on the back of the monitor.
- Gently push the monitor onto the stand until it clicks securely into place.
- Ensure all connections are firm before placing the monitor on your desk.
2.2 Connectivity
The SR650 Series monitor offers a variety of ports for connecting to your devices:
- VGA: For older systems.
- HDMI: For high-definition audio and video.
- DisplayPort: For high-resolution video output.
- USB Hub: Includes 2x USB 3.0 (downstream) and 2x USB 2.0 (downstream) ports for connecting peripherals, plus 1x USB 3.0 (upstream) to connect the hub to your computer.
Connect the appropriate cable from your computer's video output port to the corresponding input port on the monitor. If using the USB hub, connect the upstream USB 3.0 cable from the monitor to your computer.
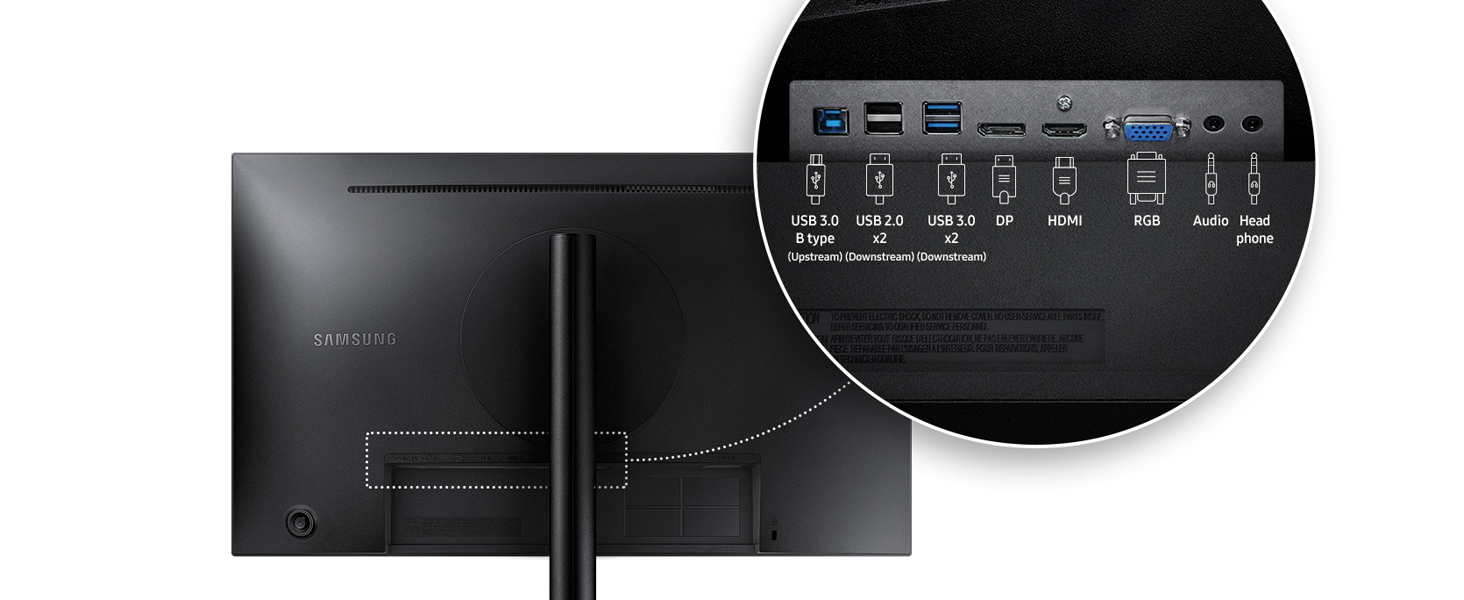
Figure 2: Rear view of the monitor displaying the available connectivity ports including USB, DisplayPort, HDMI, VGA, and audio jacks.
2.3 Power On
Connect the power cord to the monitor and then to a power outlet. Press the power button, typically located on the back or bottom edge of the monitor, to turn it on.
3. Operating Instructions
3.1 Basic Controls and Menu Navigation
The monitor's control buttons are typically located on the back or bottom of the display. Use these buttons to navigate the On-Screen Display (OSD) menu and adjust settings such as brightness, contrast, and color. Refer to the on-screen prompts for specific navigation instructions.
3.2 Eye Comfort Features
- Eye Saver Mode: This feature minimizes blue light emissions to reduce eye strain, especially during prolonged use.
- Flicker Free: Eliminates tiring and irritating screen flicker, contributing to a more comfortable viewing experience.
These modes can be activated through the monitor's OSD menu to enhance visual comfort.
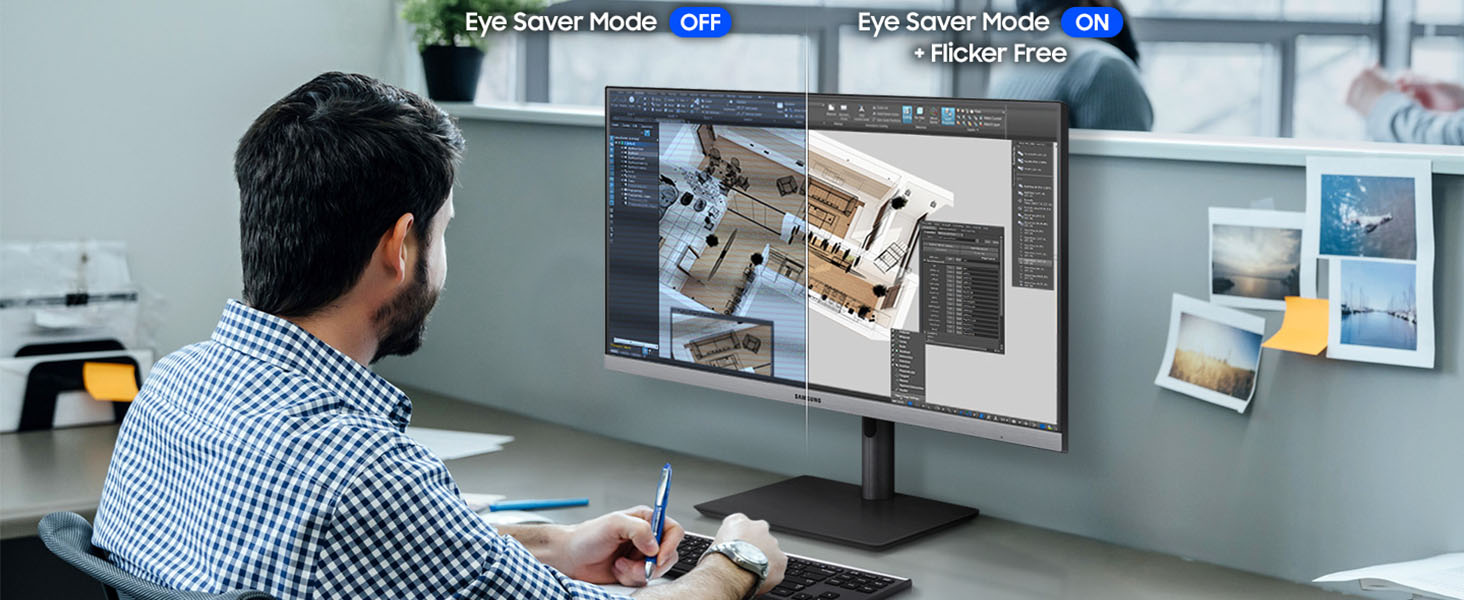
Figure 3: Visual comparison demonstrating the effect of Eye Saver Mode, showing reduced blue light when activated.
3.3 Smart Eco Saving
The Smart Eco Saving technology helps reduce power consumption by up to 10% while maintaining picture quality. It intelligently adjusts the brightness of dark sections of the screen and modifies RGB gain values. This feature can be enabled or disabled in the OSD menu.
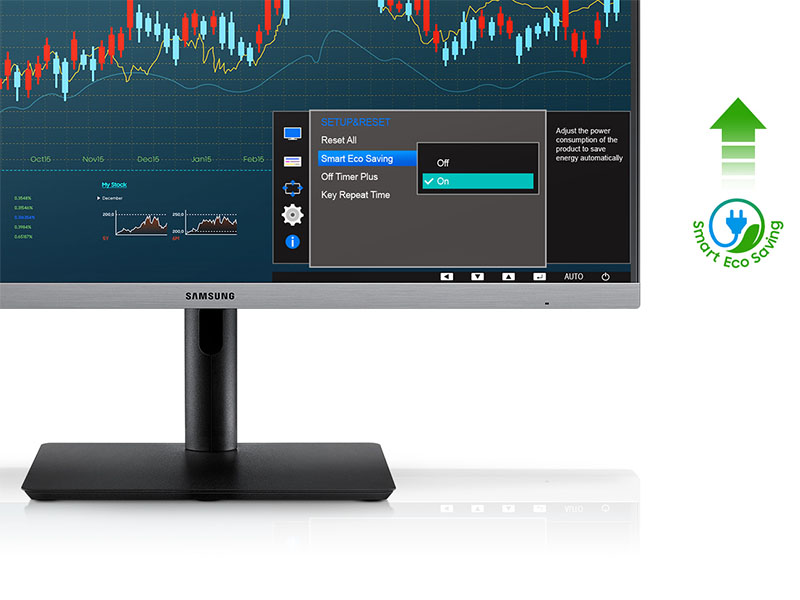
Figure 4: Screenshot showing the Smart Eco Saving option within the monitor's settings menu.
3.4 Ergonomic Adjustments
The monitor stand allows for various ergonomic adjustments to suit your viewing preferences:
- Height Adjustment: Raise or lower the monitor to your desired height.
- Tilt: Adjust the screen's vertical angle.
- Pivot: Rotate the screen between landscape and portrait orientations.
- Swivel: Rotate the screen horizontally.
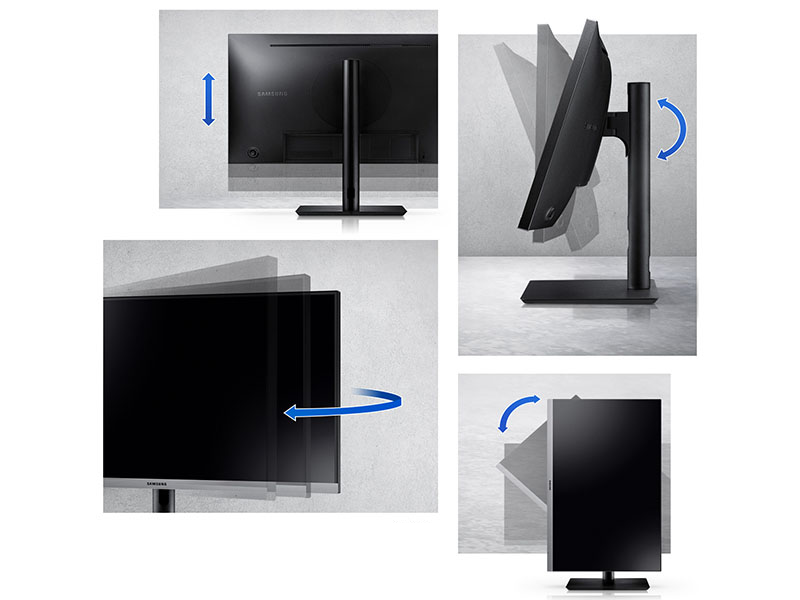
Figure 5: Illustrations demonstrating the monitor's adjustable features including height, tilt, pivot, and swivel capabilities.
4. Maintenance
4.1 Cleaning the Monitor
To clean the monitor screen, gently wipe it with a soft, lint-free cloth. For stubborn marks, lightly dampen the cloth with water or a specialized screen cleaner. Avoid using harsh chemicals, abrasive materials, or spraying liquids directly onto the screen.
4.2 General Care
Keep the monitor in a well-ventilated area. Avoid exposing it to direct sunlight, excessive heat, or moisture. Do not block the ventilation openings on the monitor casing.
5. Troubleshooting
If you encounter issues with your monitor, try the following basic troubleshooting steps:
- No Power: Ensure the power cable is securely connected to both the monitor and the power outlet. Check if the power outlet is functioning.
- No Signal: Verify that the video cable (HDMI, DisplayPort, or VGA) is correctly connected to both the monitor and your computer. Ensure the correct input source is selected on the monitor via the OSD menu.
- Display Problems (e.g., blurry image, incorrect colors): Check the monitor's resolution settings on your computer to ensure they match the monitor's native resolution (1920x1080). Adjust brightness, contrast, and color settings through the OSD menu.
- USB Hub Not Working: Ensure the USB 3.0 upstream cable is connected from the monitor to your computer. Check your computer's device manager for any driver issues.
For more detailed troubleshooting or persistent issues, please refer to the comprehensive user manual available on the Samsung support website or contact Samsung customer support.
6. Technical Specifications
| Feature | Specification |
|---|---|
| Screen Size | 23.8 Inches |
| Max Screen Resolution | 1920 x 1080 Pixels (FHD 1080p) |
| Refresh Rate | 75Hz |
| Panel Type | IPS |
| Aspect Ratio | 16:9 |
| Connectivity | VGA, HDMI, DisplayPort, 2x USB 3.0, 2x USB 2.0 |
| Item Model Number | LS24R650FDNXZA |
| Item Weight | 11.24 pounds |
| Product Dimensions | 7.89 x 21.24 x 18.65 inches |
| Color | Black |
| VESA Mount Compatible | Yes (100x100mm) |

Figure 6: Diagram illustrating the physical dimensions of the Samsung 24-inch SR650 Series Monitor.
7. Warranty and Support
This Samsung SR650 Series monitor comes with a 3-Year Warranty, covering defects in materials and workmanship under normal use. For warranty claims, technical assistance, or further support, please contact Samsung Customer Service.
You can find additional resources, FAQs, and the full user manual on the official Samsung support website: www.samsung.com/us/support/


