
Introduction
The Lorex N861D63B is a 16-channel Network Video Recorder (NVR) designed for advanced surveillance systems. It supports 4K Ultra HD resolution, features a pre-installed 3TB hard drive, and offers smart motion detection capabilities. This NVR integrates with the Lorex Home mobile app for remote viewing and is compatible with various smart home platforms for voice control.
Key features include:
- 4K Ultra HD Recording: Provides superior detail and definition with 3840 x 2160 resolution.
- 16 Channel Support: Connect up to 16 IP cameras.
- 3TB Pre-installed HDD: Expandable up to 10TB for extensive video storage.
- Smart Motion Detection: Identifies people and vehicles to reduce irrelevant alerts.
- Lorex Home App: Remote viewing and system management from smartphones or tablets.
- Smart Home Integration: Compatible with Amazon Alexa, Google Assistant, Apple TV, and Chromecast for voice control.
- Active Deterrence Camera Compatibility: Works with cameras featuring LED warning lights and remote-triggered sirens.
Package Contents
Verify that all items are present in the package:
- Lorex N861D63B NVR Unit
- HDMI Cable
- AC Power Adapter
- Ethernet Cable
- USB Mouse
- Quick Start Guide (refer to this manual for full instructions)
Setup
1. NVR Overview
Familiarize yourself with the front and rear panels of the NVR unit.
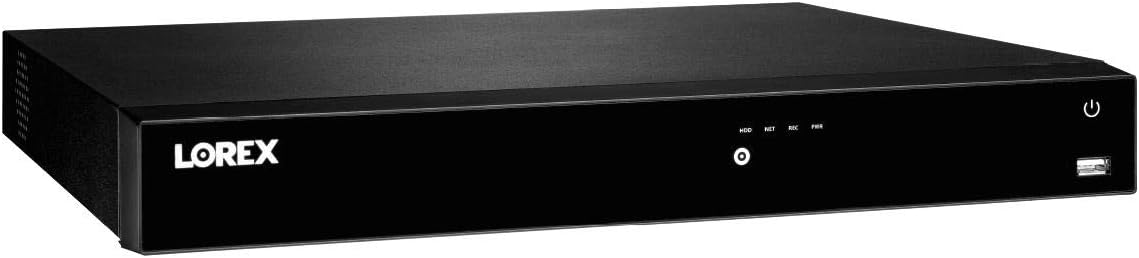
Figure 1: Front panel of the Lorex N861D63B NVR, showing the Lorex logo, status indicators (HDD, NET, REC, PWR), a central button, and a USB port on the right.

Figure 2: Rear panel of the Lorex N861D63B NVR, displaying power input, fan, 16 PoE ports, alarm I/O, VGA, RS232, HDMI, USB, Ethernet, and audio input/output ports.
2. Initial Connection
- Connect Display: Connect the NVR to a monitor using the provided HDMI cable. Alternatively, a VGA cable can be used.
- Connect Mouse: Plug the USB mouse into one of the USB ports on the NVR (front or rear).
- Connect Network: Connect the NVR to your router using the Ethernet cable. This is required for remote viewing and smart home features.
- Connect Cameras: Connect your IP cameras to the PoE ports on the rear of the NVR. The NVR provides power and data through these ports.
- Connect Power: Plug the AC power adapter into the NVR's power input and then into a power outlet. The NVR will power on automatically.
3. First-Time Setup Wizard
Upon first power-on, the NVR will guide you through a setup wizard. Follow the on-screen prompts to:
- Create a secure password.
- Configure date and time settings.
- Set up network parameters (usually automatic via DHCP).
- Scan and add connected cameras.
Operating the NVR
1. Lorex Home Mobile App
The Lorex Home app allows you to view live footage, play back recordings, and manage your NVR settings remotely.
- Download: Download the Lorex Home app from your device's app store (Lorex Home App).
- Account Creation: Create a Lorex account or log in if you already have one.
- Add Device: Follow the in-app instructions to add your NVR by scanning the QR code on the NVR or manually entering its device ID.
- Remote Viewing: Once added, you can access live camera feeds and recorded video from anywhere with an internet connection.
2. Smart Motion Detection and Smart Search
The NVR supports advanced motion detection features when paired with compatible Smart IP cameras.
- Person and Vehicle Detection: Configure cameras to detect only people or vehicles, reducing irrelevant alerts.
- Push Notifications: Receive instant notifications and image screenshots on your Lorex Home app when a person or vehicle is detected.
- Smart Search: Use the Lorex Home app or NVR interface to filter recorded motion events by area, time/date, and detection type (person or vehicle) for efficient footage review.
3. Voice Control and Smart Home Integration
Integrate your NVR with smart home platforms for convenient voice control.
- Compatibility: The NVR is compatible with Amazon Alexa, Google Assistant, Apple TV, and Chromecast.
- Setup: Refer to the specific instructions for integrating Lorex devices with your chosen smart home platform. This typically involves enabling the Lorex skill/action and linking your Lorex account.
- Commands: Use voice commands to view camera feeds on compatible smart displays or TVs.
4. Active Deterrence Features
If using compatible active deterrence cameras, you can control their features through the NVR or Lorex Home app.
- LED Warning Lights: Customize LED lights to activate manually, upon motion detection, or remain always on.
- Remote Siren: Trigger a loud warning siren directly from the Lorex Home app when motion is detected.
Maintenance
1. Hard Drive Management
The NVR comes with a 3TB hard drive pre-installed, supporting up to 10TB.
- Recording Modes: Configure continuous, scheduled, or motion-activated recording modes via the NVR interface.
- Storage Overwrite: The NVR is typically set to overwrite the oldest recordings when the hard drive is full. Verify this setting in the NVR's storage configuration.
- Hard Drive Upgrade: If more storage is needed, consult Lorex support or the full product manual for instructions on upgrading the hard drive (up to 10TB).
2. General Care
- Keep the NVR in a well-ventilated area to prevent overheating.
- Clean the exterior with a soft, dry cloth. Avoid liquid cleaners.
- Ensure power connections are secure.
Troubleshooting
This section provides basic troubleshooting steps. For more complex issues, refer to the Lorex support website or contact customer service.
- No Video Output:
- Ensure the HDMI/VGA cable is securely connected to both the NVR and the monitor.
- Verify the monitor input source is correctly selected.
- Restart the NVR.
- Cameras Not Displaying:
- Check that cameras are properly connected to the NVR's PoE ports.
- Ensure cameras are powered on (PoE ports provide power).
- Verify camera settings within the NVR interface.
- No Remote Access (Lorex Home App):
- Confirm the NVR is connected to your router via Ethernet and has internet access.
- Check your mobile device's internet connection.
- Ensure the NVR is correctly added to your Lorex Home account.
- Restart both the NVR and your router.
- False Motion Alerts:
- Adjust motion detection sensitivity settings for individual cameras.
- Utilize person and vehicle detection features if available on your cameras.
- Review camera placement to minimize detection of irrelevant movement (e.g., trees, shadows).
Specifications
| Feature | Detail |
|---|---|
| Model Number | N861D63B |
| Brand | Lorex |
| Channels | 16 |
| Video Resolution | Up to 4K Ultra HD (3840 x 2160) |
| Hard Disk Size | 3 TB (pre-installed) |
| Maximum Storage Capacity | 10 TB |
| Connectivity Technology | Ethernet, HDMI |
| Compatible Devices | Lorex IP Cameras (E581CB/CD, E861AB-E, E891AB, LNB3143/3153/3163/3321/3373/3373S/4163/4173/4421/8111/8921/8963BW/8973B, LND2750AB/3152/4750AB/4751AB, LNE3142RB/4162/4322/4422, LNE8950AB/8964ABW/8974, LNZ44P4B, LNZ3522, LNZ44P12B) |
| Item Weight | 10.78 pounds |
| Package Dimensions | 21.4 x 16.5 x 6.6 inches |
Warranty and Support
For warranty information, technical support, or to access the full product manual, please visit the official Lorex website or contact Lorex customer service. The Lorex Home app also provides resources and direct access to support.
Lorex Website: www.lorex.com


