Product Overview
The TESUP Atlas2.0 Wind Turbine Kit is a vertical axis wind generator designed for efficient electricity generation, even at lower wind speeds. Manufactured in Europe, this 2KW wind turbine features a durable aluminum body, quiet blades, and a maintenance-free slip ring for reliable operation. It is optimized for residential use and includes a TESUP Wind Charge Controller.

Figure 1: TESUP Atlas2.0 Vertical Axis Wind Turbine.
This image displays the complete TESUP Atlas2.0 wind turbine, showcasing its vertical axis design and compact form factor. The turbine is white with the "TESUP ATLAS2.0" branding visible on its body.
Key Features
- High Efficiency: Optimized for residential use with a maximum power output of 2020 Watts at 15 m/s wind speed.
- Low Wind Speed Operation: Starts generating power at wind speeds as low as 3 m/s.
- Durable Construction: Features an aluminum body for excellent heat dissipation and robust performance.
- Quiet Operation: Improved blade airfoils and double bearings contribute to low vibration and a noise level of 30 dB.
- Advanced Slip Ring: Utilizes a 3-cable slip ring, common in the aviation industry, ensuring maintenance-free operation and preventing cable twisting.
- Integrated Charge Controller: Includes the TESUP Wind Charge Controller for efficient power management.
Setup and Installation
Proper installation is crucial for the optimal performance and longevity of your TESUP Atlas2.0 wind turbine. Ensure all components are present and undamaged before beginning installation.
Component Identification
- Atlas2.0 Wind Turbine Body (with blades)
- TESUP Wind Charge Controller (CC2000-48)
- Mounting Hardware (not explicitly listed, but implied for installation)
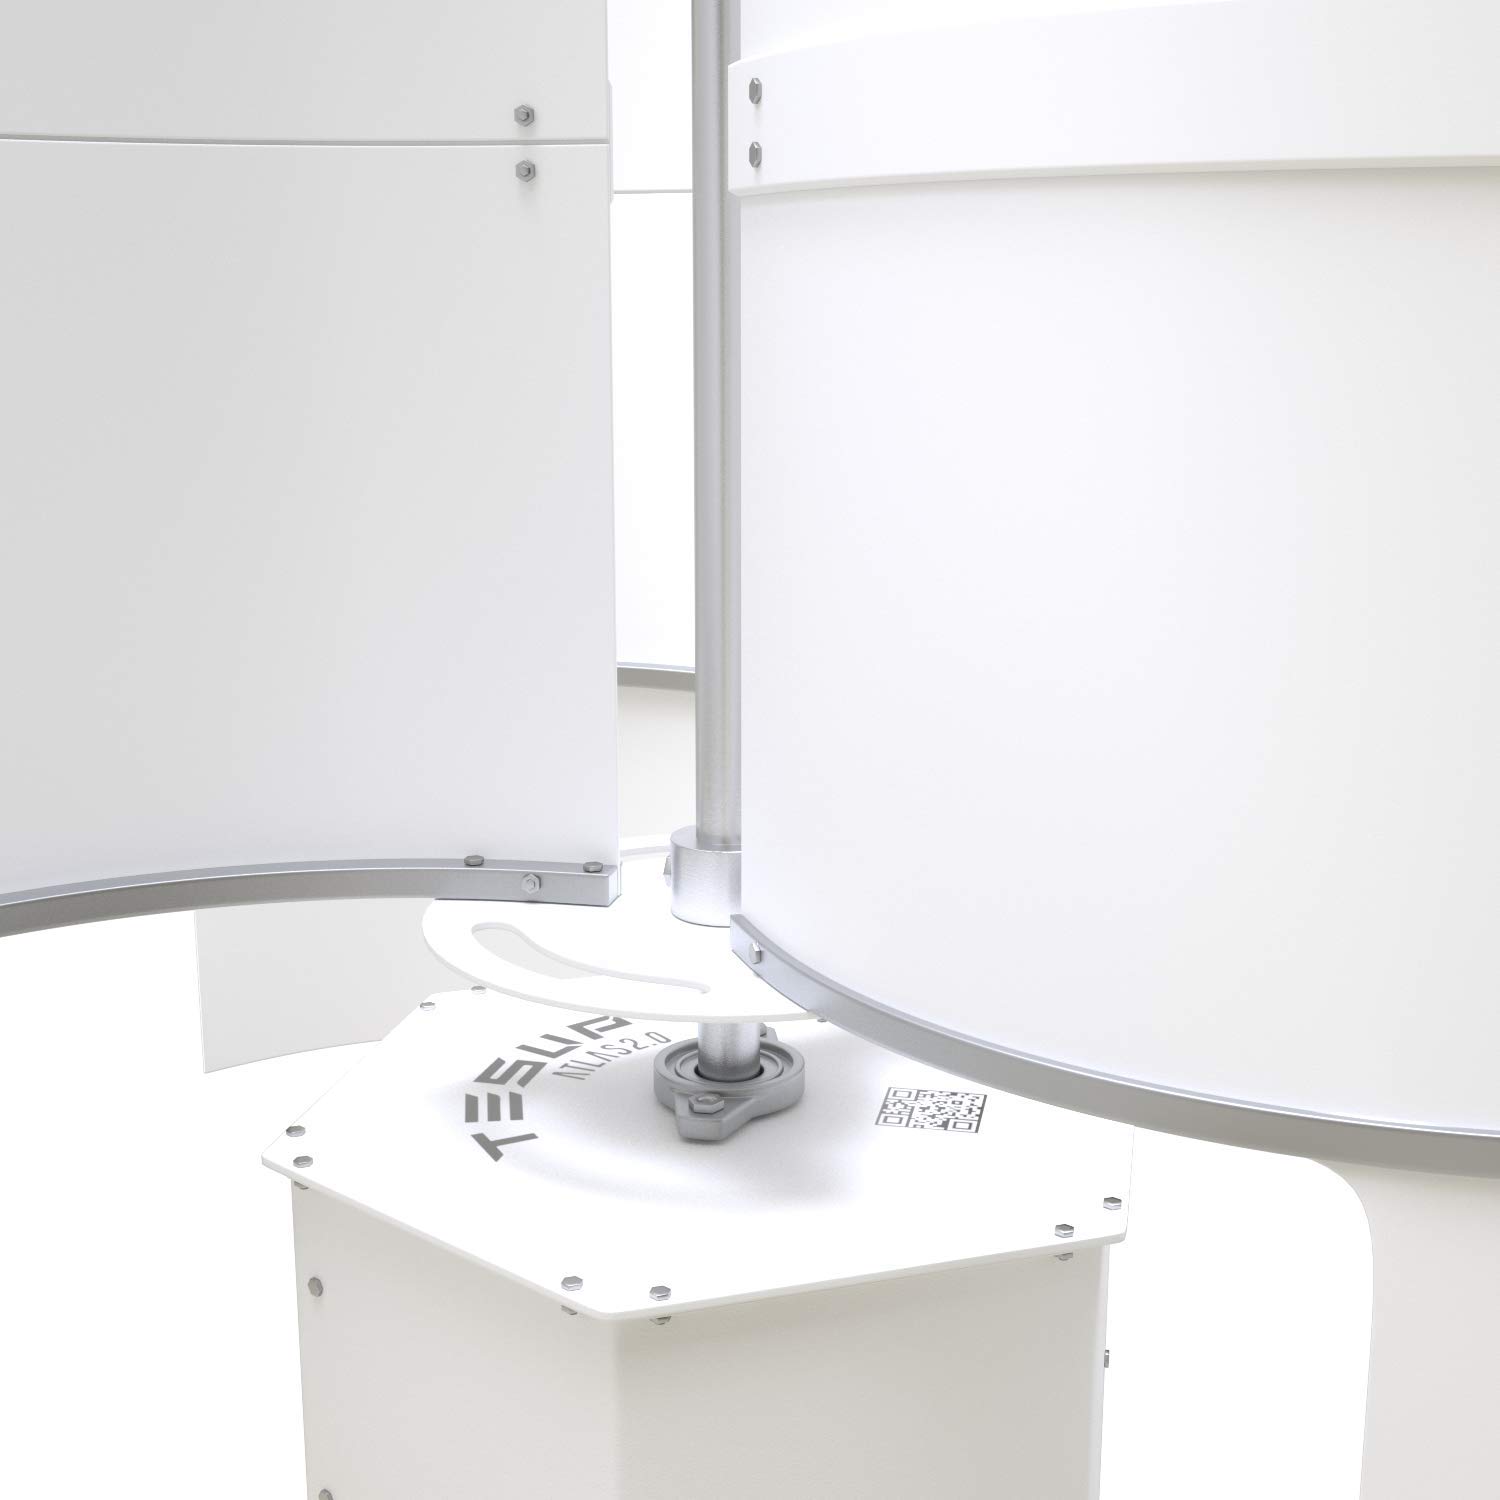
Figure 2: Turbine Base Connection Point.
This image shows a close-up of the base of the TESUP Atlas2.0 wind turbine, highlighting the robust connection point for mounting. The hexagonal base and the central shaft connection are clearly visible.
Mounting Considerations
The turbine should be mounted in an open area free from obstructions (buildings, trees) that could block wind flow. Ensure the mounting pole or structure is stable and capable of supporting the turbine's weight and resisting wind loads.
Electrical Connection
Connect the turbine to the TESUP Wind Charge Controller (CC2000-48). The controller manages the power output and charges your battery bank (48V system). Refer to the charge controller's specific manual for detailed wiring diagrams and safety precautions.

Figure 3: TESUP Wind Charge Controller (CC2000-48).
This image displays the TESUP Wind Charge Controller, a key component for managing the power generated by the wind turbine. It features a digital display, switches for battery and inverter, and a brake switch.
Important: All electrical work should be performed by a qualified electrician in accordance with local electrical codes and regulations.
Operating Instructions
Once installed and connected, the TESUP Atlas2.0 wind turbine operates automatically. It begins to rotate and generate electricity when wind speeds exceed 3 m/s (approximately 6.7 mph).
Power Generation
- The turbine's permanent magnet generator with strong neodymium magnets ensures efficient power conversion.
- The integrated charge controller regulates the output to safely charge your 48V battery bank.
- Monitor the charge controller's display for real-time information on battery voltage and charging status.
Braking System
The charge controller includes a manual brake switch. Activate the brake to stop the turbine's rotation for maintenance, during extreme weather conditions, or when power generation is not desired. Always engage the brake before approaching the turbine for any reason.
Maintenance
The TESUP Atlas2.0 wind turbine is designed for low maintenance. However, periodic checks are recommended to ensure optimal performance and longevity.
- Visual Inspection (Quarterly): Check for any visible damage to the blades, body, or mounting structure. Ensure all bolts and connections are secure.
- Cleaning (Annually or as needed): Gently clean the turbine blades and body to remove dirt, dust, or debris that may accumulate and affect efficiency. Use a soft cloth and mild detergent if necessary.
- Electrical Connections (Annually): Inspect all electrical wiring and connections for corrosion or loose terminals. Ensure the charge controller is free from dust and well-ventilated.
- Bearing Check: The inox bearings are rust-free and designed for long life. Listen for any unusual noises during operation that might indicate a bearing issue.
Caution: Always engage the turbine's brake and disconnect power before performing any maintenance or inspection.
Troubleshooting
| Problem | Possible Cause | Solution |
|---|---|---|
| Turbine not spinning in wind |
|
|
| No power output to batteries |
|
|
| Unusual noise or vibration |
|
|
Specifications
| Attribute | Value |
|---|---|
| Model Number | ATLAS2.0-48 + CC2000-48 |
| Rated Power | 530 Watts @ 7 m/s |
| Maximum Power | 2020 Watts @ 15 m/s |
| Start-up Wind Speed | 3 m/s |
| Body Material | Aluminum |
| Noise Level | 30 dB |
| System Voltage | 48 V |
| Manufacturer | TESUP |
| First Available Date | June 20, 2020 |
Dimensions

Figure 4: Overall Dimensions of TESUP Atlas2.0 Wind Turbine.
This image illustrates the overall dimensions of the TESUP Atlas2.0 wind turbine, showing a height of 1200 mm (3.94 ft) and a width of 1000 mm (3.28 ft).

Figure 5: Base Dimensions of TESUP Atlas2.0 Wind Turbine.
This image provides detailed dimensions for the base of the TESUP Atlas2.0 wind turbine, including measurements for mounting points and overall base width.
Warranty and Support
The TESUP Atlas2.0 Wind Turbine Kit comes with a 2-year product warranty from the date of purchase. This warranty covers defects in materials and workmanship under normal use.
Warranty Claims
To make a warranty claim, please contact TESUP customer support with your proof of purchase and a detailed description of the issue. Do not attempt to repair the product yourself, as this may void the warranty.
Customer Support
For technical assistance, troubleshooting, or general inquiries, please visit the official TESUP website or contact their customer service department. Refer to the TESUPCare program for extended support options.

Figure 6: TESUPCare Logo.
This image displays the TESUPCare logo, representing the brand's commitment to customer support and service for their products.


