1. Introduction
The HiLetgo W1701 is a compact 12V DC digital temperature controller designed for precise temperature management in various applications. This module is capable of controlling both heating and cooling devices by activating a relay based on a user-defined temperature setpoint and hysteresis. Its simple DIP switch configuration makes it suitable for a wide range of DIY projects and industrial uses requiring reliable temperature regulation.

Overall view of the HiLetgo W1701 12V DC Digital Temperature Controller module, showing the main components including the terminal block, relay, DIP switches, and the connected temperature probe.
2. Product Features
- Operating Voltage: 12V DC
- Digital temperature control via DIP switches
- Adjustable temperature setpoint and hysteresis (callback)
- Supports both heating and cooling control modes (via wiring)
- High-current relay output (up to 20A)
- Includes an NTC temperature sensor probe
- LED indicator for relay status
3. Safety Information
Please read and understand the following safety precautions before installing and operating the W1701 temperature controller:
- Power Disconnection: Always ensure the power supply is disconnected before performing any wiring or maintenance.
- Voltage and Polarity: Verify that the input power supply is 12V DC and observe correct polarity (+12V to +12V, GND to GND). Incorrect voltage or reversed polarity can damage the module.
- Short Circuits: Prevent short circuits during wiring. Ensure all connections are secure and insulated.
- Environmental Conditions: Avoid exposing the module to moisture, extreme temperatures, corrosive environments, or excessive dust.
- Relay Output Type: The relay output on this module is a "wet" contact. This means the relay switches and provides 12V DC power directly from the input supply to the connected load. It is not a dry (isolated) contact. Ensure your connected load is compatible with a 12V DC switched power supply and does not exceed the relay's maximum current rating of 20A. Do not connect AC loads directly to the relay output.
4. Package Contents
The package includes:
- 1x HiLetgo W1701 12V DC Digital Temperature Controller Module
- 1x NTC Temperature Sensor Probe
5. Product Diagram and Components

A close-up view of the HiLetgo W1701 temperature controller board, highlighting its key components such as the green terminal block, black relay, red DIP switches, and the temperature probe connector.
The W1701 module consists of the following main components:
- Terminal Block: The green screw terminal block provides connection points for power input and the load. It is labeled as
+ C - H + +12V GND. - Relay (SRA-12VDC-CL): This black component is an electromagnetic switch that controls the power to your heating or cooling device. It is rated for 20A at 12V DC.
- DIP Switches (1-6): These red switches are used to configure the desired temperature setpoint and hysteresis value.
- Temperature Probe Connector: A white two-pin connector where the NTC temperature sensor probe is attached.
- LED Indicator: A small red LED that illuminates when the relay is active (i.e., when power is being supplied to the connected load).
6. Setup and Installation
Follow these steps to set up and install your W1701 temperature controller:
- Power Input: Connect your 12V DC power supply to the terminal block. Connect the positive (+) terminal of your power supply to the
+12Vterminal on the module, and the negative (-) terminal (Ground) to theGNDterminal. Ensure correct polarity. - Temperature Probe Connection: Plug the NTC temperature sensor probe into the white two-pin connector on the module.
- Load Connection (Cooling Mode): If you are controlling a cooling device (e.g., a fan or refrigeration unit) that operates on 12V DC:
- Connect the positive (+) terminal of your 12V DC cooling device to the
C(Cooling) terminal on the module. - Connect the negative (-) terminal of your cooling device to the
GNDterminal of your 12V DC power supply.
In cooling mode, the relay will activate (turn ON the cooling device) when the measured temperature rises above the setpoint, and deactivate (turn OFF the cooling device) when the temperature drops below the setpoint minus the hysteresis value.
- Connect the positive (+) terminal of your 12V DC cooling device to the
- Load Connection (Heating Mode): If you are controlling a heating device (e.g., a heating pad or element) that operates on 12V DC:
- Connect the positive (+) terminal of your 12V DC heating device to the
H(Heating) terminal on the module. - Connect the negative (-) terminal of your heating device to the
GNDterminal of your 12V DC power supply.
In heating mode, the relay will activate (turn ON the heating device) when the measured temperature falls below the setpoint, and deactivate (turn OFF the heating device) when the temperature rises above the setpoint plus the hysteresis value.
- Connect the positive (+) terminal of your 12V DC heating device to the
- Important: The relay output provides 12V DC power. Ensure your connected load is a 12V DC device and its current draw does not exceed 20A.
7. Operation
The W1701 temperature controller is configured using the six red DIP switches located on the module. These switches allow you to set the desired temperature and the hysteresis (callback) value.
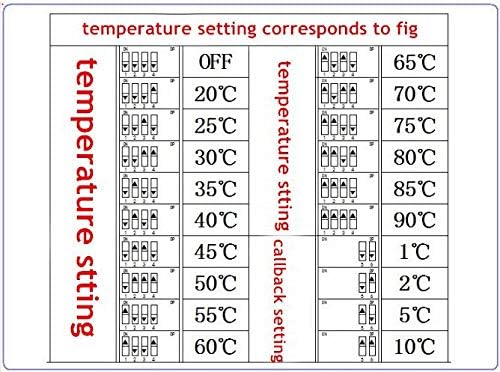
This image illustrates the configuration of the DIP switches for setting the desired temperature and hysteresis (callback) values. The table shows various combinations of switches 1-4 for temperature and switches 5-6 for callback, along with their corresponding values in Celsius.
7.1. Setting Temperature (DIP Switches 1-4)
DIP switches 1 through 4 are used to set the target temperature. Refer to the provided table to find the correct combination of ON/OFF positions for your desired temperature. The available temperature settings range from 20°C to 90°C in 5°C increments, along with an 'OFF' state.
7.2. Setting Hysteresis / Callback (DIP Switches 5-6)
DIP switches 5 and 6 are used to set the hysteresis, also known as the callback value. Hysteresis prevents the relay from rapidly cycling ON and OFF when the temperature fluctuates around the setpoint. The available hysteresis values are 1°C, 2°C, 5°C, and 10°C. Select the appropriate value from the table based on your application's requirements.
Example of Hysteresis:
- If the set temperature is 30°C and the hysteresis is 2°C:
- In Cooling Mode: The relay activates when the temperature reaches 30°C and deactivates when it drops to 28°C.
- In Heating Mode: The relay activates when the temperature drops to 30°C and deactivates when it rises to 32°C.
8. Specifications
| Brand | HiLetgo |
| Model | W1701 |
| Operating Voltage | 12 Volts DC |
| Temperature Control Range | 20°C to 90°C (Configurable via DIP switches) |
| Hysteresis (Callback) | 1°C, 2°C, 5°C, 10°C (Configurable via DIP switches) |
| Sensor Type | NTC (Included) |
| Relay Output | 20A @ 12V DC (Wet Contact) |
| Control Method | DIP Switch Control |
| Connectivity Technology | Wired |
| Power Source | DC Power Supply |
| LED Indicator | Yes (for relay status) |
9. Troubleshooting
If you encounter issues with your W1701 temperature controller, refer to the following troubleshooting guide:
- No Power / LED Off:
- Check if the 12V DC power supply is connected correctly to the
+12VandGNDterminals. - Verify the power supply is functional and providing 12V DC.
- Ensure correct polarity.
- Check if the 12V DC power supply is connected correctly to the
- Incorrect Temperature Reading:
- Ensure the NTC temperature probe is securely plugged into its connector.
- Check for any physical damage to the probe cable or sensor tip.
- Verify the probe is placed in the environment where temperature needs to be measured accurately.
- Relay Not Activating (Load Not Turning ON/OFF):
- Confirm that the DIP switches are set correctly for your desired temperature and hysteresis according to the table.
- Check if the measured temperature is within the activation range for your selected mode (heating or cooling).
- Verify that your load is correctly wired to either the
CorHterminal andGND. - Ensure the load is a 12V DC device and its current draw does not exceed 20A.
- Confirm the load itself is functional.
- Relay Rapidly Cycling ON/OFF:
- This usually indicates insufficient hysteresis. Increase the hysteresis (callback) value using DIP switches 5 and 6 to prevent frequent switching around the setpoint.
10. Maintenance
To ensure the longevity and reliable operation of your W1701 temperature controller:
- Keep the module clean and free from dust and debris. Use a soft, dry cloth for cleaning.
- Avoid exposing the module or the temperature probe to excessive moisture, water, or corrosive chemicals.
- Periodically inspect all wiring connections to ensure they are secure and free from damage.
11. Warranty and Support
The HiLetgo W1701 temperature controller is manufactured by HiLetgo. For technical support, inquiries, or assistance with any issues you may encounter, please contact:
Email: support@hiletgo.com
Please refer to your purchase documentation or the retailer for specific warranty terms and conditions.

Example of HiLetgo product packaging, which typically includes contact information for support.


