1. Introduction
Thank you for choosing an Electrolux EEM48300L Built-In Dishwasher. This manual provides essential information for the safe and efficient operation, installation, and maintenance of your appliance. Please read it thoroughly before using your dishwasher for the first time and keep it for future reference.

Figure 1: Front view of the Electrolux EEM48300L built-in dishwasher. This image shows the appliance's sleek white exterior and integrated control panel at the top.
2. Safety Information
Always observe the following safety precautions to prevent injury or damage to the appliance.
- Electrical Safety: Ensure the appliance is properly grounded. Do not use extension cords or multiple adapters. Disconnect power before any maintenance.
- Water Safety: Ensure water connections are secure to prevent leaks. Do not operate the dishwasher if there is visible damage to the water inlet hose.
- Children and Pets: Keep children and pets away from the appliance when it is in operation. Detergents are corrosive; keep them out of reach.
- Detergent and Rinse Aid: Use only detergents and rinse aids specifically designed for automatic dishwashers.
- Sharp Objects: Load sharp items (knives, forks) with handles up to reduce the risk of injury.
3. Setup and Installation
3.1 Unpacking
Carefully remove all packaging materials. Check the appliance for any transport damage. Report any damage immediately to your retailer.
3.2 Positioning and Installation
The Electrolux EEM48300L is a built-in dishwasher designed to be integrated into your kitchen cabinetry. It is important to note that this model is delivered without a decorative facade panel, allowing you to customize it with a panel matching your kitchen design.

Figure 2: Illustration indicating that the dishwasher is delivered without a facade panel. The diagram shows the dishwasher body and a separate panel with a red 'X', signifying it is not included.
Ensure the appliance is level to prevent water leaks and ensure proper door closure. Refer to the separate installation template and instructions provided with the appliance for detailed steps on securing it within your cabinet.
3.3 Water and Electrical Connection
Connect the water inlet hose to a cold water tap and the drain hose to a suitable drain. Ensure all connections are tight to prevent leaks. Connect the power cord to a properly grounded electrical outlet. Consult a qualified technician if you are unsure about these connections.
3.4 First Use
Before loading dishes for the first time, it is recommended to run an empty wash cycle with a small amount of detergent to clean the interior and remove any manufacturing residues.
4. Operating Instructions
4.1 Control Panel Overview
The control panel is located on the top edge of the dishwasher door. It features various buttons and a digital display for program selection, cycle status, and settings.

Figure 3: Close-up view of the Electrolux EEM48300L dishwasher control panel. It shows the digital display, program selection buttons, and indicators for various functions like Delay Start, Quick, Eco, ExtraPower, GlassCare, and AutoSense Program.
- Power Button: Turns the dishwasher on/off.
- Program Selection Buttons: Allows you to choose from various wash programs (e.g., Normal, Intensive, Quick Wash, Rinse Only, Delicate).
- Delay Start: Sets a delayed start time for the wash cycle.
- Display: Shows remaining time, error codes, and selected options.
- Options Buttons: For additional functions like ExtraPower or GlassCare.
4.2 Loading the Dishwasher
Proper loading ensures optimal cleaning results and prevents damage to dishes. Scrape off large food particles before loading. Place larger items in the lower basket and smaller, delicate items in the upper basket. Ensure spray arms can rotate freely.

Figure 4: Interior view of the dishwasher, highlighting the lower basket, the rotating spray arm, and the filter system at the bottom. This area is crucial for effective cleaning and requires regular maintenance.
4.3 Adding Detergent and Rinse Aid
Open the detergent dispenser and add the recommended amount of dishwasher detergent. If using a tablet, place it in the main detergent compartment. Fill the rinse aid dispenser with rinse aid to ensure streak-free drying.
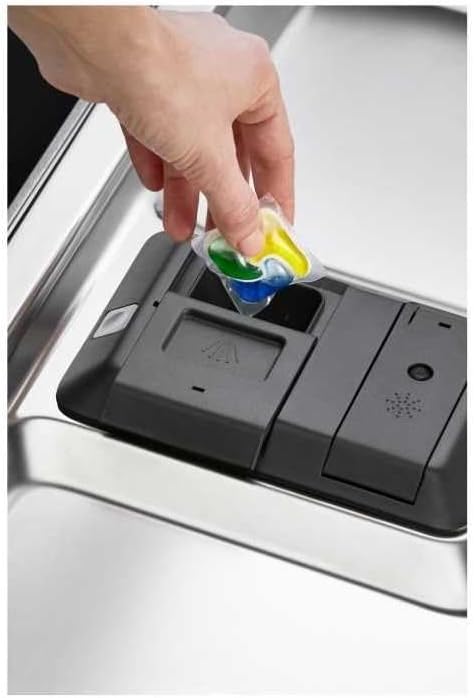
Figure 5: A hand placing a multi-chamber detergent pod into the dishwasher's detergent dispenser. This illustrates the correct way to add detergent for a wash cycle.
4.4 Selecting a Program
Press the program selection button repeatedly until the desired program is indicated on the display. Available programs include:
- Normal: For daily soiled dishes.
- Intensive: For heavily soiled pots, pans, and dishes.
- Quick Wash: For lightly soiled dishes that need a fast wash.
- Rinse Only: For rinsing dishes that will be washed later.
- Delicate: For fragile items like glassware.
- AutoSense Program: Automatically adjusts water and energy consumption based on the soil level.
4.5 Starting and Stopping a Cycle
Close the dishwasher door firmly. The cycle will start automatically. To pause a cycle, open the door slightly. To cancel, press and hold the program button or power button (refer to specific model instructions for exact method).
5. Maintenance and Cleaning
Regular maintenance ensures optimal performance and extends the life of your dishwasher.
5.1 Cleaning the Filters
The filter system (visible in Figure 4) should be cleaned regularly to prevent blockages and ensure efficient washing. Twist the cylindrical filter counter-clockwise to remove it, then remove the flat filter. Rinse both under running water, removing any food debris. Reassemble and replace them securely.
5.2 Cleaning the Spray Arms
Check the spray arm nozzles for blockages. If necessary, remove the spray arms (they usually unclip or unscrew) and clear any debris from the holes using a toothpick or similar tool. Rinse thoroughly and reattach.
5.3 Exterior and Interior Cleaning
Wipe the exterior of the dishwasher with a soft, damp cloth. For the interior, periodically run a dishwasher cleaner cycle or use a mixture of vinegar and baking soda to remove grease and odors.
6. Troubleshooting
Before contacting service, check the following common issues:
| Problem | Possible Cause | Solution |
|---|---|---|
| Dishwasher does not start | No power; Door not closed properly; Program not selected. | Check power supply; Ensure door clicks shut; Select a program and press start. |
| Dishes are not clean | Improper loading; Clogged spray arms/filters; Insufficient detergent. | Reload dishes correctly; Clean filters and spray arms; Add more detergent. |
| Water not draining | Clogged drain hose/filter; Drain pump issue. | Clean filters; Check drain hose for kinks or blockages. |
| Excessive noise | Dishes rattling; Foreign object in pump; Appliance not level. | Rearrange dishes; Check pump area; Level the appliance. |
7. Specifications
Key technical specifications for the Electrolux EEM48300L Dishwasher:
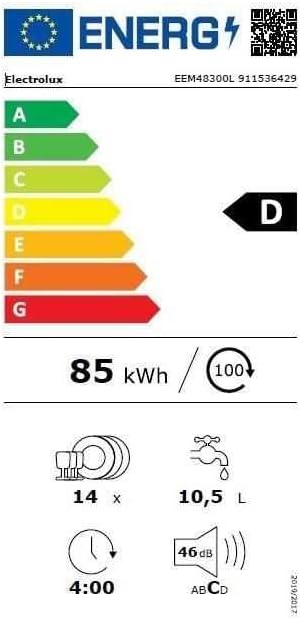
Figure 6: The EU Energy Label for the Electrolux EEM48300L dishwasher, showing its energy efficiency class (D), energy consumption (85 kWh/100 cycles), water consumption (10.5 L/cycle), capacity (14 place settings), and noise level (46 dB).
| Feature | Specification |
|---|---|
| Model Number | EEM48300L |
| Type | Built-In Dishwasher |
| Colour | White |
| Capacity | 14 Place Settings |
| Noise Level | 46 dB |
| Energy Efficiency Class (EU) | D |
| Energy Consumption (per 100 cycles) | 85 kWh |
| Water Consumption (per cycle) | 10.5 Litres |
| Product Dimensions (L x W x H) | 24 x 69 x 2.5 cm (Note: This appears to be packaging or partial dimension, refer to installation guide for full appliance dimensions) |
| Item Weight | 1 Kilogram (Note: This appears to be packaging or partial weight, refer to installation guide for full appliance weight) |
| Package Dimensions (L x W x H) | 85 x 67 x 62 cm |
| Package Weight | 36 Kilograms |
8. Warranty and Support
Your Electrolux EEM48300L Dishwasher comes with a manufacturer's warranty. Please refer to the warranty card included with your appliance for specific terms and conditions. For technical support, spare parts, or service requests, please contact Electrolux customer service or your authorized dealer. Have your model number (EEM48300L) and serial number ready when contacting support.


