1. Introduction
Thank you for choosing the CO-Z Sliding Gate Opener, model KMJ-SGO-SL60. This manual provides essential information for the safe installation, operation, and maintenance of your new gate opener. Please read these instructions thoroughly before beginning installation or operation to ensure proper function and to prevent injury or damage.
This automatic sliding gate opener is designed for gates up to 1300 kg (approximately 2866 lbs) and a maximum gate width of 12 meters (approximately 39 feet). It features a powerful motor, remote control operation, and safety mechanisms like infrared sensors.
2. Safety Information
WARNING: Failure to follow these safety instructions may result in serious injury or death, and may void your warranty.
- Ensure all electrical connections are performed by a qualified electrician and comply with local codes and regulations.
- Keep children and pets away from the gate area, especially during operation.
- Do not allow children to operate the gate opener or play with remote controls.
- Regularly inspect the gate and opener for signs of wear, damage, or misalignment. Do not operate if any issues are found.
- The infrared sensor must be installed and maintained correctly to prevent the gate from closing on people or objects.
- In case of power failure, use the emergency release key to operate the gate manually.
- Do not attempt to repair or modify the gate opener yourself. Contact qualified service personnel.
- Ensure the gate is properly balanced and moves freely before installing the opener.
3. Package Contents
Verify that all components are present before beginning installation:
- Sliding Gate Opener Motor Unit
- 2 x Remote Controls
- 2 x Infrared Sensors (Photocells)
- Emergency Release Keys
- Mounting Hardware (bolts, nuts, washers)
- Gear Racks (quantity may vary, typically 8 sections)
- Instruction Manual (this document)

Image: Complete kit for the CO-Z Sliding Gate Opener, showing the main motor unit, two remote controls, two infrared sensors, and multiple sections of gear racks.
4. Specifications
| Feature | Specification |
|---|---|
| Model Number | KMJ-SGO-SL60 |
| Max. Gate Weight | 1300 kg (approx. 2866 lbs) |
| Max. Gate Width | 12 m (approx. 39 ft) |
| Power | 280 W |
| Dimensions (L x W x H) | 24 x 22 x 26 cm (approx. 9.4 x 8.7 x 10.2 inches) |
| Weight | 17.43 kg (approx. 38.4 lbs) |
| Material | Metal |
| Installation Method | Screw-in |
| Protection Index | IP54 |
| Automatic Close Timer | Adjustable (15s, 30s, 45s) |

Image: Detailed dimensions of the gate opener motor unit, indicating 26cm height, 25cm length, and 22.5cm width, with the gear extending 7.5cm.
5. Setup and Installation
Proper installation is crucial for the safe and reliable operation of your gate opener. It is recommended that installation be performed by a professional.
5.1 Pre-Installation Checks
- Ensure the gate slides smoothly and freely by hand.
- Verify the gate is structurally sound and capable of supporting the opener's weight and forces.
- Confirm the installation area is level and provides adequate space for the opener and its components.
- Plan the electrical wiring route to ensure safety and compliance with local regulations.
5.2 Mounting the Motor Unit
- Choose a stable, level mounting surface near the gate. The motor unit should be positioned so its gear aligns with the gate's gear rack.
- Securely fasten the motor unit to the mounting surface using appropriate bolts and anchors. Ensure it is firmly fixed and cannot move.

Image: The gate opener motor unit with a segment of the gear rack installed, illustrating how the rack engages with the motor's drive gear.
5.3 Installing Gear Racks
- Attach the gear racks along the bottom edge of the sliding gate. Ensure the racks are level and parallel to the ground.
- Maintain a small clearance (approx. 1-2mm) between the motor's gear and the rack to allow for smooth operation and prevent binding.
- Securely fasten each section of the gear rack to the gate.
5.4 Wiring and Electrical Connections
All electrical work must be performed by a certified electrician.
- Connect the main power supply to the motor unit according to the wiring diagram provided in the full product manual (not included here).
- Install the infrared sensors (photocells) on opposite sides of the gate opening, ensuring they are aligned and the beam is unobstructed. These sensors detect objects in the gate's path, preventing closure.
- Connect the infrared sensors to the motor unit's control board.
- Optional: Connect other safety accessories such as warning lights or additional safety edges.
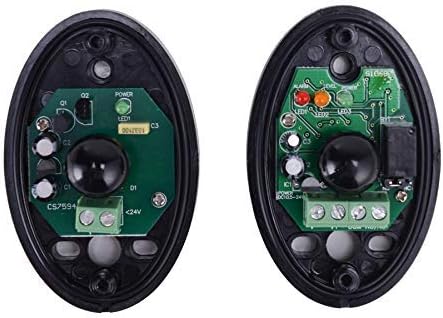
Image: Internal components of the infrared safety sensors, displaying the circuit board, LED indicators, and wiring terminals for connection to the gate opener.
5.5 Programming Remote Controls
Refer to the detailed programming instructions in the full product manual for pairing remote controls with the gate opener. Typically, this involves pressing a programming button on the control board and then a button on the remote control.

Image: Two remote controls for operating the CO-Z sliding gate opener, each featuring multiple buttons for various functions.
6. Operating Instructions
6.1 Remote Control Operation
- Press the designated button on your remote control to open or close the gate.
- Pressing the button again during operation will stop the gate. A third press will reverse its direction.

Image: A hand holding a remote control, operating a large sliding gate, with the CO-Z gate opener unit positioned at the bottom of the gate.
6.2 Automatic Closing Function
The gate opener can be set to close automatically after a preset time (15s, 30s, or 45s). This feature is configured during installation or through the control board settings.
6.3 Infrared Sensor Safety
The infrared sensors detect obstructions in the gate's path. If the beam is broken while the gate is closing, the gate will stop and reverse direction to prevent impact.
6.4 Manual Operation (Emergency Release)
In case of power failure or malfunction, the gate can be operated manually:
- Locate the emergency release lock on the motor unit.
- Insert the emergency release key and turn it to disengage the motor.
- The gate can now be pushed open or closed by hand.
- To re-engage the motor, turn the key back to its original position and remove it.
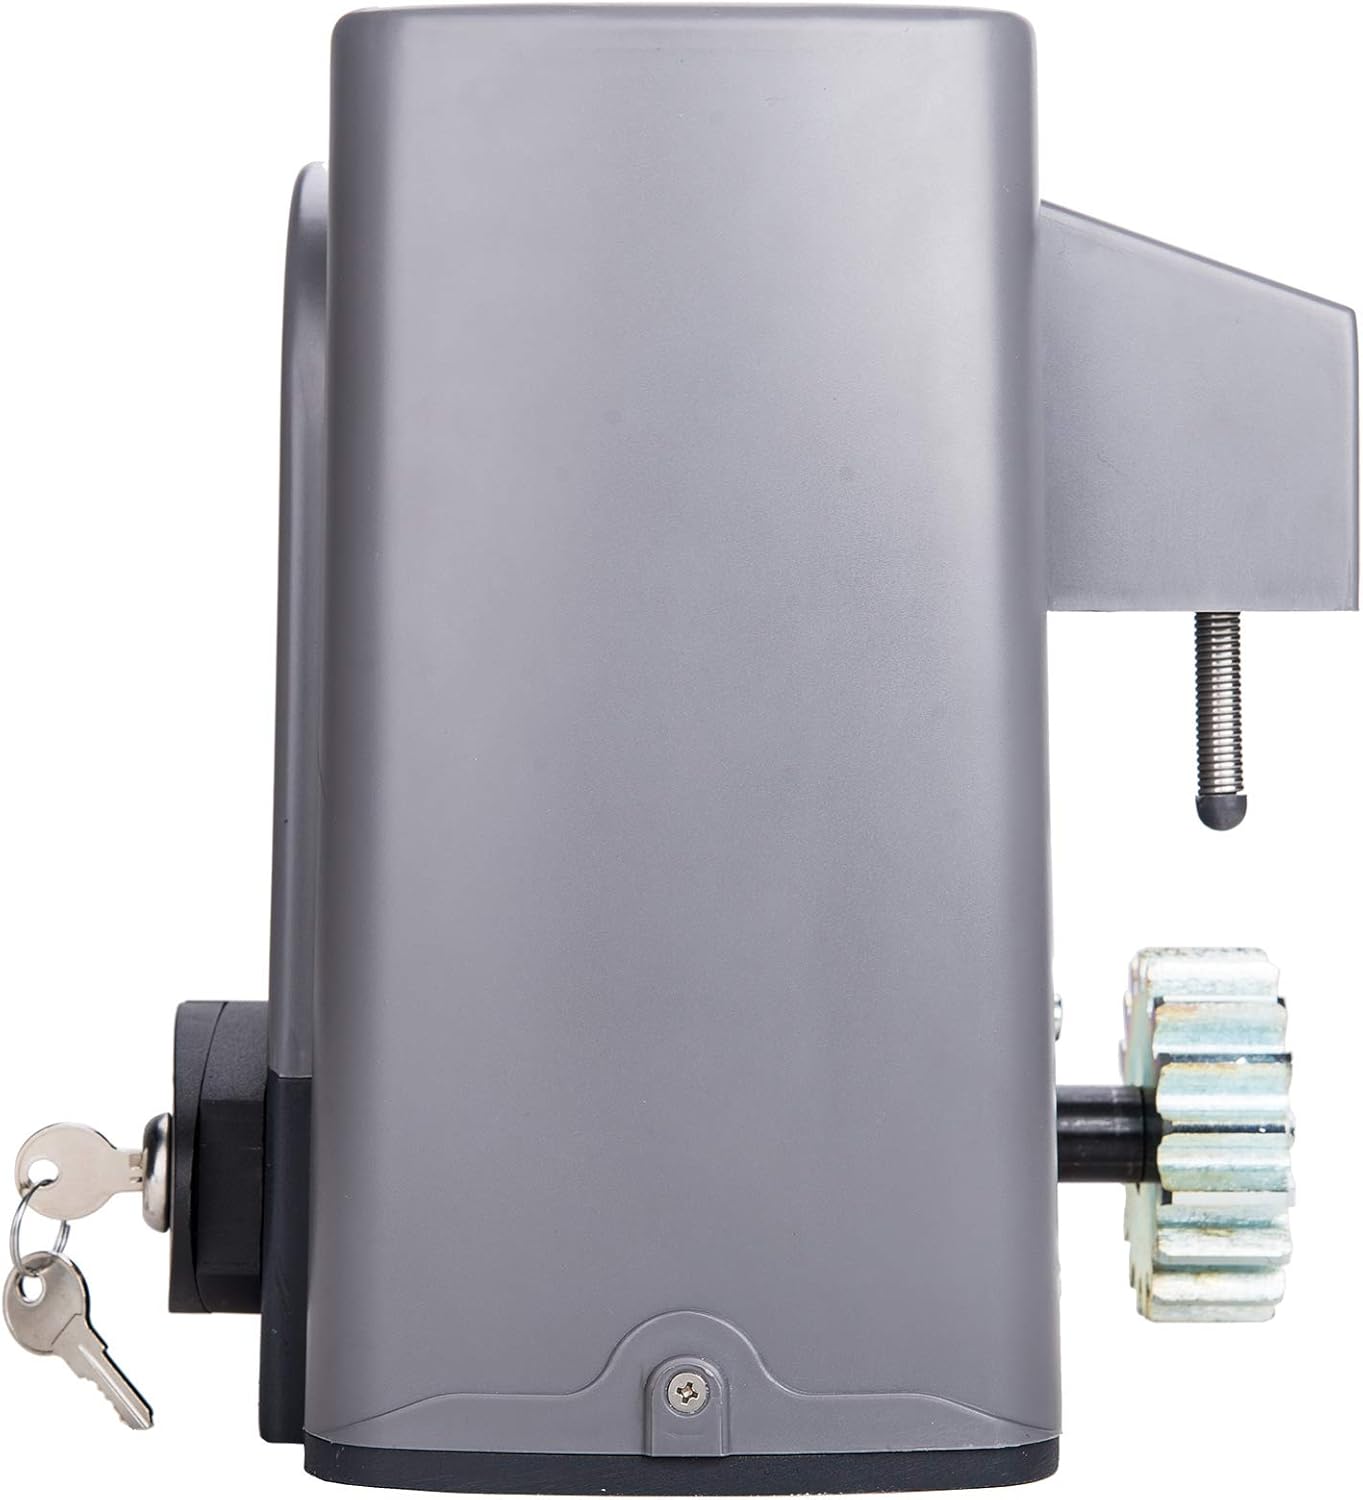
Image: Side view of the gate opener motor unit, highlighting the manual release mechanism with keys inserted, allowing for manual gate operation during power outages.
7. Maintenance
Regular maintenance ensures the longevity and safe operation of your CO-Z Sliding Gate Opener.
- Monthly: Inspect the gate's movement. Ensure it slides freely without excessive friction. Check for any loose bolts or connections on the motor unit and gear racks.
- Quarterly: Clean the infrared sensors to ensure an unobstructed beam. Check the condition of the gear rack teeth for wear or damage. Lubricate moving parts of the gate (e.g., rollers, hinges) as recommended by the gate manufacturer.
- Annually: Have a qualified technician inspect the entire system, including electrical connections, motor performance, and safety features.
- Keep the area around the gate opener clear of debris, vegetation, and obstructions.
8. Troubleshooting
This section addresses common issues you might encounter. For more complex problems, consult a qualified technician.
| Problem | Possible Cause | Solution |
|---|---|---|
| Gate does not respond to remote control. |
|
|
| Gate opens but does not close. |
|
|
| Gate stops or reverses unexpectedly. |
|
|
| Motor makes noise but gate does not move. |
|
|
9. Warranty and Support
CO-Z products are designed for durability and performance. For warranty information, technical support, or to purchase replacement parts, please refer to the contact information provided with your purchase or visit the official CO-Z website.
Please have your model number (KMJ-SGO-SL60) and purchase date ready when contacting support.


