Introduction
The RYOBI Multi-Surface Laser Level (Model ELL1750) is an innovative tool designed for various leveling projects. It offers multiple attachment methods and features a 90-degree protractor for accurate angle measurements, ensuring precision and convenience for both DIY enthusiasts and professionals.
Safety Information
WARNING: This product emits a laser. Avoid direct eye exposure to the laser beam. Do not stare into the beam. Always operate the device in a safe manner, away from children and unauthorized personnel. Follow all local safety regulations.
- Do not attempt to modify or disassemble the laser level.
- Store the device in a safe place when not in use.
- Ensure the work area is clear of obstructions and potential hazards.
Package Contents
- RYOBI Multi Surface Laser Level (ELL1750)
- 2 AAA batteries (included)
- Wall attachment accessories (suction cups, pins, magnets)
- 90-degree protractor attachment
- Instruction Manual
Note: This item is bulk packaged and may arrive in a generic box.
Product Features
- Multi-Surface Attachment: Equipped with three methods for hands-free leveling: suction cups for smooth surfaces, pins for textured surfaces, and magnets for metal surfaces.
- 90-Degree Protractor: Integrated protractor allows for accurate leveling of items with an angle.
- Horizontal and Vertical Bubble Vials: Ensures precise leveling for all applications.
- 20 ft. Laser Range: Projects a clear laser line up to 20 feet for various project sizes.
- Compact Design: Lightweight and easy to handle for both DIY and professional tasks.
Setup
1. Battery Installation
- Locate the battery compartment cover on the device.
- Open the cover and insert 2 AAA batteries, ensuring correct polarity (+/-).
- Close the battery compartment cover securely.
2. Attaching the Protractor
Align the 90-degree protractor attachment with the designated slots on the laser level and secure it firmly. This allows for precise angle measurements.
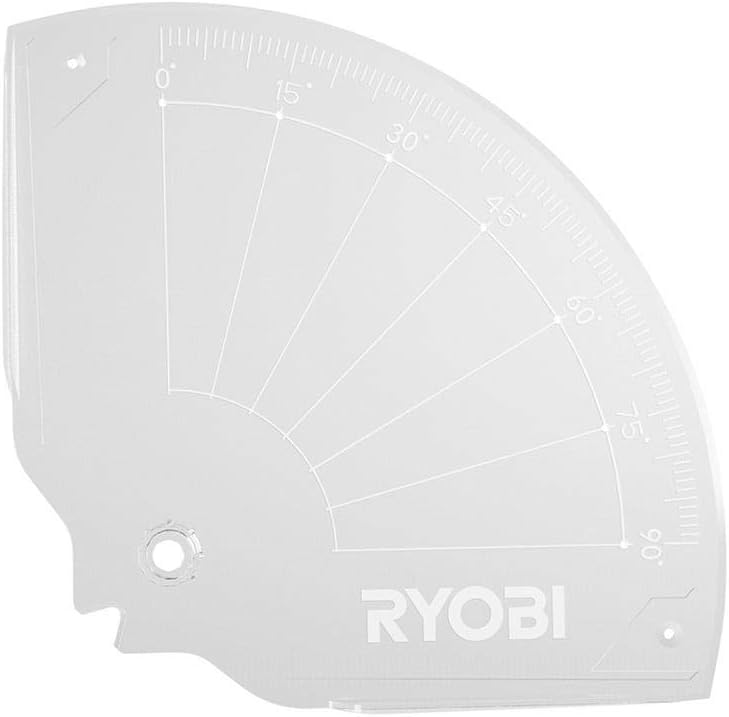
Image: The RYOBI Multi Surface Level with its clear 90-degree protractor attachment, showing angle markings.
Operating Instructions
1. Powering On/Off
Press the power button located on the device to turn the laser level on or off. The laser line will project once powered on.

Image: Top-down view of the RYOBI Multi Surface Level, highlighting the power button and the horizontal and vertical bubble vials.
2. Attachment Methods for Hands-Free Leveling
The RYOBI Multi Surface Level offers versatile attachment options:
- Suction Cups: For smooth, non-porous surfaces like glass, tiles, or painted drywall. Press the suction cups firmly against the surface until they adhere.
- Pins: For textured surfaces or wallpapers where suction cups may not hold. Gently push the pins into the surface to secure the device.
- Magnets: For attaching to metal surfaces such as steel beams, metal shelving, or appliance sides. The strong magnets will hold the level in place.

Image: Underside view of the RYOBI Multi Surface Level, showing the suction cups and magnetic base for various attachment options.
3. Achieving Level Lines
- Attach the laser level to your desired surface using one of the methods described above.
- Adjust the device until the bubble in the horizontal or vertical vial is centered, indicating a level or plumb position.
- The projected laser line will provide an accurate reference for your task.

Image: A woman using the RYOBI Multi Surface Level, attached to a wall with suction cups, to project a horizontal laser line for marking. The level is positioned on a staircase wall.

Image: The RYOBI Multi Surface Level positioned in a corner on a floor, projecting cross laser lines to assist with tile alignment during installation.
Maintenance
- Keep the laser lens clean and free of dust or debris. Use a soft, dry cloth for cleaning.
- Store the device in a cool, dry place when not in use.
- Remove batteries if the device will not be used for an extended period to prevent leakage.
- Regularly check the battery compartment for corrosion.
Troubleshooting
- Laser not turning on: Check battery installation and ensure batteries are not depleted. Replace if necessary.
- Laser line is dim or flickering: Replace batteries. Ensure the laser lens is clean.
- Device not adhering to surface: For suction cups, ensure the surface is clean, smooth, and non-porous. For pins, ensure they are fully inserted. For magnets, ensure the surface is ferrous metal.
- Inaccurate readings: Ensure the device is properly leveled using the bubble vials. Avoid extreme temperatures or vibrations during use.
Specifications
| Brand | RYOBI |
| Model Number | ELL1750 |
| Laser Range | 20 ft. |
| Power Source | 2 AAA batteries (included) |
| Material | Metal |
| Color | Black (device is primarily green/yellow) |
| Item Weight | 331 g |
| Operation Mode | Manual |
Official Product Videos
Portable Laser Level by VNW-Tools
Video: This video demonstrates the unboxing, setup, and various uses of a portable laser level, including its tripod compatibility, illuminated vials, and projection of horizontal and cross lines. It also shows magnetic attachment to metal surfaces.
Warranty and Support
For warranty information, technical support, or service inquiries, please refer to the manufacturer's official website or contact their customer service department. Keep your purchase receipt for warranty claims.