
SWORDFISH 64963
Swordfish 64963 M6.3-1.81 x 20mm Hex Head Tapping Screw Instruction Manual
Model: 64963
1. Product Overview
This manual provides instructions for the Swordfish 64963 Hex Head Tapping Screws. These screws are designed for automotive applications, specifically as replacements for Sems screws in Honda, Nissan, and Toyota vehicles.
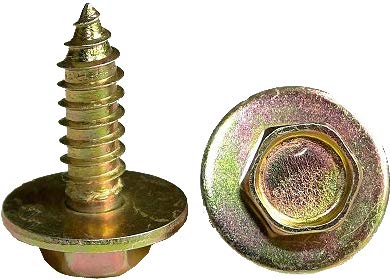
Image 1.1: A close-up view of the Swordfish 64963 Hex Head Tapping Screw. The image shows the screw from two angles: a side profile highlighting the tapping threads and the integrated washer, and a top-down view of the hex head with the loose washer. The screw has a yellow zinc finish.
Key Features:
- Yellow Zinc Finish Indented Hex Head Screw
- M6.3-1.81 x 20mm (#14 x 25/32") dimensions
- 18mm (45/64") Loose Washer O.D.
- 10mm Hex head size
- Direct replacement for Honda, Nissan, Toyota Sems Screws
2. Specifications
| Specification | Detail |
|---|---|
| Item Model Number | 64963 |
| Material | Zinc |
| Head Style | Hex |
| Exterior Finish | Yellow Zinc |
| Thread Size | M6.3-1.81 (#14) |
| Length | 20mm (25/32") |
| Washer O.D. | 18mm (45/64") |
| Hex Size | 10mm |
| Manufacturer | Swordfish Tools Inc |
3. Installation and Setup
These screws are designed for specific automotive applications. Ensure compatibility with your vehicle's make and model (Honda, Nissan, Toyota) before installation.
3.1 Required Tools
- 10mm Hex Socket or Wrench
- Appropriate driver (e.g., ratchet, impact driver)
- Safety glasses (recommended)
3.2 Installation Steps
- Identify Fastener Location: Locate the existing Sems screw or the designated mounting point where the new screw will be installed on your Honda, Nissan, or Toyota vehicle.
- Remove Old Fastener (if applicable): If replacing an existing screw, use the appropriate tool to carefully remove it.
- Position New Screw: Place the Swordfish 64963 screw into the designated hole. The integrated loose washer should sit flush against the surface.
- Tighten Screw: Using a 10mm hex socket or wrench, carefully tighten the screw. Apply firm, even pressure. Avoid overtightening, which can strip threads or damage the surrounding material.
- Verify Secure Fit: After tightening, ensure the screw is securely fastened and the component is held firmly in place.
Caution:
- Always wear safety glasses during installation.
- Do not use excessive force when tightening to prevent damage to the screw or vehicle components.
- Ensure the screw length and thread type are appropriate for the application to avoid damage to underlying structures.
4. Usage
The Swordfish 64963 Hex Head Tapping Screws are intended for securing various automotive body and trim components. Their design, including the tapping threads and integrated loose washer, provides a secure and stable fastening solution.
Typical Applications:
- Fender liners
- Splash guards
- Underbody panels
- Interior trim pieces
- Other non-structural components requiring a Sems screw replacement
These screws are designed for a secure fit in pre-drilled or self-tapping applications where a hex head and integrated washer are required.
5. Maintenance
These screws are designed for durability and require minimal maintenance once installed correctly.
- Periodic Inspection: Periodically check the fastened components to ensure the screws remain tight. Vibrations from vehicle operation can sometimes loosen fasteners over time.
- Corrosion Resistance: The yellow zinc finish provides a degree of corrosion resistance. However, in harsh environments (e.g., road salt, extreme moisture), inspect for signs of rust or degradation. Replace any corroded screws to maintain structural integrity.
- Cleaning: If cleaning the vehicle, ensure no harsh chemicals come into prolonged contact with the screws, as this could affect the zinc coating.
6. Troubleshooting
This section addresses common issues that may arise during or after installation.
6.1 Screw Not Tightening
- Cause: Stripped threads in the mounting hole or on the screw itself.
- Solution: Remove the screw and inspect both the screw threads and the receiving hole. If the hole is stripped, a larger diameter screw or a thread repair solution may be necessary. If the screw is stripped, replace it with a new one.
6.2 Component Remains Loose
- Cause: Screw not fully tightened, incorrect screw size for the application, or damaged mounting point.
- Solution: Re-tighten the screw carefully. Verify that the screw length and diameter are appropriate for the component and mounting hole. Inspect the component and mounting point for any damage that prevents a secure fit.
6.3 Screw Head Damage During Installation
- Cause: Using an incorrect size hex socket/wrench, or applying excessive torque.
- Solution: Ensure you are using a 10mm hex socket or wrench that fits snugly. Apply torque gradually and avoid power tools on high settings without proper control. If the head is damaged, it may need to be extracted and replaced.
7. Warranty and Support
For specific warranty information or technical support regarding Swordfish products, please contact Swordfish Tools Inc. directly.
Manufacturer: Swordfish Tools Inc.
Refer to the original purchase documentation or the manufacturer's official website for the most current warranty terms and contact details.
Online Resources:
- Visit the SWORDFISH Store on Amazon for product information and other offerings.
Ask a question about this manual
Ask about setup, troubleshooting, compatibility, parts, safety, or missing instructions. Manuals+ will review the question and use this page’s manual context to help answer it.