
1. Introduction
Thank you for choosing the Rabalux 2106 Willie LED Ceiling Lamp. This modern ceiling lamp features integrated LED lighting with dimmable functionality, adjustable color temperature (CCT), RGB color options, and a timer function, all controllable via a remote control. This manual provides essential information for safe installation, operation, and maintenance of your new lighting fixture.
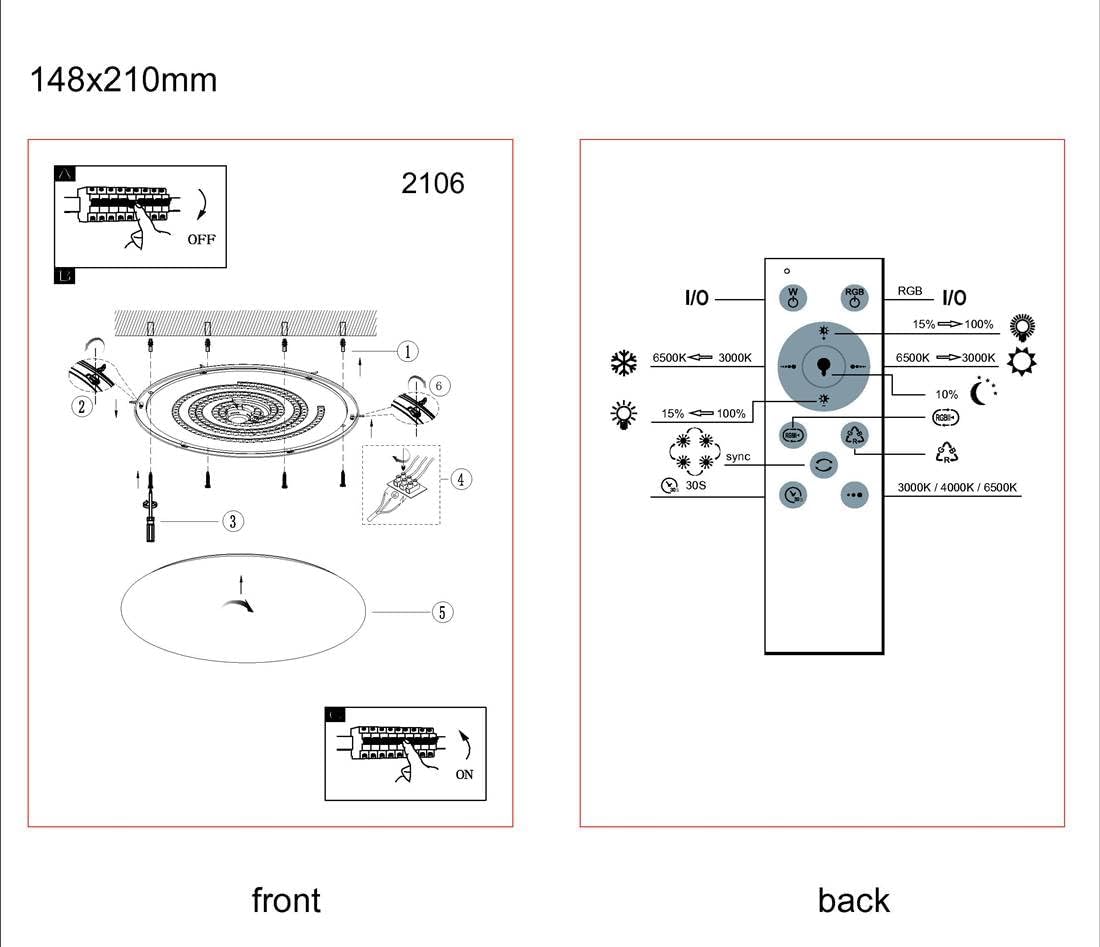
Image 1.1: The Rabalux 2106 Willie LED Ceiling Lamp installed in a modern living room, showcasing its subtle integration into the decor.
2. Safety Instructions
Please read and follow these safety instructions carefully to prevent accidents and ensure proper operation:
- Electrical Safety: Installation must be performed by a qualified electrician or a person with appropriate electrical knowledge, in accordance with local wiring regulations.
- Power Disconnection: Always disconnect the main power supply before installation, maintenance, or cleaning. Ensure the power is off at the circuit breaker.
- Voltage: Ensure the supply voltage matches the requirements specified on the product label.
- Mounting: Mount the lamp securely to a stable ceiling surface capable of supporting its weight.
- Environment: This lamp is designed for indoor use only (IP20 rating). Do not expose it to moisture or extreme temperatures.
- LED Source: The LED light source is integrated and cannot be replaced by the user. Do not attempt to open or modify the LED module.
- Cleaning: Clean the lamp only with a soft, dry cloth. Do not use abrasive cleaners or solvents.
- Children: Keep packaging materials and small parts away from children.
3. Package Contents
Verify that all components are present before beginning installation:
- Rabalux 2106 Willie LED Ceiling Lamp (1 unit)
- Remote Control (1 unit)
- Mounting Hardware (screws, wall plugs)
- Instruction Manual (this document)
Note: Batteries for the remote control may not be included. Please check the remote control compartment.
4. Installation
Follow these steps for proper installation. Refer to the diagram for visual guidance.
- Prepare for Installation:
- Ensure the main power supply to the installation area is switched off at the circuit breaker.
- Unpack all components and inspect for any damage.
- Mounting the Base:
- Mark the desired mounting position on the ceiling.
- Drill holes for the mounting screws, ensuring they are appropriate for the provided wall plugs.
- Secure the lamp's mounting bracket or base to the ceiling using the provided screws and wall plugs.
- Electrical Connection:
- Connect the household electrical wires to the terminal block on the lamp's base. Ensure correct polarity (Live, Neutral, Earth).
- Double-check all connections for security and proper insulation.
- Attaching the Lamp Body:
- Carefully attach the main body of the lamp to the mounted base, following the specific locking or screwing mechanism.
- Ensure the lamp is firmly secured and flush with the ceiling.
- Final Check:
- Once installation is complete, restore power at the circuit breaker.
- Test the lamp's functionality with the remote control.

Image 4.1: Detailed installation diagram showing components and wiring connections for the ceiling lamp.
5. Operating Instructions
The Rabalux 2106 Willie LED Ceiling Lamp is controlled via the included remote control. Ensure batteries are correctly inserted into the remote control.
5.1 Remote Control Functions

Image 5.1: The remote control for the Rabalux 2106 Willie LED Ceiling Lamp, showing various buttons for light control.
- Power On/Off (W / RGB buttons): Press the 'W' button to turn on white light, or 'RGB' to turn on RGB color mode. Press either button again to turn off.
- Brightness Adjustment (Sun +/- buttons): Increase or decrease the light intensity.
- Color Temperature (CCT) Adjustment (6500K <-> 3000K buttons): Adjust the white light from warm white (3000K) to natural white (4000K) to cool white (6500K).
- RGB Color Selection: In RGB mode, use the dedicated RGB buttons to cycle through various colors or select specific color presets.
- Timer Function (Clock button): Activate the timer function to automatically turn off the lamp after a set period (e.g., 30 minutes). Refer to the remote control diagram for specific timer options.
- Night Light Mode (Moon button): Activates a low-brightness setting suitable for a night light.
- Memory Function: The lamp typically remembers the last setting used when turned off and on again.
For detailed button functions, refer to the remote control diagram provided in the installation instructions (Image 4.1, right side).
6. Maintenance
Regular maintenance ensures the longevity and optimal performance of your lamp.
- Cleaning:
- Before cleaning, ensure the lamp is switched off and cooled down.
- Wipe the lamp's surface with a soft, dry, or slightly damp cloth.
- Do not use harsh chemicals, abrasive cleaners, or solvents, as these can damage the finish or plastic components.
- LED Source: The integrated LED light source is designed for a long lifespan and does not require replacement. Do not attempt to disassemble the lamp to access the LEDs.
7. Troubleshooting
If you encounter issues with your Rabalux 2106 Willie LED Ceiling Lamp, refer to the following common problems and solutions:
| Problem | Possible Cause | Solution |
|---|---|---|
| Lamp does not turn on. | No power supply; loose wiring; remote control battery depleted. | Check circuit breaker. Verify wiring connections (ensure power is off first). Replace remote control batteries. |
| Remote control not working. | Batteries depleted or incorrectly inserted; remote not paired (if applicable); obstruction. | Replace batteries, ensuring correct polarity. Ensure clear line of sight to the lamp. Refer to pairing instructions if necessary (usually automatic). |
| Light flickers or dims unexpectedly. | Unstable power supply; loose connection; incompatible dimmer switch (if not using remote). | Check power supply stability. Verify wiring connections. Ensure only the provided remote control is used for dimming. |
| Color temperature or RGB not changing. | Incorrect remote mode; remote control issue. | Ensure you are in the correct mode (e.g., RGB mode for color changes). Check remote control batteries. |
If the problem persists after attempting these solutions, please contact customer support.
8. Specifications
| Feature | Detail |
|---|---|
| Model | 2106 Willie |
| Brand | Rabalux |
| Type | LED Ceiling Lamp |
| Material | Metal (housing), Plastic (shade) |
| Color | White |
| Dimensions | Diameter: 750 mm |
| Light Source | Integrated LED |
| Power Consumption | 60 W |
| Luminous Flux | 4800 Lumens |
| Color Temperature | 3000K - 6500K (Adjustable) |
| Dimmable | Yes |
| RGB Function | Yes |
| Timer Function | Yes |
| Control Method | Remote Control |
| Protection Rating | IP20 |
| Energy Class (EU) | G (as per 2019/2015 regulation) |

Image 8.1: EU Energy Label indicating the energy efficiency class and integrated LED nature of the luminaire.
9. Warranty and Support
Rabalux products are manufactured to high-quality standards. For warranty information, please refer to the terms and conditions provided at the point of purchase or contact your local Rabalux distributor.
For technical support or inquiries, please visit the official Rabalux website or contact their customer service department. Please have your model number (2106 Willie) and purchase details ready when contacting support.
This manual is subject to change without prior notice. Please refer to the latest version available on the manufacturer's website.


