
1. Introduction
This manual provides comprehensive instructions for the safe and efficient use of your Wiltec Multi-Stage Centrifugal Pump, Model 51547. This powerful pump is designed for optimal clear water supply in domestic and garden applications, including household water systems, garden irrigation, and rainwater harvesting. With a robust 2200W motor, it delivers up to 9000 liters of clear water per hour, featuring a discharge head of 105 meters and a suction height of 9 meters. The bipolar induction motor operates at 2850 RPM and includes thermal protection against overheating. Constructed from high-quality stainless steel, cast iron, and aluminum, this pump ensures stability and durability.
2. Safety Instructions
Read all safety warnings and instructions carefully before installation and operation. Failure to follow these instructions may result in electric shock, fire, and/or serious injury.
- Electrical Safety: Ensure the power supply matches the pump's specifications (230V, 50Hz). Always connect the pump to a properly grounded outlet. Do not operate the pump with a damaged power cord or plug.
- Water Safety: This pump is designed for clear water only. Do not use it for flammable, corrosive, or explosive liquids. Ensure the pump is not submerged unless specifically designed for submersible use (this model is not).
- Installation: Install the pump on a stable, level surface. Ensure adequate ventilation. Keep children and unauthorized persons away from the operating pump.
- Maintenance: Disconnect the power supply before performing any maintenance or cleaning.
- Thermal Protection: The pump is equipped with thermal protection. If the pump overheats, it will automatically shut off. Allow it to cool down before restarting and investigate the cause of overheating.
- Operating Environment: Protect the pump from frost and direct sunlight.
3. Product Overview
Familiarize yourself with the components of your Wiltec Multi-Stage Centrifugal Pump.

Figure 3.1: Main view of the Wiltec Multi-Stage Centrifugal Pump, showcasing its yellow motor housing, stainless steel pump body, and robust cast iron base.

Figure 3.2: Side view of the pump, highlighting the inlet and outlet ports, and the sturdy construction materials.
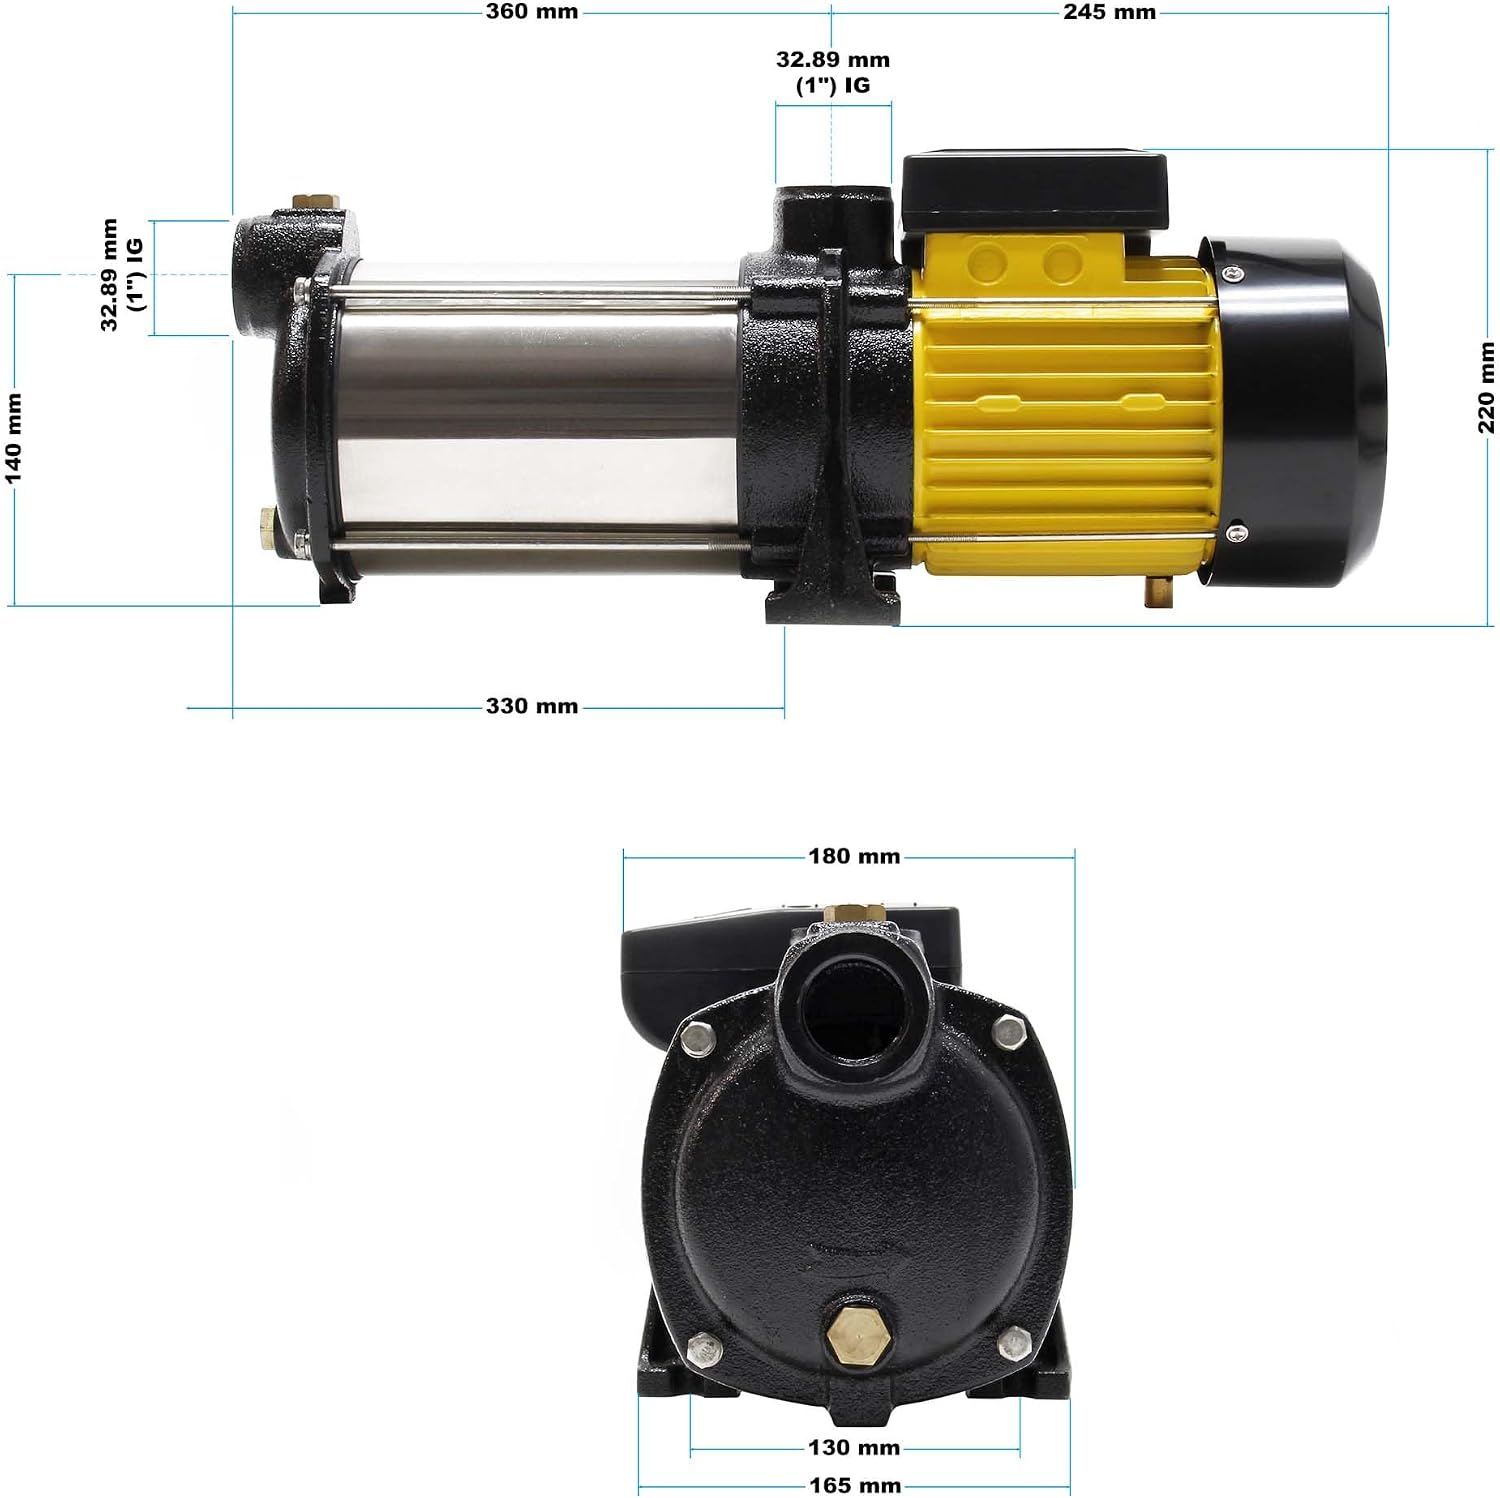
Figure 3.3: Technical drawing illustrating the pump's dimensions, including length, height, and connection sizes (1" IG).

Figure 3.4: Rear view of the pump, showing the motor's cooling fins and the attached power cord with a standard European plug.

Figure 3.5: Performance curve for the HMC-10SC model, showing the relationship between flow rate (L/min) and head (m).

Figure 3.6: Front view of the pump, showing the inlet connection and the robust cast iron casing.
4. Technical Specifications
| Feature | Specification |
|---|---|
| Brand | WilTec |
| Model Number | 51547 |
| Power | 2200 W |
| Max Flow Rate | 9000 L/H (150 L/min) |
| Max Discharge Head | 105 m |
| Max Suction Height | 9 m |
| Motor Speed | 2850 RPM |
| Voltage | 230 V |
| Material | Cast Iron, Stainless Steel, Aluminum |
| Dimensions (L x W x H) | 60.5 x 18 x 22 cm |
| Weight | 21 kg |
| Power Source | Electric Cable |
5. Setup and Installation
- Placement: Position the pump on a firm, level, and dry surface. Ensure it is protected from weather elements (rain, frost, direct sun) and has adequate ventilation.
- Suction Line Connection:
- Connect a suction hose (minimum 1-inch diameter) to the pump's inlet port.
- Ensure the suction line is airtight to prevent air ingress, which can cause priming issues.
- For optimal performance, keep the suction line as short and straight as possible.
- Install a foot valve with a filter at the end of the suction line in the water source to prevent debris from entering the pump and to maintain prime.
- Discharge Line Connection:
- Connect the discharge hose or pipe to the pump's outlet port.
- Use appropriate fittings and sealants to ensure a watertight connection.
- Priming the Pump:
- Before initial operation, the pump housing must be filled completely with water through the designated filling port (usually on top of the pump body).
- Open any valves in the discharge line to allow air to escape during priming.
- Once filled, close the filling port securely.
- Electrical Connection:
- Connect the pump's power plug to a grounded electrical outlet (230V, 50Hz).
- Ensure the electrical circuit is protected by a residual current device (RCD) for safety.
6. Operating Instructions
- Pre-Operation Check:
- Verify all connections are secure and watertight.
- Ensure the pump housing is filled with water (primed).
- Confirm the water source is sufficient.
- Starting the Pump:
- Plug in the pump. The pump will start immediately.
- Observe the pump for any unusual noises or vibrations.
- Allow the pump to run for a few minutes to ensure stable water flow and proper operation.
- During Operation:
- Monitor the water flow and pressure.
- Avoid running the pump dry, as this can cause severe damage.
- If the pump stops unexpectedly, refer to the Troubleshooting section.
- Stopping the Pump:
- Unplug the pump from the power outlet.
- If the pump is part of a larger system, close any relevant valves.
7. Maintenance
Regular maintenance ensures the longevity and optimal performance of your pump.
- Before any maintenance, always disconnect the pump from the power supply.
- Cleaning: Periodically clean the exterior of the pump. Do not use harsh chemicals.
- Foot Valve Filter: Regularly check and clean the filter on the foot valve in the suction line to prevent blockages and maintain efficient suction.
- Frost Protection: During winter or periods of frost, drain all water from the pump and hoses to prevent damage from freezing. Store the pump in a frost-free environment.
- Seals and Connections: Periodically inspect all seals and connections for leaks. Replace worn seals as necessary.
- Storage: If storing the pump for an extended period, ensure it is clean, dry, and stored in a protected, frost-free location.
8. Troubleshooting
This section addresses common issues you might encounter with your pump.
| Problem | Possible Cause | Solution |
|---|---|---|
| Pump does not start | No power supply; Thermal overload activated; Motor seized. | Check power connection and circuit breaker. Allow pump to cool down. Contact qualified service personnel if motor is seized. |
| Pump runs but no water is delivered | Pump not primed; Air leak in suction line; Suction height too high; Foot valve clogged; Water source empty. | Prime the pump. Check suction line for leaks. Ensure suction height is within limits (max 9m). Clean foot valve filter. Check water level in source. |
| Low water pressure/flow | Partial blockage in suction/discharge line; Air in system; Worn impeller; Suction height too high. | Check for blockages. Re-prime the pump. Contact service for impeller inspection. Ensure suction height is appropriate. |
| Pump is noisy | Air in pump/suction line; Cavitation; Bearings worn. | Re-prime the pump. Ensure adequate water supply to prevent cavitation. Contact service for bearing inspection. |
| Pump leaks | Loose connections; Damaged seals. | Tighten all connections. Replace damaged seals. |
9. Warranty and Support
Wiltec products are manufactured with high-quality materials and undergo strict quality control. This product typically comes with a 2-year warranty from the date of purchase, covering manufacturing defects. Please retain your proof of purchase for warranty claims.
For technical support, spare parts, or warranty inquiries, please contact Wiltec customer service. You can find contact information on the official Wiltec website or through your retailer.
Wiltec Wildanger Technik GmbH
www.wiltec.de
