Introduction
Welcome to the user manual for your YunLone ToyZoom Kids Digital Camera. This camera is designed to be a fun and educational tool for children, allowing them to capture their world through photos and videos. Featuring a 2.4-inch LCD screen, 24MP photo resolution, and 1080P HD video recording, it's equipped with a dual lens for both front-facing shots and selfies. Its durable, child-safe silicone material ensures it can withstand active play, making it an ideal companion for young photographers.

Figure 1: YunLone ToyZoom Kids Digital Camera and accessories.
Package Contents
Please check the package to ensure all items are present:
- YunLone ToyZoom Kids Digital Camera
- Rechargeable Battery (pre-installed or separate)
- 32GB MicroSD Card
- USB Cable
- Lanyard
- Cartoon Stickers
- User Manual (this document)
Product Overview
Familiarize yourself with the camera's components and controls.
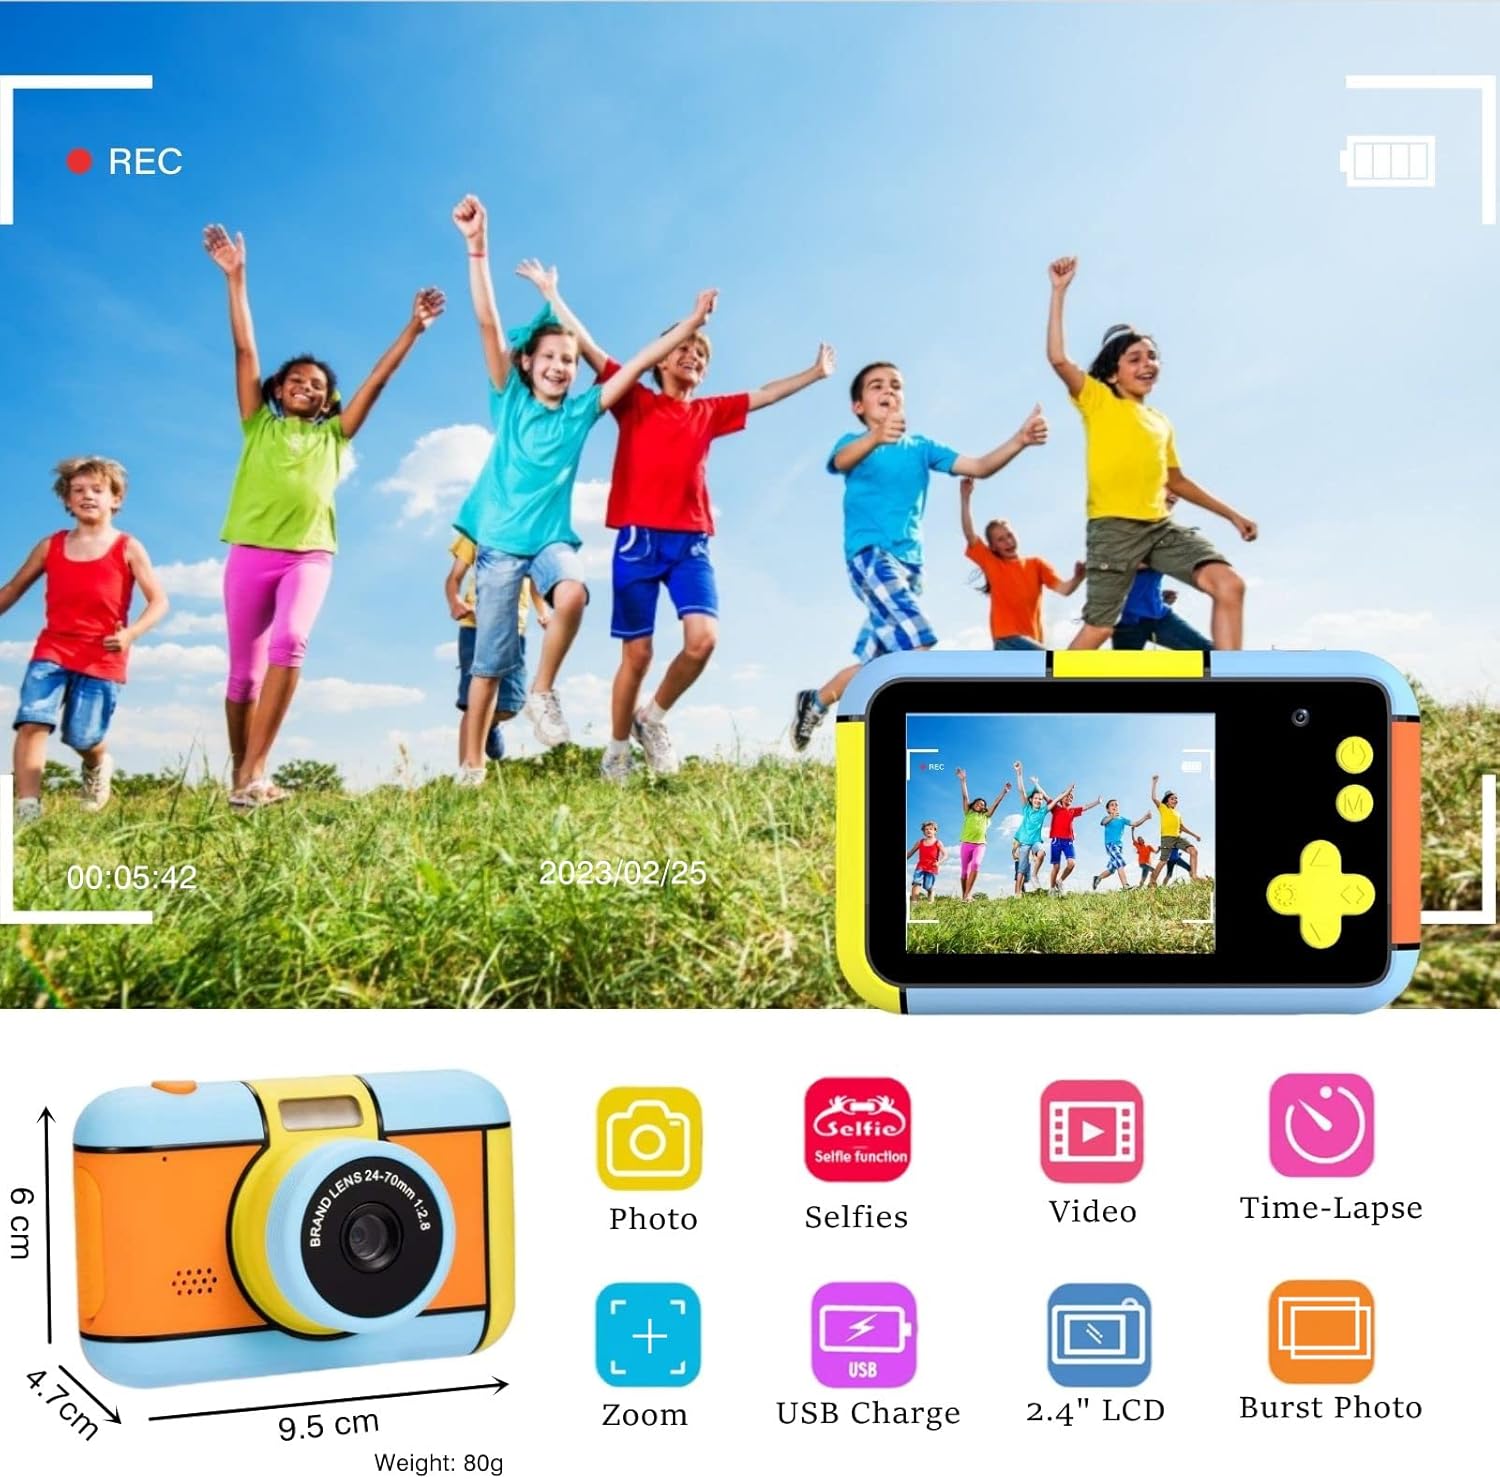
Figure 2: Camera features and dimensions. The camera measures approximately 9.5 cm in length, 6 cm in height, and 4.7 cm in depth, weighing 80g.

Figure 3: Side view showing the MicroSD card slot and USB port, and the 2.4-inch HD LCD screen.
Key Components:
- Front Lens: For standard photo and video capture.
- Rear Lens: For selfie mode.
- 2.4-inch HD LCD Screen: For viewing photos, videos, and navigating menus.
- Power Button: To turn the camera on or off.
- Shutter/OK Button: To take photos, start/stop video recording, or confirm selections.
- Navigation Buttons (Up, Down, Left, Right): For menu navigation and zoom control.
- Menu Button: To access camera settings and modes.
- Playback Button: To review captured photos and videos.
- MicroSD Card Slot: For inserting the memory card.
- USB Port: For charging and connecting to a computer.
Setup
1. Charging the Camera
Before first use, fully charge the camera. Connect the provided USB cable to the camera's USB port and the other end to a USB power adapter (not included) or a computer's USB port. The charging indicator light will show the charging status. A full charge typically takes a few hours.
2. Inserting the MicroSD Card
The camera requires a MicroSD card to store photos and videos. Locate the MicroSD card slot on the side of the camera (refer to Figure 3). Gently insert the 32GB MicroSD card into the slot until it clicks into place. Ensure the card is inserted in the correct orientation.
3. Powering On/Off
To turn on the camera, press and hold the Power button for a few seconds. The LCD screen will light up. To turn off the camera, press and hold the Power button again until the screen shuts down.
Operating Instructions
1. Taking Photos
- Turn on the camera.
- Ensure the camera is in photo mode (usually the default upon startup). If not, navigate to photo mode using the menu buttons.
- Frame your shot using the LCD screen.
- Press the Shutter/OK button to take a picture.
2. Recording Videos
- Turn on the camera.
- Navigate to video recording mode using the menu buttons.
- Press the Shutter/OK button once to start recording. A red recording indicator will appear on the screen.
- Press the Shutter/OK button again to stop recording.
3. Selfie Mode (Dual Lens)
This camera features a dual lens, allowing for easy selfies.
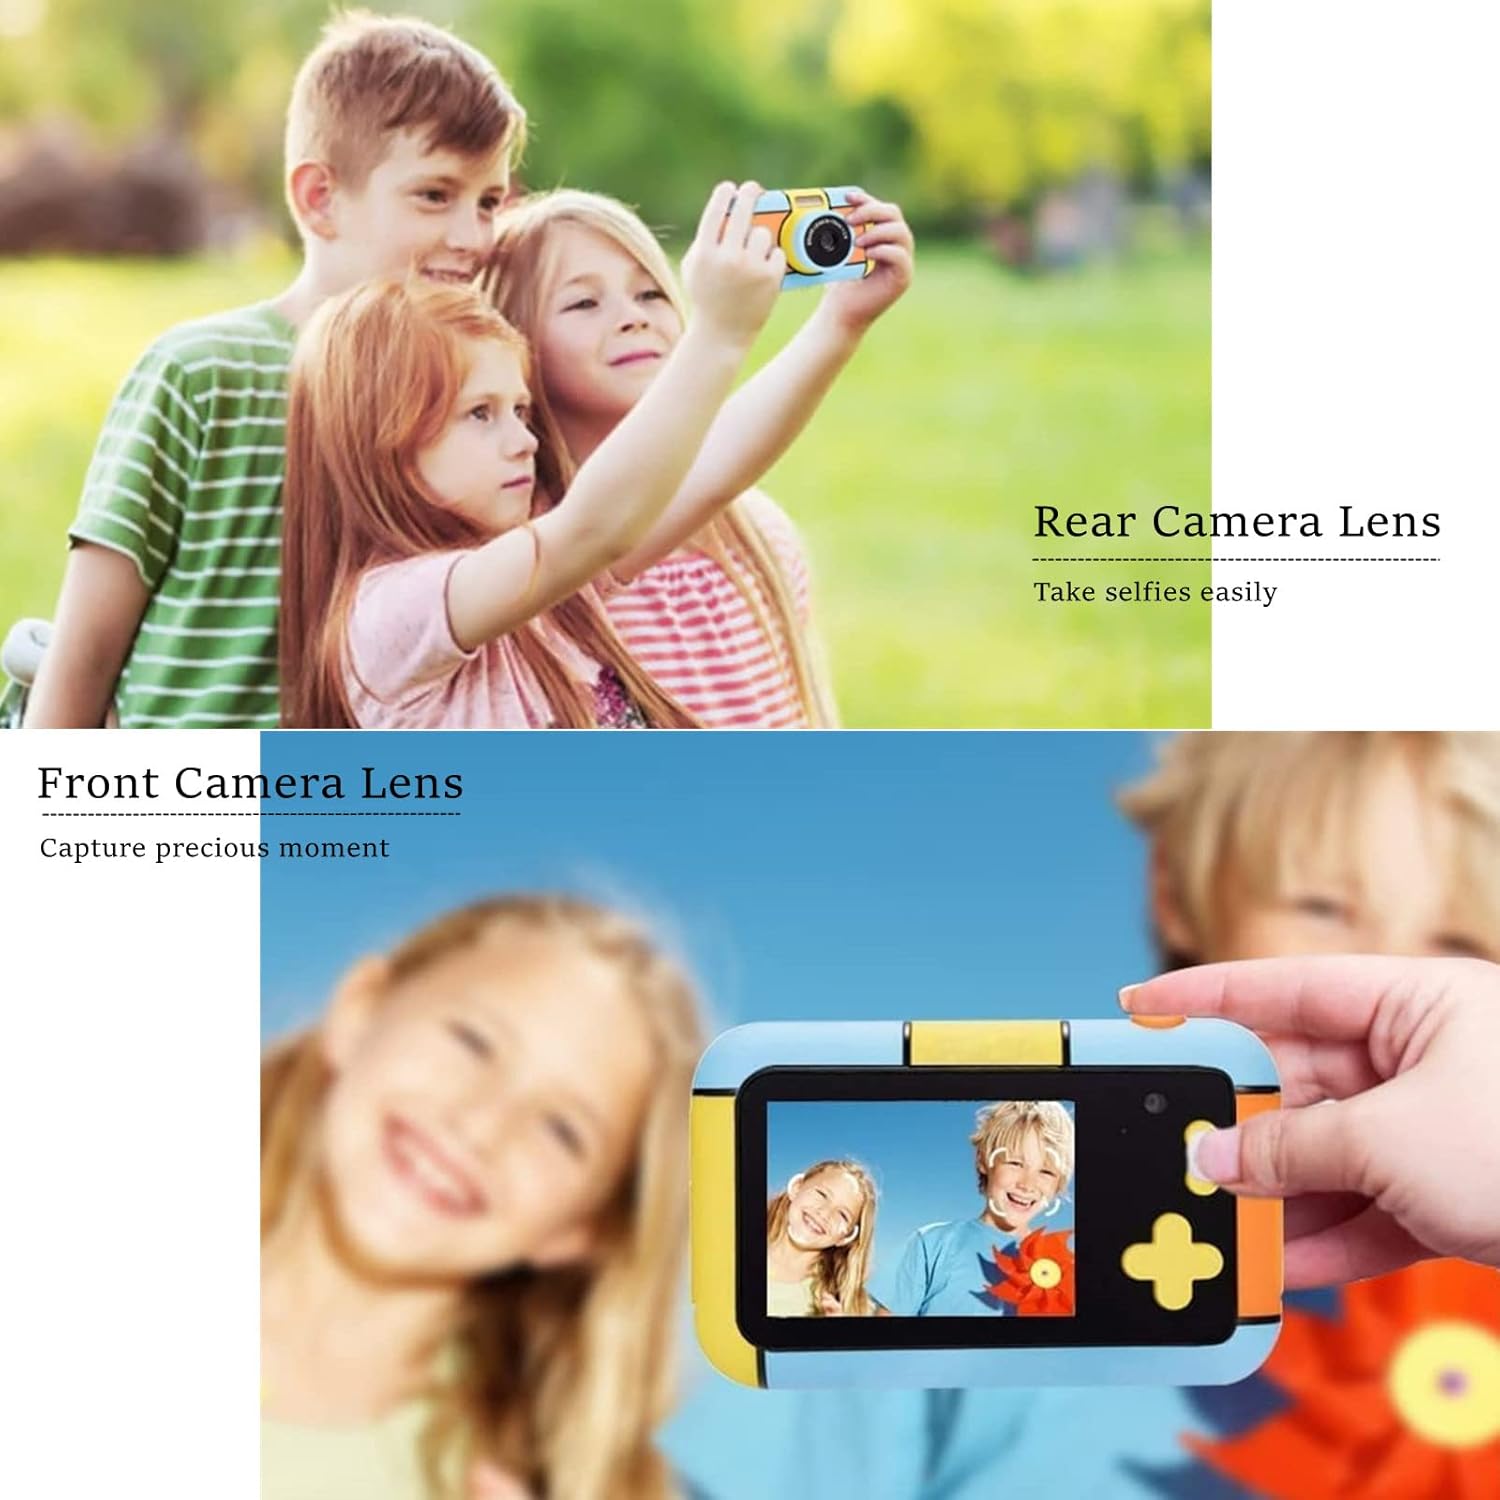
Figure 4: Demonstrating the dual lens functionality for selfies and standard photos.
To switch between the front and rear lenses, use the designated button or menu option (refer to the on-screen prompts or camera interface). Once in selfie mode, you can frame yourself and others using the LCD screen and capture photos or videos as usual.
4. Playback
To view your captured photos and videos:
- Press the Playback button.
- Use the Left/Right navigation buttons to scroll through your media.
- Press the Shutter/OK button to view a video.
- Press the Playback button again to exit playback mode.
5. Menu Navigation and Special Functions
Press the Menu button to access various settings and creative modes. Use the navigation buttons to select options and the Shutter/OK button to confirm.
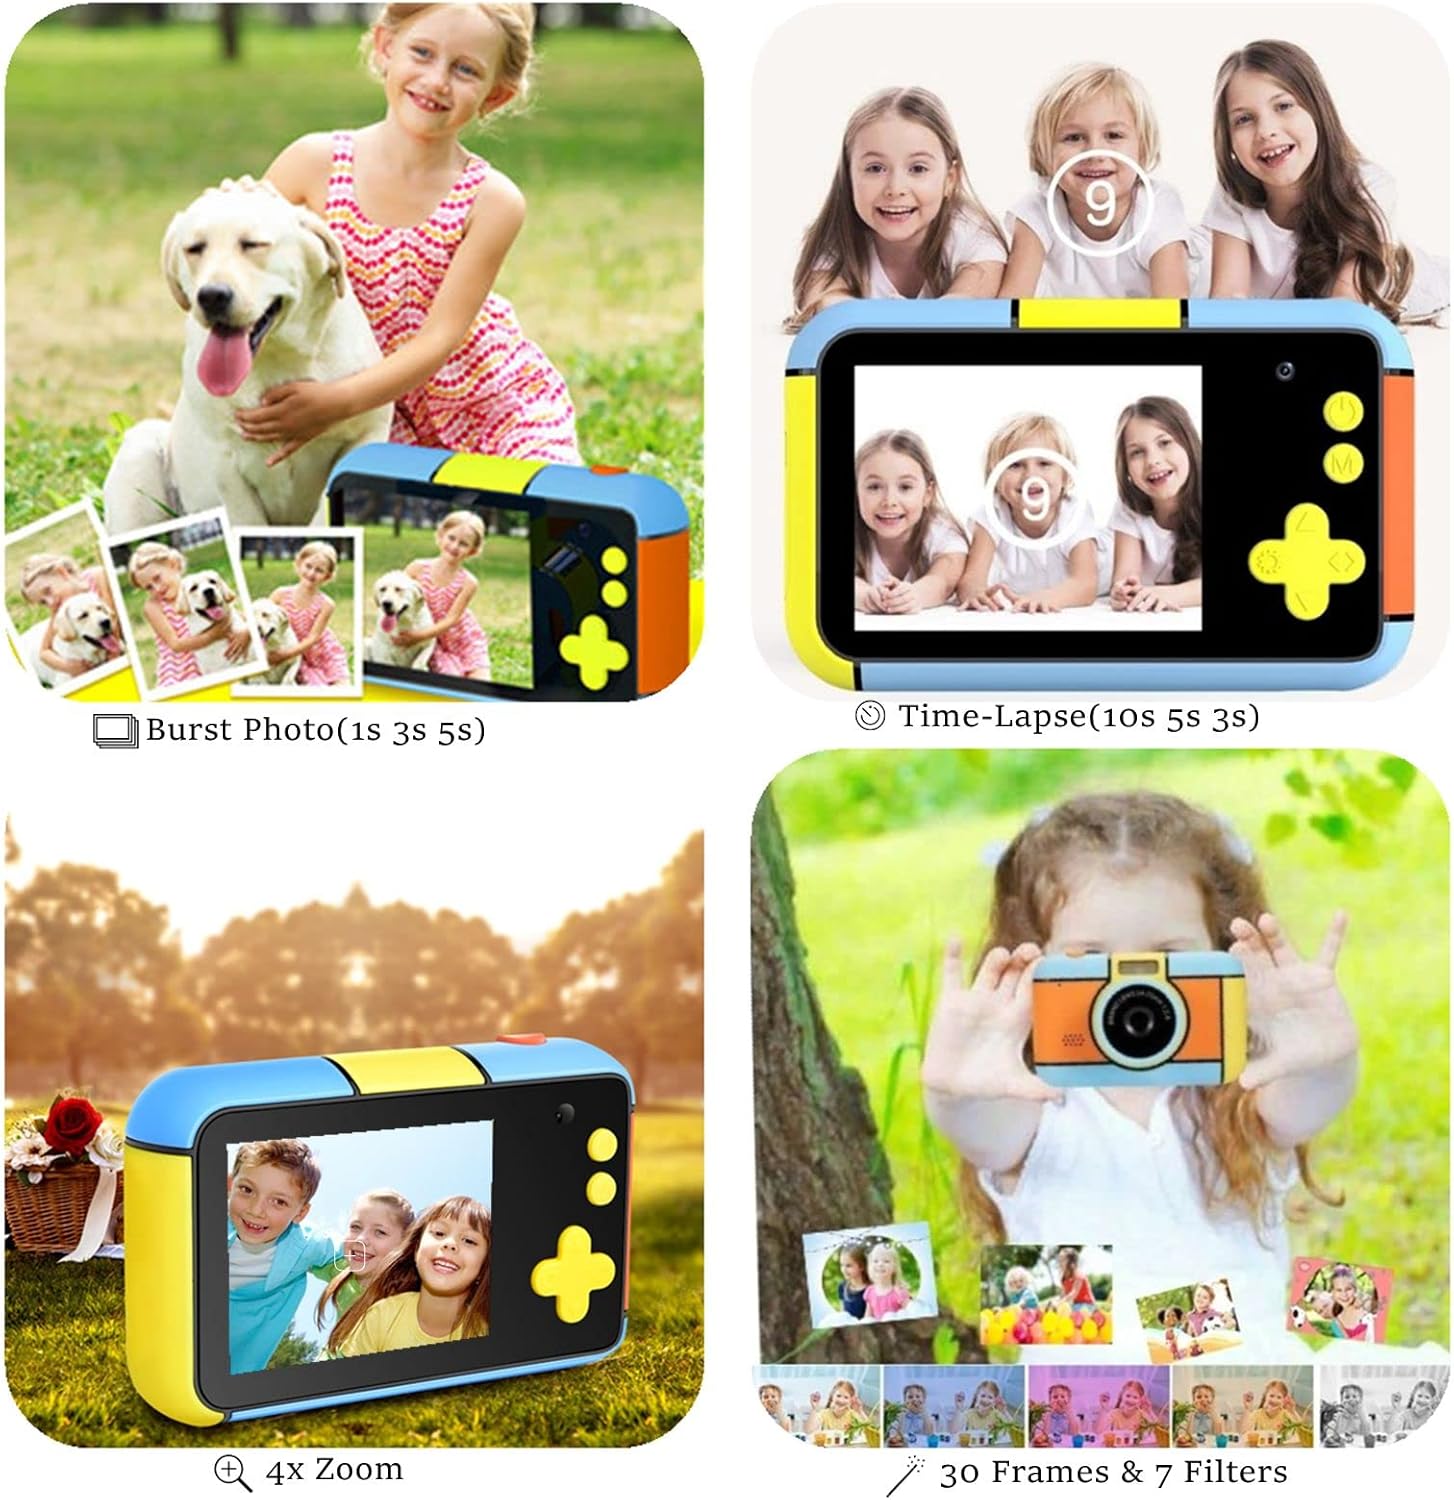
Figure 5: Creative features including Burst Photo, Time-Lapse, Zoom, and various frames and filters.
- Photo Settings: Adjust resolution, quality, and other photo-specific options.
- Video Settings: Adjust video resolution (e.g., 1080P).
- Filters & Frames: Apply fun filters and decorative frames to your photos (30 photo stickers and 7 filters available).
- Time-Lapse: Set the camera to take photos at set intervals (e.g., 3s, 5s, 10s).
- Burst Photo: Capture multiple photos in quick succession (e.g., 1s, 3s, 5s intervals).
- Zoom: Use the navigation buttons to digitally zoom in or out (up to 4X zoom).
- Autofocus & Face Detection: The camera features automatic focus and can detect smiling faces for easier capture.
6. Connecting to a Computer
To transfer photos and videos to a computer:
- Ensure the camera is turned off.
- Connect the camera to your computer using the provided USB cable.
- The camera should appear as a removable disk drive on your computer.
- Open the camera's folder to access and copy your media files.
Maintenance
Cleaning
Wipe the camera body with a soft, dry cloth. For the lens and screen, use a specialized lens cleaning cloth. Do not use liquid cleaners or abrasive materials.
Storage
When not in use, store the camera in a cool, dry place away from direct sunlight and extreme temperatures. Remove the MicroSD card if storing for extended periods.
Battery Care
The camera uses a built-in Lithium-ion battery. To prolong battery life:
- Avoid fully discharging the battery frequently.
- Charge the camera regularly, even if not in frequent use.
- Do not expose the camera to extreme heat or cold.
Troubleshooting
| Problem | Possible Cause | Solution |
|---|---|---|
| Camera does not turn on. | Battery is depleted. | Charge the camera using the provided USB cable. |
| Cannot take photos/videos. | MicroSD card is full or not inserted correctly. | Check if the MicroSD card is properly inserted. Delete some files or replace the card if full. |
| Camera freezes or becomes unresponsive. | Software glitch. | Press and hold the Power button for 10-15 seconds to force a restart. |
| Cannot connect to computer. | Incorrect cable or driver issue. | Ensure you are using the original USB cable. Try a different USB port on your computer. |
| Poor image quality. | Lens is dirty or lighting conditions are poor. | Clean the lens. Ensure adequate lighting when taking photos. |
Specifications
| Feature | Detail |
|---|---|
| Model Number | D7 |
| Product Dimensions | 10 x 6 x 5 cm |
| Item Weight | 20 grams |
| Display Screen | 2.4-inch HD LCD |
| Photo Resolution | 24MP (Front and Rear Lenses) |
| Video Resolution | 1080P / 30fps |
| Image Sensor Technology | CMOS |
| Supported File Format | MP4 |
| Optical Zoom | 4.0x |
| Battery Type | Lithium-ion (610mAh mentioned in image) |
| Storage | Supports MicroSD card (32GB included) |
| Material | Silicone, Plastic |
Warranty and Support
For specific warranty details and customer support, please refer to the documentation included with your purchase or visit the official YunLone website. Keep your purchase receipt as proof of purchase for any warranty claims.
If you encounter any issues not covered in this manual, please contact YunLone customer service for assistance.


