
1. Introduction
This manual provides detailed instructions for the safe and effective operation of the SNDWAY SW-TG100 Laser Distance Meter. Please read this manual thoroughly before using the device to ensure proper functionality and to prevent potential hazards.
2. Safety Instructions
Warning: This device emits a Class 2 laser. Avoid direct eye exposure to the laser beam. Do not stare into the beam or view directly with optical instruments.
- Do not attempt to modify or disassemble the device.
- Keep the device out of reach of children.
- Do not use the device in explosive environments or near flammable materials.
- Ensure the battery compartment is securely closed to prevent water or dust ingress.
- Dispose of batteries according to local regulations.
3. Product Overview
The SNDWAY SW-TG100 is a portable laser distance meter designed for accurate distance, area, and volume measurements. It features a clear LCD display, multiple measurement modes, and a durable design.
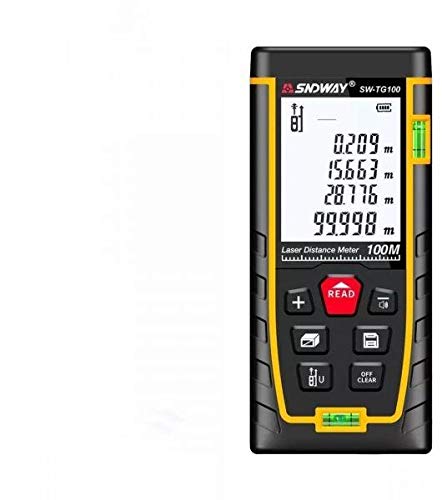
Figure 1: Front view of the SNDWAY SW-TG100 Laser Distance Meter. The device is black with yellow accents, featuring a large LCD screen displaying measurement values (e.g., 0.209m, 15.663m, 28.776m, 99.998m) and icons for measurement modes and battery status. Below the screen are several buttons: a red 'READ' button, '+' button, a button for unit/reference point, a button for area/volume, a button for Pythagorean mode, and an 'OFF/CLEAR' button. A horizontal bubble level is visible at the bottom, and a vertical one on the right side.
3.1 Components
- Laser Emission Aperture: Where the laser beam exits.
- Laser Receiving Lens: Detects the reflected laser beam.
- LCD Display: Shows measurements, battery status, and mode indicators.
- Keypad: For operating various functions.
- Battery Compartment: Located at the rear.
- Bubble Levels: For horizontal and vertical alignment.
4. Setup
4.1 Battery Installation
- Open the battery compartment cover on the back of the device.
- Insert two AAA alkaline batteries, ensuring correct polarity (+/-).
- Close the battery compartment cover securely.
4.2 Power On/Off
- To power on, press the READ button. The laser will activate.
- To power off, press and hold the OFF/CLEAR button for approximately 3 seconds. The device will also automatically power off after 150 seconds of inactivity.
5. Operating Instructions
5.1 Basic Distance Measurement
- Press the READ button once to activate the laser.
- Aim the laser dot at the target point.
- Press the READ button again to take a measurement. The measured distance will be displayed on the screen.
5.2 Continuous Measurement (Tracking)
- Press and hold the READ button for approximately 2 seconds. The device will enter continuous measurement mode, displaying real-time distance as you move the device.
- Press the READ button again to exit continuous measurement.
5.3 Area Measurement
- Press the Area/Volume button once. An icon for area measurement will appear on the display.
- Measure the first side (length) by pressing READ.
- Measure the second side (width) by pressing READ.
- The calculated area will be displayed.
5.4 Volume Measurement
- Press the Area/Volume button twice. An icon for volume measurement will appear.
- Measure the length by pressing READ.
- Measure the width by pressing READ.
- Measure the height by pressing READ.
- The calculated volume will be displayed.
5.5 Pythagorean Measurement
This mode allows indirect measurement of height or distance using the Pythagorean theorem.
- Press the Pythagorean button (often depicted as a triangle icon) once or twice depending on the specific Pythagorean function needed (e.g., two-point or three-point).
- Follow the on-screen prompts to measure the required sides (hypotenuse, base).
- The calculated indirect measurement will be displayed.
5.6 Unit Switching
Press the Unit/Reference button (often depicted as 'ft/m/in' or similar) repeatedly to cycle through available measurement units (e.g., meters, feet, inches).
5.7 Reference Point Adjustment
The measurement reference point can be set to the front or rear of the device. Press and hold the Unit/Reference button to switch between front and rear reference points. An icon on the display will indicate the current reference point.
5.8 Data Storage (if applicable)
Some models allow storing measurements. If your device has this feature, a dedicated memory button (often depicted as a folder icon) will be present. Press it to save the current measurement or to recall stored data.
5.9 Clear Function
Press the OFF/CLEAR button once to clear the last measurement or error message from the display.
6. Maintenance
- Cleaning: Use a soft, damp cloth to clean the device. Do not use abrasive cleaners or solvents. Clean the laser lens carefully with a soft cloth, similar to cleaning camera lenses.
- Storage: When not in use for extended periods, remove the batteries to prevent leakage. Store the device in a cool, dry place, away from direct sunlight and extreme temperatures.
- Calibration: The device is factory calibrated. If you suspect inaccuracies, contact customer support.
7. Troubleshooting
| Problem | Possible Cause | Solution |
|---|---|---|
| Device does not power on. | Low or dead batteries; incorrect battery polarity. | Replace batteries; ensure correct polarity. |
| Inaccurate measurements. | Unstable surface; laser blocked; target surface too reflective/absorbent; device not level. | Ensure stable position; clear laser path; use a target plate for difficult surfaces; use bubble levels for alignment. |
| "Error" message on display. | Measurement out of range; strong light interference; internal error. | Ensure target is within range; avoid strong light; restart device. If error persists, contact support. |
8. Specifications
| Feature | Detail |
|---|---|
| Brand | Sndway |
| Model | SW-TG100 |
| Measurement Range | Up to 100m |
| Measurement Accuracy | Typically ±2mm |
| Units | Meters (m), Feet (ft), Inches (in) |
| Laser Class | Class 2 |
| Battery Type | 2 x AAA Alkaline batteries |
| Automatic Laser Off | 30 seconds |
| Automatic Device Off | 150 seconds |
| Operating Temperature | 0°C to 40°C (32°F to 104°F) |
| Storage Temperature | -20°C to 60°C (-4°F to 140°F) |
| Dimensions | 16 x 8.8 x 5.2 cm (approximate) |
| International Protection Rating | IP54 (Dust protected, splash proof) |
9. Warranty and Support
For warranty information and technical support, please refer to the documentation provided with your purchase or contact your retailer. Keep your purchase receipt as proof of purchase for warranty claims.


