1. Product Overview
The SolaMr 60A Solar Charge Controller is designed for off-grid solar systems, managing the charging and discharging of your battery. Its primary function is to protect the battery, ensuring a longer lifespan and improved system performance through an intelligent charging process. This controller features automatic voltage recognition for 12V/24V systems, dual 5V USB outputs, and a backlight LCD display for easy operation.

Figure 1: Front view of the SolaMr 60A Solar Charge Controller, showing the LCD display, buttons, USB ports, and connection terminals.
It incorporates quick charge technology to handle high power demands and offers comprehensive protection against overcharge, over-discharge, overload, low voltage, short circuit, and reverse connection. The humanized backlight LCD display and dual button operation provide a user-friendly interface, especially in low-light conditions.
2. Safety Information and Precautions
WARNING: Solar panel voltage can be very high under sunlight, which may cause injury or damage to the controller. Always connect loads to the controller correctly. For 48V systems, reverse connection of the solar panel will destroy the solar charge controller.
To prevent injury from load voltage, always disconnect the load from the controller using the button first before connecting or disconnecting the physical load wires to prevent damage. This controller does not offer reverse connection protection for the load, and incorrect connection can damage connected devices (e.g., destroy a bulb).
- Ensure all connections are secure and correct before applying power.
- Do not expose the controller to water or excessive moisture.
- Install in a well-ventilated area to prevent overheating.
- Keep out of reach of children.
3. Product Features
The SolaMr ST6-60A Solar Charge Controller is equipped with several key features to optimize your solar power system:
- Quick Charge Technology: Designed to meet high power demands efficiently.
- Comprehensive Protection: Includes safeguards against overcharge, over-discharge, overload, low voltage, short circuit, and reverse connection.
- Backlight LCD Display: A large, white backlight screen for convenient operation, especially in dark conditions.
- Dual USB Ports: Two 5V USB outputs for charging external devices.
- User-Friendly Interface: Double button operation for easy setup and modification of technical data.
- Load Control Modes: Selectable load control modes, including a time function for street lights at night.
- Accurate Temperature Compensation: Automatically corrects charging and discharging voltage based on temperature, extending battery life.

Figure 2: Detailed view of the controller's features, including the power switch, menu button, LCD display, USB ports, and aluminum alloy casing.

Figure 3: Close-up illustrating the dual USB 2.1A ports and the clear LCD screen, capable of displaying battery voltage and other parameters.
4. Setup and Installation
Proper wiring is crucial for the safe and efficient operation of your solar charge controller. Follow these steps carefully:
- Connect the Battery: First, connect the battery to the charge controller's battery terminals (marked "BATT"). Ensure correct polarity (+ to + and - to -). The controller will automatically detect the 12V or 24V system voltage.
- Connect the Solar Panel: Next, connect the solar panel to the charge controller's PV terminals (marked "PV"). Ensure correct polarity.
- Connect the Load: Finally, connect your DC load to the charge controller's load terminals (marked "LOAD"). Ensure correct polarity. Remember to disconnect the load using the controller's button before connecting or disconnecting the physical load wires to prevent damage.

Figure 4: Wiring diagram illustrating the connections between the solar panel (PV), battery (BATT), and various loads (LOAD) such as an inverter, light bulb, fan, speakers, computer, and TV.
Always ensure all connections are tight and secure to prevent loose contacts and potential hazards.
5. Operating Instructions
The SolaMr ST6-60A controller is designed for ease of use with its intuitive LCD display and two-button interface.
- LCD Display: The backlight LCD displays real-time system parameters such as battery voltage, charging status, and load status. The backlight ensures visibility in various lighting conditions.
- MENU Button: Press the "MENU" button to cycle through different display screens and access settings.
- ON/OFF Button: Use the "ON/OFF" button to control the load output. Press it to toggle the load on or off. This button is also used to confirm selections within the menu.
- Setting Parameters: To adjust parameters like load control mode or time functions, navigate through the menu using the "MENU" button and confirm changes with the "ON/OFF" button. Refer to the on-screen prompts for specific adjustments.
- USB Charging: The dual 5V USB ports provide power for charging compatible electronic devices. Simply plug your device's USB cable into one of the ports.
6. Maintenance
To ensure the longevity and optimal performance of your SolaMr solar charge controller, consider the following maintenance tips:
- Regular Cleaning: Periodically wipe down the controller with a dry, soft cloth to remove dust and debris. Ensure the LCD screen remains clear for readability.
- Check Connections: Annually inspect all wiring connections (PV, Battery, Load) to ensure they are tight and free from corrosion. Loose connections can lead to power loss or overheating.
- Ventilation: Ensure the installation area remains well-ventilated to allow for proper heat dissipation from the controller. Avoid blocking the ventilation holes.
- Environmental Conditions: Protect the controller from direct exposure to extreme temperatures, moisture, and corrosive environments.
7. Troubleshooting
While the SolaMr ST6-60A controller is designed for reliability, here are some general troubleshooting tips for common issues:
- Controller Not Powering On:
- Check battery connections. Ensure the battery is connected first and has sufficient voltage.
- Verify battery polarity. Reverse polarity can prevent the controller from powering on or cause damage.
- Battery Not Charging:
- Check solar panel connections and polarity.
- Ensure there is sufficient sunlight reaching the solar panels.
- Verify the solar panel's open circuit voltage is within the controller's acceptable range.
- Load Not Working:
- Check load connections and polarity.
- Ensure the load output is enabled via the ON/OFF button.
- Verify the battery has enough charge to power the load. The controller will cut off load output if battery voltage is too low.
- Check for overload conditions. If the load current exceeds the controller's rating, the output may be shut off.
- LCD Display Issues:
- If the display is dim or flickering, check battery voltage.
- Ensure the controller is receiving power.
For more complex issues or if troubleshooting steps do not resolve the problem, please contact SolaMr customer support.
8. Specifications
| Attribute | Value |
|---|---|
| Brand | SolaMr |
| Model Number | ST6-60A |
| Rated Current | 60A |
| System Voltage | 12V/24V Automatic Recognition |
| USB Output | Dual 5V, 2.1A |
| Display Type | LCD with Backlight |
| Item Weight | 1.94 pounds |
| Package Dimensions | 8.82 x 5.39 x 2.4 inches |
| UPC | 732376585064 |
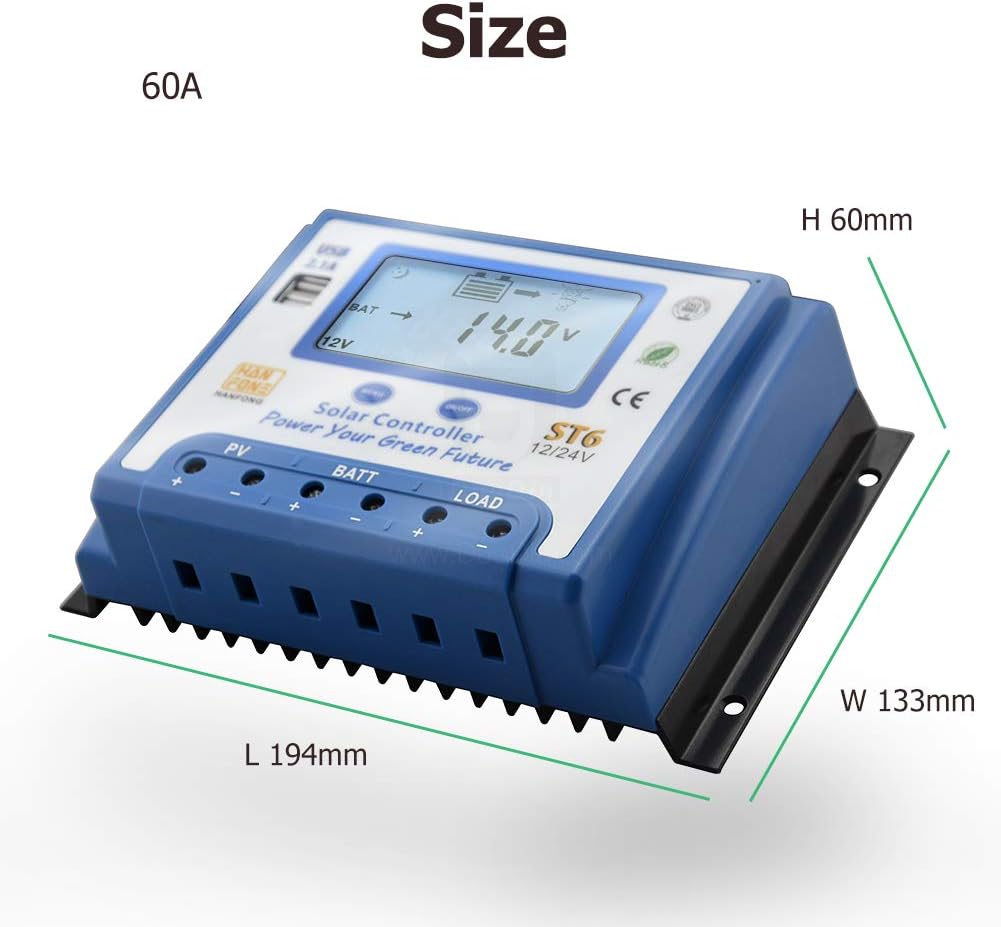
Figure 5: Dimensions of the SolaMr 60A Solar Charge Controller, showing length (L 194mm), width (W 133mm), and height (H 60mm).
9. Warranty and Support
SolaMr is committed to providing high-quality products and customer satisfaction. For any questions, concerns, or support needs regarding your ST6-60A Solar Charge Controller, please do not hesitate to contact us.
You can find more information and contact details by visiting the official SolaMr Store on Amazon: SolaMr Store.
Please retain your purchase receipt for warranty purposes. Specific warranty terms and conditions may apply and are available upon request or through the seller's official channels.


