Hescn Diamond Painting Kit User Manual
Model: Hescn 822395
1. Introduction
Welcome to the world of diamond painting! This Hescn Diamond Painting Kit provides a creative and engaging way to produce stunning, sparkling artworks. Diamond painting is a popular DIY craft where you apply small resin "diamonds" to a pre-printed canvas to create a mosaic-like image. This manual will guide you through the process, from setting up your workspace to completing your masterpiece.
Please read all instructions carefully before beginning your project to ensure a smooth and enjoyable experience.
Important Safety Note:
- The kit contains small parts (resin diamonds) which can be a choking hazard. Keep out of reach of small children.
- This product is a semi-finished item and does not include a picture frame.
2. Product Overview
2.1. Package Contents
Your Hescn Diamond Painting Kit includes the following components:
- 1 x High-Quality Printed Canvas (with adhesive layer)
- 1 x Diamond Painting Pen (applicator tool)
- 1 x Painting Mud (wax for the pen tip)
- 1 x Pallet (tray for holding diamonds)
- Multiple Diamond Bags (sorted by color, corresponding to the canvas symbols)
- Some Replacement Zip Pockets (for storing leftover diamonds)

Figure 2.1: Included tools and accessories for diamond painting.

Figure 2.2: Bags of sorted resin diamonds, ready for use.
2.2. Key Features
- High-Quality Canvas: Features a natural ecological canvas with a strong adhesive layer and clear, pre-printed symbols.
- Shiny 5D Diamonds: Crystal rhinestones designed to sparkle and create a vibrant, three-dimensional effect.
- Complete Kit: Includes all necessary tools and materials to start your project immediately.
- Stress Reduction: The process of diamond painting can help reduce stress, improve focus, and enhance patience.
- Decorative Art: Once completed, the painting serves as an excellent wall decoration for various rooms, including living rooms, bedrooms, and offices.
3. Setup
Before you begin, prepare your workspace:
- Choose a Flat Surface: Select a clean, flat, and well-lit surface to work on. This will help keep your canvas smooth and prevent diamonds from rolling away.
- Unroll the Canvas: Carefully unroll your canvas. If it has creases, you can place heavy books on it for a few hours or gently iron the back (low heat, no steam) to flatten it.
- Organize Diamonds: Identify the symbols on the canvas and match them to the corresponding diamond bags. It's helpful to pour a small amount of one color of diamonds into the green pallet tray at a time.
- Prepare the Pen: Peel back the protective film from the pink painting mud (wax). Dip the tip of your diamond painting pen into the mud to pick up a small amount of wax. This wax will help the pen pick up the diamonds.

Figure 3.1: Preparing the canvas and applying diamonds.
4. Operating Instructions
Follow these steps to create your diamond painting:
- Expose Canvas Section: Peel back only a small portion of the protective film from the canvas. Do not remove the entire film at once, as the adhesive can dry out or collect dust.
- Identify Symbols: Refer to the legend on the side of your canvas to identify which diamond color corresponds to which symbol.
- Pick Up Diamonds: Gently press the tip of your diamond painting pen (with wax) onto the faceted side of a diamond in the tray. The diamond should stick to the pen.
- Apply Diamonds: Carefully place the diamond onto the corresponding symbol on the adhesive canvas. Press down lightly to secure it.
- Repeat: Continue picking up and applying diamonds, working section by section. As you complete an area, slowly peel back more of the protective film.
- Reinforce: Once a section or the entire painting is complete, place a piece of parchment paper or the original protective film over the diamonds and gently press down with a book or your hand. This ensures all diamonds are firmly adhered to the canvas.
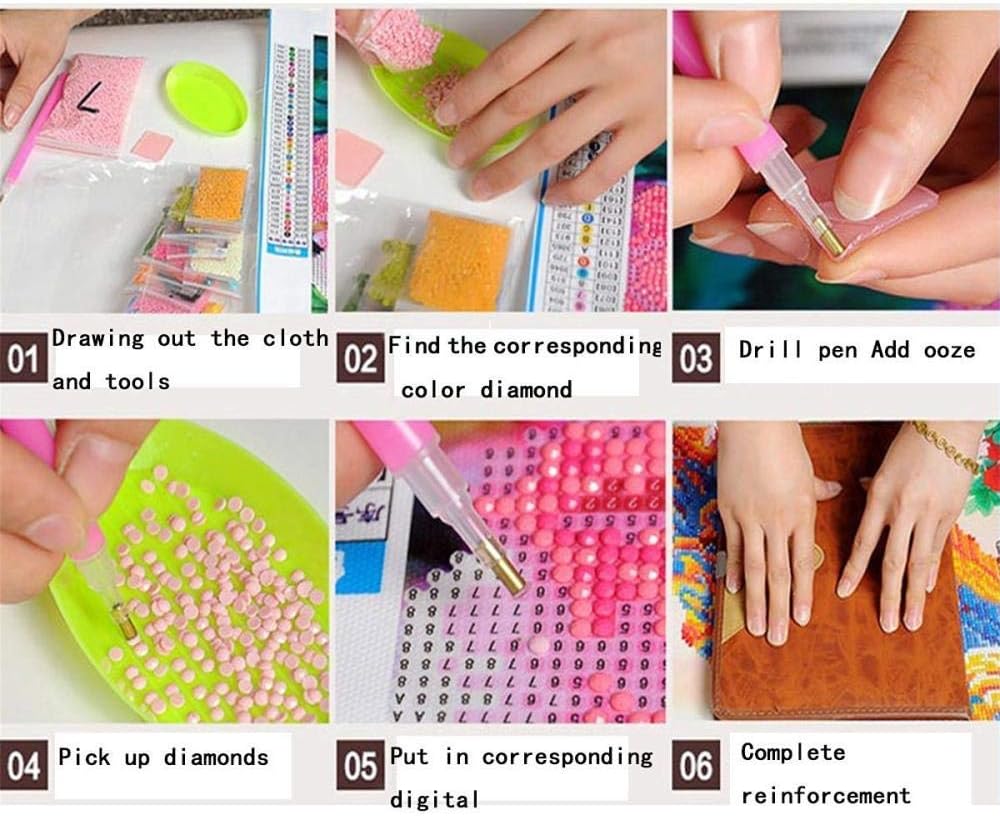
Figure 4.1: Visual guide to the diamond painting process.

Figure 4.2: Example of detailed diamond application on the canvas.
5. Maintenance
To ensure the longevity and beauty of your diamond painting:
- Cleaning: If dust accumulates on the finished painting, gently wipe it with a soft, dry cloth. Avoid using water or cleaning solutions, as they may damage the adhesive or diamonds.
- Storage of Leftover Diamonds: Use the provided zip pockets to store any unused diamonds. Label them clearly with their corresponding symbol or DMC code for future reference or other projects.
- Framing (Optional): For best preservation and display, consider framing your completed diamond painting. This will protect it from dust and physical damage.
6. Troubleshooting
Here are solutions to common issues you might encounter:
| Problem | Solution |
|---|---|
| Diamonds are not sticking to the pen. | Dip the pen tip deeper into the painting mud (wax). Ensure the wax is fresh and not dried out. |
| Diamonds are falling off the canvas. | Ensure you are pressing the diamonds firmly onto the canvas. After completing a section, use a book or roller to press down on the diamonds to reinforce adhesion. Avoid touching the adhesive surface with your fingers. |
| Canvas has creases. | Place heavy books on the canvas for several hours or overnight. Alternatively, gently iron the back of the canvas on a low heat setting without steam. |
| Diamonds are not uniform or aligned. | Use a ruler or straight edge to gently nudge diamonds into alignment. Take your time and place each diamond carefully. |
7. Specifications
| Attribute | Detail |
|---|---|
| Brand | Hescn |
| Model Number | Hescn 822395 |
| Product Type | 5D DIY Diamond Painting Kit |
| Canvas Size (approx.) | 250x90cm (This specific variant) |
| Diamond Type | Round Resin Diamonds |
| ASIN | B081T2P7VT |
| First Available Date | 21 Nov. 2019 |
8. Warranty and Support
Hescn is committed to providing high-quality products. While specific warranty details are not provided, if you encounter any issues with your Hescn Diamond Painting Kit, please contact the seller or retailer from whom you purchased the product. They will be able to assist you with returns, replacements, or troubleshooting.
For general inquiries or tips on diamond painting, you may also find helpful resources online through various crafting communities and tutorials.