
FeiyuTech G6 MAX
FeiyuTech G6 Max 3-Axis Handheld Gimbal Stabilizer User Manual
Model: G6 MAX
1. Introduction
The FeiyuTech G6 Max is a versatile 3-axis handheld gimbal stabilizer designed for a wide range of devices, including mirrorless cameras, action cameras, and smartphones. It features a robust design, enhanced motor strength, and an intuitive OLED screen for seamless operation. This manual provides detailed instructions for setup, operation, maintenance, and troubleshooting to ensure optimal performance of your device.

Figure 1.1: FeiyuTech G6 Max Gimbal Stabilizer and included accessories.
2. Setup Guide
2.1. Mounting the Stand
Before attaching your camera, securely mount the mini tripod stand to the bottom of the gimbal handle. This provides a stable base for balancing and operation.

Figure 2.1: Attaching the mini tripod stand to the gimbal.
2.2. Attaching the Camera
Attach the quick release plate to the bottom of your camera. Ensure the plate is tightened securely. Pay attention to the installation direction of the quick release plate on the gimbal.

Figure 2.2: Quick release plate for camera attachment.
Open the motor locks on the gimbal and move the gimbal to the appropriate installation angle. Then, lock the motors to secure the gimbal's position during camera attachment.
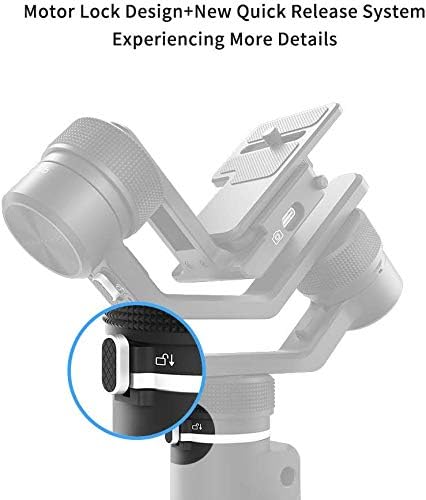
Figure 2.3: Motor lock design for secure setup.
2.3. Balancing the Gimbal
Proper balancing is crucial for optimal performance and to prevent motor strain. Follow these steps for each axis:
- Tilt Axis Balancing: Open the motor lock of the tilt axis. Put the camera lens up vertically and let go. Observe the direction in which the camera drops. Loosen the knob ring and push/pull the sliding arm until the lens can face up stably and no longer falls. Then, tighten the knob ring.
- Roll Axis Balancing: Open the motor lock of the roll axis. Put the camera lens forward and let go to observe the falling direction. Loosen the knob ring and push/pull the cross arm until it is balanced. Then, tighten the knob ring. After balancing, the cross arm should stay at any angle.
- Pan Axis Balancing: Open the motor lock of the pan axis. Put the gimbal horizontally. Observe the falling direction of the vertical arm. Loosen the knob ring and pull/push the cross arm back and forth until it is balanced. Then, tighten the knob ring.
Once all axes are balanced, long press the power button to start the gimbal. It should stabilize smoothly without any motor vibration.
Video 2.1: Detailed guide on how to install and balance the camera on the FeiyuTech G6 Max Gimbal.
3. Operating Modes and Functions
The FeiyuTech G6 Max offers various operating modes to suit different shooting scenarios. You can switch between modes using the function button and joystick on the gimbal's handle.
3.1. Heading Following Mode (HF)
This is the default power-on mode. The lens moves following the handle to rotate left and right, while keeping still in other directions.
3.2. Lock Mode (LK)
Click the function button once to enter Lock Mode. In this mode, the lens remains motionless, providing a fixed perspective.
3.3. Panning and Tilting Following Mode (TF)
Double-click the function button to enter Panning and Tilting Following Mode. The lens moves following the panning and tilting axes. The camera can be shot in these directions: up, down, left, and right.
3.4. All Following Mode (AF)
Triple-click the function button to enter All Following Mode. The lens follows all movements of the handle, allowing for dynamic shots.
3.5. Self-timer Mode
Triple-click the trigger button to enter Self-timer Mode. This mode positions the camera for self-recording.
3.6. Inception Effect
To achieve the Inception Effect, click the power button, select 'Inception' from the menu, and move the joystick to the right to confirm. The gimbal will automatically rotate, creating a spinning effect.
Video 3.1: Demonstrating Inception Effect and Vertical Shooting.
3.7. Vertical Shooting
To enable vertical shooting, put the gimbal horizontally. Click the power button, select 'Portrait' (Vertical Shooting) from the menu, and move the joystick to the right to confirm. Vertical shooting will start. To exit, move the joystick to the right again.
3.8. Time-Lapse Shooting
Connect the camera shutter release cable. Turn on the gimbal first, then the camera. Turn on Bluetooth on your smartphone and open the Feiyu ON APP. The gimbal will automatically connect. Select 'Timelapse' in the menu. You can set panning time, tilting time, pan-axis rotation time, tilt-axis rotation time, photo capture interval, and capture wait time. Click the power button on the gimbal, select 'Timelapse', and move the joystick to the right to confirm. The gimbal will move to the starting point. Move the joystick to the right again to confirm the ending point. The time-lapse shooting will then start.
Video 3.2: Instructions on how to shoot time-lapse with the gimbal.
4. Camera Control
The FeiyuTech G6 Max allows for integrated control of your camera's functions directly from the gimbal.
4.1. Shutter and Video Recording
Connect the camera's shutter release cable to the gimbal. Turn on the gimbal first, then the camera. Half-press the shutter button on the gimbal to focus, then fully press it to take a photo. Click the button to switch from camera mode to video mode. Press the shutter button to record video.
4.2. Magic Focus Ring (Zoom & Focus)
The multi-functional 'Magic Focus Ring' 2.0 allows for precise control. The tilt axis can be rotated by the magic ring. Short press the magic ring to switch between other axes. Long press the magic ring to control the zoom of the camera. Short press again to switch to control the follow focus of the camera.
4.3. Trigger Button Functions
The trigger button on the handle provides quick access to specific modes:
- Hunting Mode: Press and hold the trigger button to enter Hunting Mode. The lens will follow movements faster.
- Reset Gimbal: Double-click the trigger button to reset the gimbal to its default position. The gimbal will also return to Heading Following Mode.
- Self-timer Mode: Triple-click the trigger button to enter Self-timer Mode.
Video 4.1: Guide on how to control camera shooting functions.
Video 4.2: Introduction to various functions and modes of the gimbal.
5. Key Features
- All-in-One Compatibility: Compatible with mirrorless cameras (below 1.2kg with short lens), smartphones (54-88mm width), sports cameras, and pocket video vlog cameras.
- Compact Design & Increased Payload: The G6 Max has an increased payload of up to 1.2Kg/2.65lb while being 20% smaller than the G6 Plus, roughly the size of half an A4 paper.
- Motor Locks & New Quick Release System: All three axes feature physical motor locks for secure transport and easier balancing. The new quick release system allows for rapid assembly and disassembly of the camera.
- Improved "Magic Focus Ring" 2.0: Enhanced sensitivity (25% improvement over G6 Plus) for precise control over zoom, focus, three-axis rotation, and camera parameters (ISO, WB, exposure value).
- Better OLED Screen Interactive Experience: A low-power consumption OLED screen, 200% larger than the G6 Plus, displays gimbal and camera parameters, working mode, power consumption, and Bluetooth connection status. It also allows direct setup of Inception, Instant Vertical Photography, and Motion Time-lapse modes, as well as gimbal strength and camera parameters.
- Splash-proof Design: Designed to withstand splashes, making it suitable for various shooting environments.

Figure 5.1: The G6 Max features a splash-proof design.

Figure 5.2: Enhanced OLED screen for interactive experience.
6. Storage and Maintenance
- Keep the gimbal out of the reach of children and pets.
- DO NOT leave the gimbal near heat sources such as a furnace or heater.
- DO NOT leave the gimbal inside of a vehicle on hot days.
- Please store the gimbal in a dry environment.
- DO NOT overcharge or overuse the battery, otherwise it will cause damage to the battery core.
- Never use the gimbal when the temperature is too high or too low.
7. Specifications
| Feature | Detail |
|---|---|
| Product Dimensions | 11.81 x 7.87 x 3.23 inches (3.23"D x 7.87"W x 11.81"H) |
| Item Weight | 1.48 pounds |
| Maximum Weight Recommendation | 1.2 Kilograms (2.65 lbs) |
| Compatible Devices | Camera, Cellphone (Mirrorless Cameras, Action Cameras, Smartphones) |
| Item Model Number | G6 MAX |
| Manufacturer | FeiyuTech |
| Date First Available | November 21, 2019 |
8. Troubleshooting
- Gimbal Vibrating After Power On: If the gimbal vibrates, it indicates that it is not properly balanced. Please re-balance the gimbal with your device. Ensure all axes are correctly balanced as per Section 2.3.
- Gimbal Not Working/Trembling: This is often a balance issue. After installing your camera/smartphone/action camera, set all axes to be balanced. Every time you change the device, set the motor power strength to 'Self-Adapt' via the Feiyu ON app. This allows the gimbal to automatically adapt to the camera's weight.
- Motor Overload Message: This typically occurs if the gimbal is not balanced or if the payload exceeds the maximum limit (1.2kg). Ensure proper balancing and check your camera's weight.
- Camera Control Issues: Ensure the shutter release cable is correctly connected and the gimbal is turned on before the camera. Verify Bluetooth connection for app control. Check the Feiyu ON app for firmware updates, as compatibility issues can sometimes be resolved with the latest firmware.
- Battery Drains Quickly: A poorly balanced gimbal will cause the motors to work harder, leading to faster battery drain. Ensure your gimbal is perfectly balanced. Avoid prolonged continuous operation in high temperatures.
9. Warranty and Support
For detailed warranty information and further support, please refer to the official FeiyuTech resources:
- Official User Manual (PDF): Download PDF Manual
- FeiyuTech Official Website: www.feiyu-tech.com
- FeiyuTech YouTube Channel: FeiyuTech on YouTube
- FeiyuTech Facebook Page: FeiyuTech on Facebook
- FeiyuTech Twitter: FeiyuTech on Twitter
- FeiyuTech Instagram: FeiyuTech on Instagram
Please note: Failure to read and follow instructions and warnings in this document may result in serious injury to yourself or others, or damage to your products or damage to other objects in the vicinity. FeiyuTech accepts no liability for damage, injury or any legal responsibility incurred directly or indirectly from the used of product obtained from abnormal channels.
Related documentsG6 MAX


Ask a question about this manual
Ask about setup, troubleshooting, compatibility, parts, safety, or missing instructions. Manuals+ will review the question and use this page’s manual context to help answer it.