
CLASSIC P70B20AP-S1-W
CLASSIC Countertop Microwave Oven User Manual
Model: P70B20AP-S1-W
Introduction
Thank you for purchasing the CLASSIC Countertop Microwave Oven. This manual provides important information for the proper installation, operation, and maintenance of your new appliance. Please read it thoroughly before use and keep it for future reference.
This 0.7 cu. ft., 700-watt microwave oven is designed for convenient countertop placement, featuring a touch control panel with LED display, 10 power levels, and various one-touch cooking options.
Important Safety Instructions
When using electrical appliances, basic safety precautions should be followed, including the following:
- Read all instructions before using the appliance.
- Do not operate the oven if it has a damaged cord or plug, if it is not working properly, or if it has been damaged or dropped.
- Do not heat liquids or other foods in sealed containers since they are liable to explode.
- Do not use corrosive chemicals or vapors in this appliance.
- Always ensure proper ventilation around the microwave.
- Do not immerse cord or plug in water.
- Close supervision is necessary when the appliance is used by or near children.
Product Overview
Familiarize yourself with the components of your microwave oven.

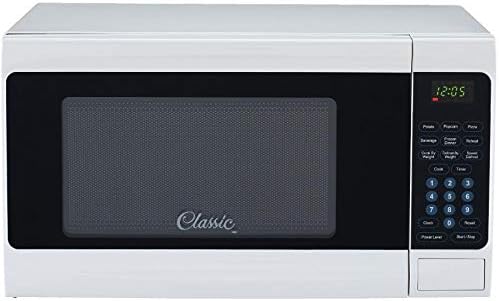

Control Panel Features:
- LED Display: Shows time of day, cooking time, and power level.
- Number Pad (0-9): Used to enter cooking times, weights, and set the clock.
- Power Level: Adjusts microwave power from 10% to 100%.
- One-Touch Cooking Buttons: Popcorn, Baked Potato, Pizza, Beverage, Reheat, Frozen Dinner.
- Defrost: Options for weight and speed defrost.
- Clock: Sets the time of day.
- Timer: Functions as a kitchen timer.
- Start/Stop: Starts or cancels cooking.
- Push Button Door Release: Opens the microwave door.
Setup
- Unpacking: Carefully remove the microwave oven from its packaging. Remove all packing materials, including the turntable and turntable ring.
- Placement: Place the microwave on a flat, stable surface, such as a kitchen countertop. Ensure there is adequate ventilation space around the unit (at least 4 inches on top, sides, and back). Do not block air vents.
- Power Connection: Plug the power cord into a grounded electrical outlet. Ensure the voltage matches the specifications of the microwave.
- Initial Cleaning: Wipe the interior and exterior of the microwave with a damp cloth before first use.
- Turntable Assembly: Place the turntable ring in the center of the microwave cavity. Then, place the glass turntable securely on top of the ring.
Operating Instructions
Setting the Clock:
- Press the Clock button once.
- Use the number pad to enter the current time (e.g., 12:30 for 12:30 PM).
- Press the Clock button again to confirm.
Basic Microwave Cooking:
- Place food in a microwave-safe container on the turntable.
- Close the door securely.
- Enter the desired cooking time using the number pad (e.g., 1 for 1 minute, 10 for 10 seconds).
- Press Power Level button, then use the number pad to select a power level (1-10, where 10 is 100% power). If no power level is selected, it defaults to 100%.
- Press Start/Stop to begin cooking.
One-Touch Cooking Menus:
This microwave features 6 pre-programmed cooking options:
- Popcorn: Press the Popcorn button.
- Baked Potato: Press the Baked Potato button.
- Pizza: Press the Pizza button.
- Beverage: Press the Beverage button.
- Reheat: Press the Reheat button.
- Frozen Dinner: Press the Frozen Dinner button.
For each one-touch menu, simply press the corresponding button. The microwave will automatically set the optimal cooking time and power level for typical serving sizes. Refer to the internal cooking guide (if available) for specific weight/quantity instructions.
Defrosting:
The microwave offers both weight and speed defrost functions.
- Weight Defrost: Press Weight Defrost, enter the weight of the food in pounds (e.g., 1.0 for 1 pound), then press Start/Stop.
- Speed Defrost: Press Speed Defrost, enter the desired defrosting time, then press Start/Stop.
Maintenance and Cleaning
Regular cleaning and maintenance will ensure the longevity and optimal performance of your microwave oven.
- Interior Cleaning: After each use, wipe the interior with a damp cloth to remove food splatters. For stubborn stains, use a mild detergent. Do not use abrasive cleaners or scouring pads.
- Exterior Cleaning: Clean the exterior surface with a soft, damp cloth. Avoid getting water into the ventilation openings.
- Turntable and Ring: The glass turntable and turntable ring can be removed and washed in warm, soapy water or in the dishwasher. Ensure they are completely dry before placing them back in the oven.
- Door Seal: Keep the door seal clean to ensure proper closure and efficient operation.
- Odor Removal: To remove odors, combine a cup of water with a few slices of lemon or a tablespoon of vinegar in a microwave-safe bowl. Heat on high for 2-3 minutes, then let it sit in the oven for 5 minutes before wiping clean.
Troubleshooting
| Problem | Possible Cause | Solution |
|---|---|---|
| Oven will not start. | Power cord not plugged in; Door not closed properly; Fuse blown or circuit breaker tripped. | Ensure plug is firmly in outlet; Close door securely; Check household fuse/circuit breaker. |
| Food not cooking evenly. | Food not stirred or turned; Turntable not rotating. | Stir or turn food halfway through cooking; Check if turntable and ring are correctly placed and clean. |
| Light not working. | Bulb burned out. | Contact qualified service personnel for bulb replacement. |
| Oven smells. | Food residue inside. | Clean oven interior thoroughly. Use odor removal method (lemon/vinegar). |
Specifications
- Brand: CLASSIC
- Model: P70B20AP-S1-W
- Capacity: 0.7 Cubic Feet
- Wattage: 700 Watts
- Installation Type: Countertop
- Product Dimensions: 17.8 x 12.7 x 10.3 inches (W x D x H)
- Item Weight: 25.1 Pounds
- Color: White
- Inner Material: Stainless Steel
- Control Type: Button, Touch
- Special Features: Defrost, 10 Power Levels, 6 One-Touch Menus
Warranty and Support
This CLASSIC microwave oven is covered by a limited warranty. Please refer to the warranty card included with your purchase for specific terms and conditions. For technical support, service, or parts inquiries, please contact CLASSIC customer service. Keep your proof of purchase for warranty claims.
Note: Specific warranty details and contact information are subject to change. Please refer to the documentation provided with your product or visit the official CLASSIC website for the most current information.
Related documentsP70B20AP-S1-W


Ask a question about this manual
Ask about setup, troubleshooting, compatibility, parts, safety, or missing instructions. Manuals+ will review the question and use this page’s manual context to help answer it.