
1. Introduction
This manual provides essential instructions for the safe assembly, operation, and maintenance of your vidaXL Outdoor Dog Kennel with Roof. This versatile enclosure is designed to provide a secure space for your dog's play, exercise, training, or protection. Please read all instructions carefully before assembly and retain this manual for future reference.
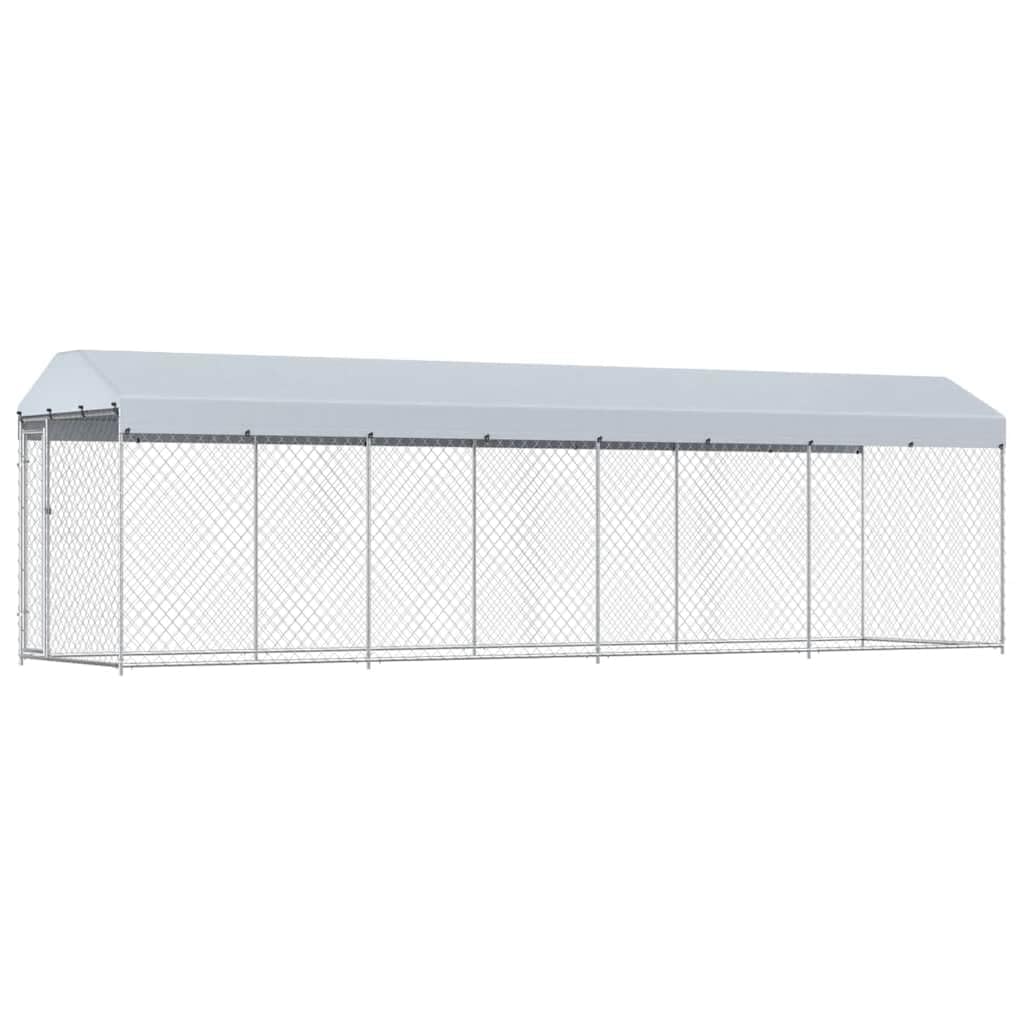
The kennel features a robust galvanized steel construction and a 100% polyethylene roof that is fire-retardant and UV-protected, offering shelter from various weather conditions. A hinged door with a locking latch ensures additional security for your pet.
2. Safety Information
- Read all instructions: Ensure you understand all assembly steps and safety warnings before proceeding.
- Adult assembly required: This product should be assembled by adults.
- Wear protective gear: Gloves are recommended during assembly to prevent cuts from metal edges or wire mesh.
- Check components: Before assembly, verify that all parts are present and undamaged. Do not use if any parts are missing or defective.
- Secure placement: Choose a level, stable surface for the kennel. Ensure it is anchored securely to prevent tipping or movement, especially in windy conditions.
- Regular inspection: Periodically check all connections, bolts, and the integrity of the wire mesh and roof for wear or damage. Tighten any loose fasteners.
- Pet supervision: While the kennel provides a secure enclosure, always supervise your pet, especially during initial use.
- Proper use: This kennel is intended for dogs. Do not use it for other animals or purposes.
- Ventilation: Ensure adequate ventilation within the kennel.
- Weather protection: While the roof offers protection, extreme weather conditions may require additional measures or bringing your pet indoors.
3. Package Contents
Before beginning assembly, ensure all components listed below are present. If any parts are missing or damaged, contact vidaXL customer support.
- Galvanized Steel Frame Components (Pipes, Connectors)
- Wire Mesh Fencing
- Hinged Door with Latch Mechanism
- Polyethylene Roof Cover
- Assembly Hardware (Bolts, Nuts, Washers, Wire Ties/Clips)
4. Assembly Instructions
Assembly requires at least two adults. Do not fully tighten bolts until all sections are aligned.
4.1. Frame Assembly
- Unpack Components: Carefully unbox all parts and lay them out on a clean, flat surface. Verify against the package contents list.
- Assemble Base Frame: Connect the horizontal and vertical pipes to form the base rectangle of the kennel. Use the appropriate connectors and loosely secure with bolts.
- Install Vertical Supports: Insert the vertical support pipes into the base frame connectors.
- Attach Top Frame: Connect the remaining horizontal pipes to the top of the vertical supports using the T-connectors. Ensure all connections are aligned.
- Install Roof Frame: Assemble the angled roof frame components and attach them to the top frame.

4.2. Wire Mesh Installation
- Unroll Mesh: Carefully unroll the wire mesh. This step may require patience as the mesh can be tangled.
- Attach Mesh to Frame: Starting from one corner, attach the wire mesh to the assembled frame using the provided wire ties or clips. Ensure the mesh is taut and evenly distributed around the frame.
- Secure All Edges: Secure the mesh along all horizontal and vertical frame pipes. Pay close attention to corners and edges to prevent gaps.
4.3. Door Installation
- Position Door Frame: Identify the designated opening for the door. Insert the door frame into position.
- Attach Hinges: Secure the door hinges to the main frame, ensuring the door swings freely and closes properly.
- Install Latch: Attach the locking latch mechanism to the door and the adjacent frame pipe. Test the latch to ensure it operates smoothly and securely.

4.4. Roof Cover Installation
- Drape Roof Cover: Carefully drape the polyethylene roof cover over the assembled roof frame.
- Secure Cover: Use the provided fasteners (bungee cords, clips, or ties) to secure the roof cover to the frame. Ensure it is taut to prevent water pooling and flapping in the wind.
4.5. Final Tightening and Inspection
Once all components are in place and aligned, systematically tighten all bolts and fasteners. Perform a thorough inspection of the entire kennel to ensure stability, security, and that there are no sharp edges or loose parts that could harm your pet.

5. Operating Instructions
- Opening/Closing the Door: To open, disengage the latch mechanism and swing the door outwards. To close, swing the door shut and engage the latch securely. Always ensure the latch is fully engaged when your pet is inside.
- Introducing Your Pet: Allow your pet to acclimate to the new enclosure gradually. Provide water, shelter, and toys to make the space comfortable.
- Monitoring: Regularly check on your pet while they are in the kennel.
6. Maintenance
- Regular Cleaning: Clean the kennel regularly to maintain hygiene. Remove any waste and debris. The galvanized steel frame can be wiped down with a damp cloth and mild detergent.
- Wire Mesh Inspection: Periodically inspect the wire mesh for any signs of damage, rust, or sharp points. Repair or replace damaged sections immediately to prevent injury to your pet.
- Frame and Fastener Check: Routinely check all frame connections and fasteners (bolts, nuts, wire ties). Tighten any loose bolts to ensure the structural integrity of the kennel.
- Roof Cover Care: Inspect the polyethylene roof cover for tears, holes, or signs of wear. Clean it with water and a soft brush if necessary. Ensure it remains taut to prevent water accumulation.
- Winter Care: In areas with heavy snowfall, regularly clear snow from the roof to prevent excessive weight accumulation, which could damage the frame.
7. Troubleshooting
- Kennel feels unstable:
Ensure all bolts are fully tightened. Verify the kennel is placed on a level surface. Consider anchoring the base to the ground for added stability.
- Wire mesh is loose or sagging:
Re-tension the wire mesh and add more wire ties or clips where needed to secure it firmly to the frame. Inspect for any broken wires and repair or replace as necessary.
- Door does not close securely:
Check the alignment of the door frame and hinges. Ensure the latch mechanism is installed correctly and is not obstructed. Adjust if necessary.
- Roof cover collects water:
Ensure the roof cover is stretched tightly and evenly over the roof frame. Adjust the tension of the securing fasteners. Check for any sagging in the roof frame itself.
- Difficulty during assembly:
Refer back to the assembly instructions and diagrams. Ensure all parts are correctly oriented before tightening. Do not force components together. Contact customer support if issues persist.
8. Specifications
| Model | 760x192x225 cm |
| Brand | vidaXL |
| Overall Dimensions (L x W x H) | 760 x 192 x 225 cm (299.2 x 75.6 x 88.6 inches) |
| Material | Galvanized Alloy Steel (Frame), 100% Polyethylene (Roof) |
| Color | Silver (Frame), Grey (Roof) |
| Mesh Gap Size | 1.6 inches (4 cm) |
| Number of Doors | 1 |
| Special Features | Durable, Robust, UV-protected and fire-retardant roof |
| Intended Use | Outdoor dog enclosure |
| Recommended Breed Size | Large |
| Item Weight | 82.31 Kilograms |
9. Warranty and Support
For information regarding product warranty, returns, or technical support, please refer to the documentation included with your purchase or contact vidaXL customer service directly through their official website or the retailer where the product was purchased.
Manufacturer: vidaXL


