
1. Introduction
Thank you for choosing the EROMMY 7.5FT Hexagonal Walk-in Greenhouse. This manual provides essential information for the safe assembly, operation, and maintenance of your new greenhouse. Please read these instructions thoroughly before beginning assembly and retain them for future reference.

Image 1.1: Fully assembled EROMMY Hexagonal Walk-in Greenhouse with plants on shelves.
2. Safety Information
Please observe the following safety precautions to ensure safe use and longevity of your greenhouse:
- Wind Conditions: Secure your greenhouse with extra ropes and stakes when wind speeds exceed 24 miles/hour (38 km/h). Install the greenhouse away from direct wind exposure.
- Snow Conditions: Keep the greenhouse cover clear of snow during snowy conditions. Snow coverage should not exceed 2 inches (5 cm). Excessive snow can cause structural damage.
- Assembly: Ensure all metal pieces are pushed completely into the connectors during assembly to maintain structural integrity.
- Shelf Capacity: Each single-tier shelf can bear a maximum of 20 lbs (9 kg). Do not overload shelves.
- Supervision: Do not allow children to play unsupervised around or inside the greenhouse.
3. Package Contents
Verify that all components are present before beginning assembly:
- Galvanized Steel Frame Components (various tubes and connectors)
- Transparent PE Plastic Cover
- 3-Tier Metal Shelves
- Plastic PE Connectors
- Tethers and Single-Sided Tape
- Slant Bracing Tubes
- Middle Reinforced Tubes
- Ground Ropes and Stakes

Image 3.1: Key components of the greenhouse kit, including frame parts and securing accessories.
4. Setup and Assembly
The EROMMY greenhouse is designed for straightforward assembly. It is recommended that two people assemble the greenhouse for ease and stability.
4.1 Assembly Steps
- Unpack Components: Lay out all parts and verify against the package contents list.
- Assemble Base Frame: Connect the base tubes using the plastic PE connectors to form the hexagonal base.
- Install Vertical Supports: Attach the vertical tubes to the base connectors.
- Add Shelves: Insert the 3-tier shelves into the designated slots on the vertical supports. Ensure they are securely seated.
- Construct Upper Frame: Continue building the upper frame structure, including slant bracing tubes and middle reinforced tubes for enhanced stability.
- Drape PE Cover: Carefully place the transparent PE plastic cover over the assembled frame. Ensure the roll-up door is correctly positioned.
- Secure Cover: Attach the cover to the frame using the included tethers and single-sided tape. The overlong PE cover at the base can be sealed by soil or weight to keep warm inside and provide additional stability.
- Anchor Greenhouse: Use the provided ground ropes and stakes to firmly anchor the greenhouse to the ground. For windy conditions, consider additional anchoring methods.
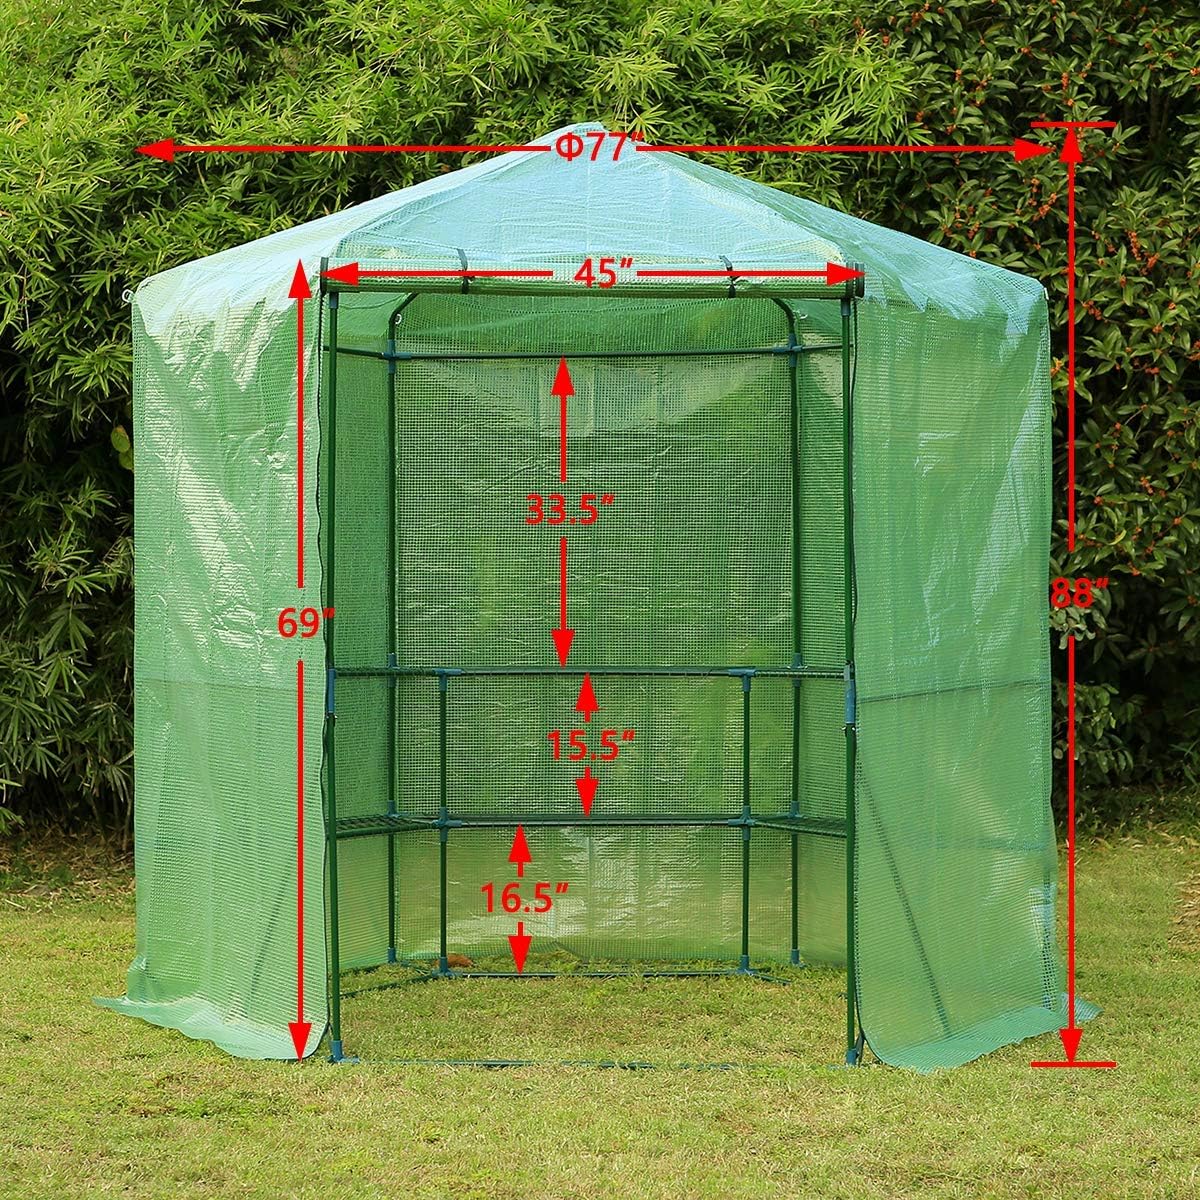
Image 4.1: Dimensional overview of the greenhouse structure.
5. Operating Instructions
5.1 Roll-Up Door Operation
The greenhouse features a large zipped roll-up door for easy access and ventilation. To open, unzip the door completely and roll it upwards. Secure it at the top using the integrated ties to keep it open. To close, unfasten the ties, roll the door down, and zip it securely.

Image 5.1: The roll-up door provides ventilation, and the closed cover offers cold protection.
5.2 Plant Placement and Growth
Utilize the three-tier shelves to organize your plants. The shelves are removable, allowing you to adjust the internal space to accommodate taller plants as they grow. Ensure adequate spacing between plants for optimal air circulation and light exposure.

Image 5.2: Removable shelves provide flexible space for various plant sizes.
6. Maintenance
Regular maintenance will extend the life of your EROMMY greenhouse.
- Cleaning the Cover: Periodically clean the PE plastic cover with mild soap and water to ensure maximum light transmission. Avoid abrasive cleaners.
- Frame Inspection: Regularly check all frame connections and ensure they are secure. Tighten any loose connections.
- Weather Preparedness: During periods of high wind or heavy snow, take extra precautions as outlined in the Safety Information section. Consider temporarily disassembling the greenhouse or reinforcing it further in extreme weather.
- Shelf Integrity: Inspect shelves for any signs of damage or bending, especially if heavy pots are used.

Image 6.1: The extended PE cover helps secure the greenhouse and retain warmth.
7. Troubleshooting
Here are solutions to common issues you might encounter:
- Greenhouse Instability in Wind: If the greenhouse rattles or feels unstable, ensure all ground stakes and ropes are firmly secured. Consider adding sandbags or heavy objects to the extended PE cover at the base. For persistent issues, additional external anchoring or temporary disassembly during severe weather may be necessary.
- Shelves are Flimsy/Unstable: Ensure all shelf components are fully inserted into their connectors. If shelves feel loose, use zip ties or similar fasteners to secure them more tightly to the frame. Avoid exceeding the 20 lbs (9 kg) weight limit per shelf.
- Poor Heat Retention: Verify that the roll-up door is fully zipped and sealed. Ensure the extended PE cover at the base is properly weighted down with soil or other materials to prevent heat loss from the bottom.
- Difficulty with Assembly: Double-check the assembly manual for correct part orientation and connection points. Ensure all tubes are fully seated into the plastic connectors. Sometimes, a slight rotation of a tube can help it fit better.
8. Specifications
Detailed product specifications for your EROMMY greenhouse:
| Feature | Detail |
|---|---|
| Brand | EROMMY |
| Model | 7.5FT Hexagonal Walk-in Greenhouse with 3-Tier Shelf |
| Product Dimensions (L x W x H) | 480"L x 144"W x 90"H (Note: This appears to be a general dimension, actual hexagonal footprint is approx. 77"W x 88"H) |
| Overall Greenhouse Dimensions (H x W) | 88"H x 77"W |
| Color | Green |
| Cover Material | Polyethylene (PE) |
| Frame Material | Alloy Steel (Galvanized Finish) |
| Number of Tiers | 3 (6 tiers of flower shelves on 3 sides) |
| Single Tier Shelf Capacity | 20 lbs (9 kg) |
| Door Style | Roll-up door with zipper |
| Closure Type | Zipper |
| Number of Doors | 1 |
| GTIN / UPC | 761882352594 |
| ASIN | B081GJSQ7L |
9. Warranty and Support
EROMMY stands behind the quality of its products. For specific warranty details, please refer to the warranty card included with your purchase or visit the official EROMMY website. If you encounter any issues or require assistance, please contact EROMMY customer support through the retailer where you purchased the product or via the contact information provided on the EROMMY brand store page.
Please have your model number (7.5FT Hexagonal Walk-in Greenhouse with 3-Tier Shelf) and purchase date available when contacting support.