1. Introduction
The KeeYees Electronics Fun Kit is an all-in-one starter kit designed for individuals interested in learning about electronics, especially beginners. It provides a comprehensive selection of basic electronic components to facilitate hands-on learning and circuit building.
This kit includes 56 distinct types of electronic components, totaling 526 individual pieces, along with 265 wires. It is ideal for constructing various circuits on a breadboard or universal PCB.
2. Product Contents
The KeeYees Electronics Fun Kit contains a wide array of components essential for basic electronic projects. Below is a general overview of the included items:
- Breadboard
- Jumper Wires (various types)
- Universal PCBs
- Power Module
- 5mm LEDs (various colors)
- Resistors (various values)
- LED Display
- Electrolytic Capacitors
- Ceramic Capacitors
- Buttons/Switches
- Transistors
- Diodes
- Potentiometer
- Piezoelectric Speaker
- IC Chips (e.g., Timer IC NE555)
- Photoresistor
- Thermistor

Figure 2.1: Overview of all components included in the KeeYees Electronics Fun Kit, neatly arranged.

Figure 2.2: Detailed list of 56 component types with quantities.
3. Setup Instructions
Before beginning any project, ensure you have a clean and organized workspace. Identify the components required for your specific circuit from the kit.
- Power Module Setup: The kit includes a power module. Connect a 6.5-9V DC power source (e.g., a 9V battery with a snap connector or a DC adapter) to the power module. Alternatively, a USB power source can be used. Select the desired output voltage (3.3V or 5V) using the switch on the module.
- Breadboard Placement: Insert the power module into the breadboard. The module provides power rails to distribute voltage to your circuit.
- Component Identification: Familiarize yourself with the various resistors, LEDs, and other components. Resistors are color-coded; refer to standard resistor color code charts if needed.
- Initial Circuit Assembly: For your first project, start with a simple circuit, such as lighting an LED. Use jumper wires to connect components on the breadboard according to your circuit diagram.
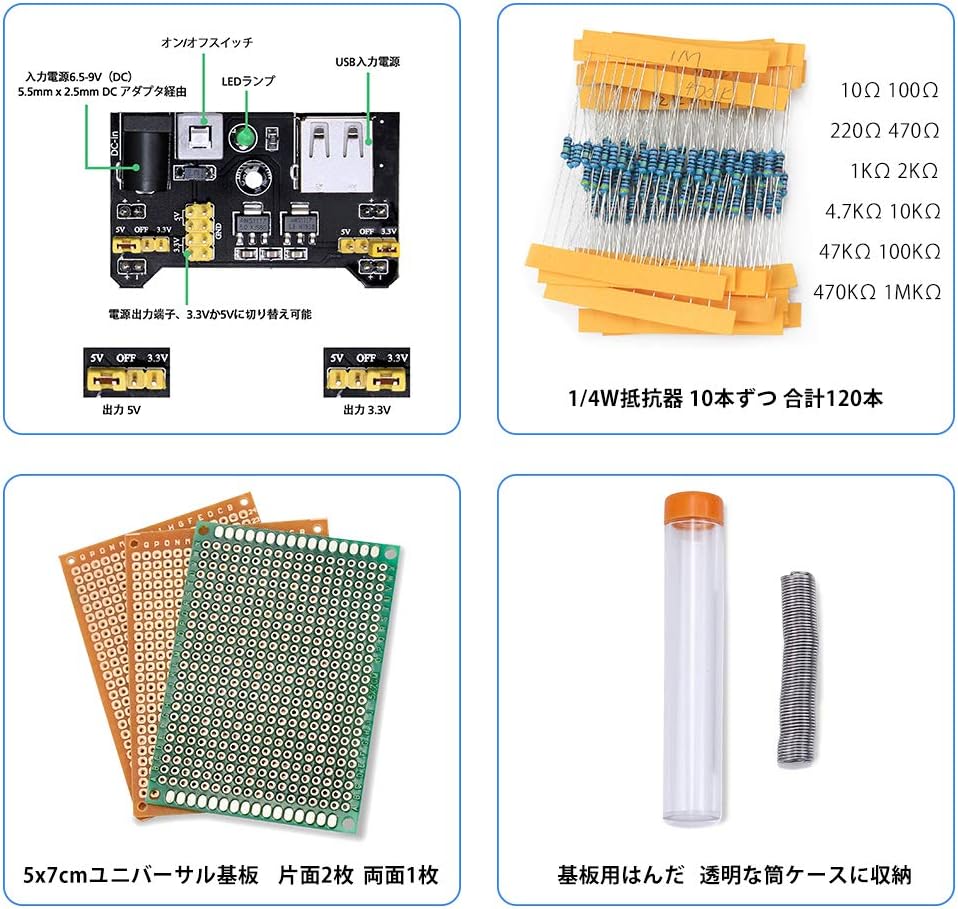
Figure 3.1: Breadboard Power Module with 5V/3.3V output selection.
4. Operating Instructions
This kit is designed for experimental learning. To effectively use the kit, it is highly recommended to follow the provided tutorial. The tutorial contains 11 lessons that guide you through various electronic concepts and projects.
4.1 Accessing the Tutorial
A Japanese tutorial is available to assist with your learning. You can obtain this tutorial by contacting KeeYees support, or it can be downloaded directly. Refer to the product images, specifically the image showing tutorial pages, for download instructions or a direct link.

Figure 4.1: Sample pages from the Japanese tutorial.
4.2 Example Experiments
The tutorial will guide you through experiments such as:
- Lighting up LEDs
- Operating a buzzer
- Creating flowing light patterns with LEDs
- Displaying numbers using an LED display
- Controlling buzzer volume with a potentiometer
- Playing musical notes (do-re-mi-fa-sol-la-si-do) using a piezoelectric speaker

Figure 4.2: Examples of circuits built with the kit.
5. Maintenance
Proper maintenance ensures the longevity and functionality of your electronic components.
- Storage: Store all components in their original packaging or in a dedicated storage box to prevent loss or damage. Keep them away from dust, moisture, and extreme temperatures.
- Handling: Handle components carefully, especially delicate items like ICs and LEDs. Avoid bending leads excessively.
- Cleaning: If components become dusty, gently clean them with a soft, dry brush or compressed air. Do not use liquids unless specifically designed for electronics cleaning.
- Power Safety: Always disconnect power before making changes to your circuit. Ensure correct polarity when connecting power sources.
6. Troubleshooting
If you encounter issues while building or operating circuits, consider the following general troubleshooting steps:
- No Power: Check if the power module is correctly connected to a power source and if the voltage selection switch is set appropriately (3.3V or 5V). Ensure the breadboard connections for power are secure.
- Component Not Working: Verify the component's orientation (e.g., LED polarity, IC notch). Check for loose connections or incorrect wiring on the breadboard. Test individual components if possible.
- Incorrect Output: Double-check your circuit diagram against your physical build. Ensure all resistor values, capacitor types, and other component specifications match the design.
- Short Circuits: Look for any wires or component leads that might be accidentally touching, creating an unintended connection.
- Refer to Tutorial: The provided tutorial often includes troubleshooting tips for specific lessons.
7. Specifications
| Feature | Detail |
|---|---|
| Brand | KeeYees |
| Model | Electronics Fun Kit Starter Kit |
| Number of Component Types | 56 |
| Total Components | 526 pieces (including 265 wires) |
| Main Material | Ceramic (referring to ceramic capacitors) |
| Battery Usage | No (external power required for circuits) |
| Package Size | 23.2 x 18 x 5.3 cm |
| Package Weight | 440 g |
| ASIN | B081F7FNR7 |
| UPC | 713871272734 |
8. Warranty and Support
For any questions, technical assistance, or to request the Japanese tutorial, please contact the seller directly. The seller for this product is KeeYees-JP. Please refer to your purchase documentation or the Amazon product page for specific contact information.
Information regarding specific warranty terms is not provided in the product details. Please contact the seller for any warranty-related inquiries.


