
Bristan RS2 BSM C
Contents
Bristan RS2 BSM C Renaissance Bath Shower Mixer Tap User Manual
Model: RS2 BSM C
1. Introduction
Thank you for choosing the Bristan RS2 BSM C Renaissance Bath Shower Mixer Tap. This product is designed to provide reliable performance and enhance the aesthetic of traditional bathrooms. This manual provides essential information for the safe installation, operation, maintenance, and troubleshooting of your new bath shower mixer.
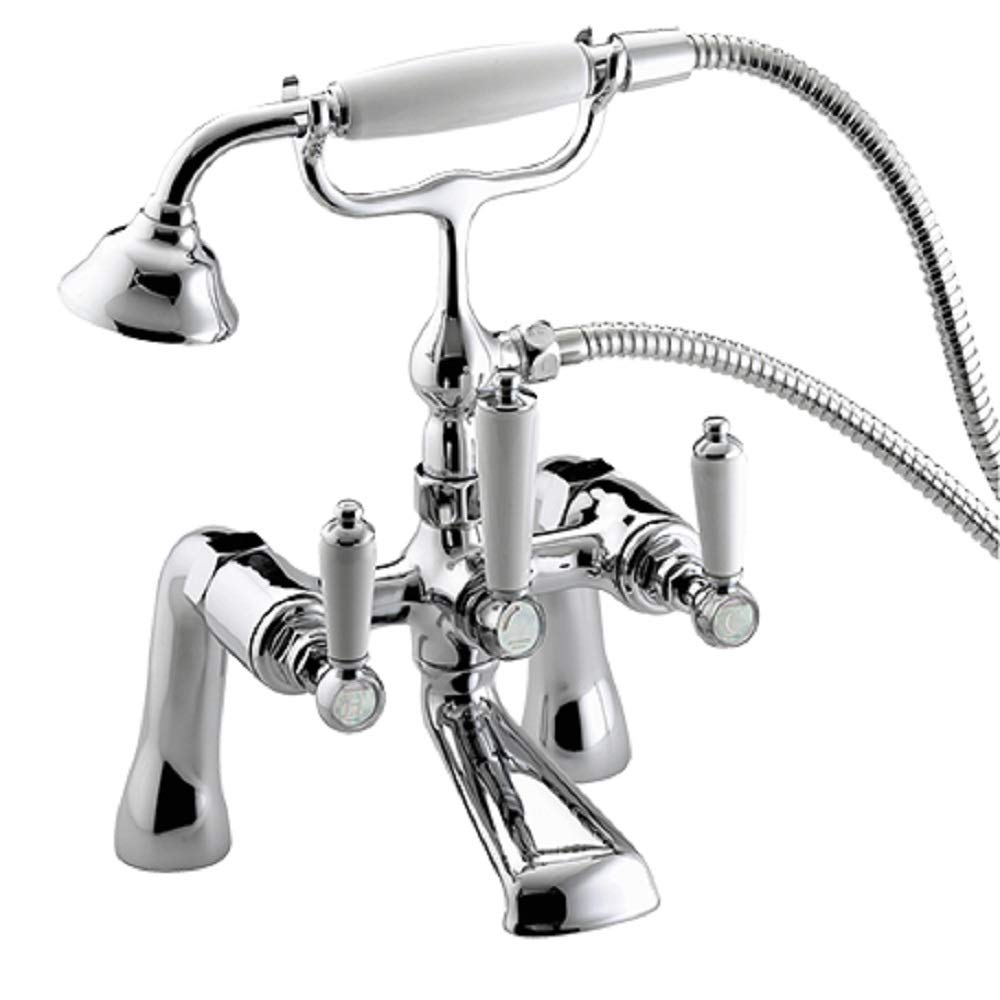
Image 1: The Bristan RS2 BSM C Renaissance Bath Shower Mixer Tap, showcasing its traditional design and chrome finish.
1.1 Safety Information
- Always turn off the main water supply before attempting any installation or maintenance.
- If you are unsure about any part of the installation process, consult a qualified plumber.
- Ensure all connections are secure to prevent leaks.
- Do not use abrasive cleaners or materials that could damage the chrome finish.
2. Package Contents
Please check that all components are present before beginning installation:
- 1x Bath Shower Mixer unit
- 2x Backnuts & Washers
- 1x Single Mode Handset (shower head)
- 1x Cradle (shower head holder)
- 1x 1.5m Hose (for shower handset)
- 1x Fitting Instructions (detailed installation guide)
3. Installation
This bath shower mixer is designed for deck mounting on a bathtub. For detailed, step-by-step instructions, please refer to the separate "Fitting Instructions" document included in your package. The following is a general overview.
3.1 Tools and Materials (Not Supplied)
- Adjustable spanner or appropriate wrench
- PTFE tape
- Screwdriver (if required for cradle mounting)
- Sealant (if required for deck mounting)
3.2 General Installation Steps
- Prepare the Installation Area: Ensure the water supply is turned off at the mains. Clear the area around the bath tap holes.
- Mount the Mixer: Position the bath shower mixer onto the pre-drilled holes on your bathtub. Secure it from underneath using the provided backnuts and washers. Ensure a watertight seal.
- Connect Water Supplies: Connect the hot and cold water supply pipes to the corresponding inlets on the mixer. Use PTFE tape on threaded connections to ensure a leak-free seal.
- Install Shower Components: Attach the 1.5m hose to the mixer's shower outlet. Connect the single mode handset to the other end of the hose. Mount the cradle in a convenient location on the wall or bath surround.
- Test for Leaks: Slowly turn on the main water supply and check all connections for any signs of leakage. Tighten connections as necessary.
- Flush the System: Allow water to run through the tap and shower for a few minutes to flush out any debris from the pipes.
Important: Always refer to the specific "Fitting Instructions" provided with your product for detailed diagrams and safety warnings.
4. Operation
The Bristan RS2 BSM C features two handles for precise control of water temperature and flow, and a diverter to switch between bath filler and shower functions.
4.1 Water Flow and Temperature Control
- The left handle controls the hot water supply.
- The right handle controls the cold water supply.
- Turn the handles to adjust the flow rate and mix hot and cold water to achieve your desired temperature. The 1/4 turn ceramic disc valves provide smooth and precise control.
4.2 Diverter Function (Bath to Shower)
To switch water flow from the bath spout to the shower handset:
- Ensure water is flowing from the bath spout.
- Pull up the diverter knob, typically located on the main body of the mixer, to redirect water to the shower handset.
- Push the diverter knob down to return water flow to the bath spout.
5. Maintenance and Cleaning
Regular cleaning and proper maintenance will ensure the longevity and appearance of your Bristan bath shower mixer.
5.1 Cleaning the Chrome Finish
- Clean the chrome finish regularly with a soft, damp cloth and mild soap.
- Rinse thoroughly with clean water and dry with a soft cloth to prevent water spots.
- Do not use abrasive cleaners, scouring pads, harsh chemicals, or polishes containing alcohol, acids, or abrasives, as these can damage the chrome finish and void your warranty.
5.2 Ceramic Disc Valves
The tap is fitted with long-life ceramic disc valves, which generally require no maintenance. In case of persistent drips or leaks from the handles, it may indicate wear in the ceramic cartridge, which should be replaced by a qualified professional.
5.3 Shower Handset and Hose
- Periodically clean the nozzles of the shower handset to remove limescale buildup. This can often be done by gently rubbing the nozzles or using a descaling solution suitable for bathroom fixtures.
- Inspect the shower hose for any signs of wear, kinks, or damage. Replace if necessary.
6. Troubleshooting
Here are some common issues and their potential solutions:
| Problem | Possible Cause | Solution |
|---|---|---|
| Low Water Flow |
|
|
| Tap Dripping/Leaking |
|
|
| Water Leaking from Shower Hose Connection |
|
|
If you encounter issues not listed here or if solutions do not resolve the problem, please contact Bristan Customer Service or a qualified plumber.
7. Specifications
| Model Number | RS2 BSM C |
| Brand | Bristan |
| Finish | Chrome |
| Main Construction Material | Brass |
| Handle Material | Ceramic |
| Number of Handles | 2 |
| Mounting Type | Deck Mount |
| Valve/Cartridge Type | 3/4 Inch Ceramic Disc Valves |
| Maximum Pressure | 3 Bars |
| Flow Rate (at 3.0 bar) | 57.3 Litre/minute |
8. Warranty and Support
Bristan products are manufactured to the highest standards and come with a comprehensive warranty.
8.1 Manufacturer's Warranty
This product comes with a 5-year manufacturer's warranty. Bristan also offers a Lifetime Guarantee on certain aspects of their products, ensuring repair, replacement, or refund on all parts and finishes under specific terms and limitations.
Image 2: A visual representation of the Bristan Lifetime Guarantee, featuring a diamond icon and text stating "Our Lifetime Guarantee is Watertight. Repair, replacement or refund on all parts and finishes." This guarantee is subject to terms and limitations.
For full details on the warranty and lifetime guarantee, including terms and conditions, please visit the official Bristan website or refer to the warranty card included with your product.
8.2 Customer Support
If you require assistance with installation, have questions about your product, or need to make a warranty claim, please contact Bristan Customer Service. Contact details can typically be found on the Bristan website or in the product packaging.
Website: www.bristan.com
Please have your model number (RS2 BSM C) and proof of purchase ready when contacting support.
Ask a question about this manual
Ask about setup, troubleshooting, compatibility, parts, safety, or missing instructions. Manuals+ will review the question and use this page’s manual context to help answer it.