
Introduction
The IMPERIAL DB 6 S HD is a compact HDTV satellite and multimedia receiver designed for high-quality DVB-S/S2 program reception. It offers a range of features including EPI program information, automatic software updates, and child safety functions. Its USB port allows for digital media playback in various formats. The receiver's 12V DC external power supply makes it suitable for both home and mobile use, such as camping.
Safety Information
- Ensure the receiver is placed on a stable, flat surface.
- Do not expose the device to rain or moisture to prevent fire or electric shock.
- Avoid blocking ventilation openings. Proper ventilation is crucial to prevent overheating.
- Use only the provided power adapter. Using unauthorized adapters may damage the device and void the warranty.
- Do not attempt to open or repair the device yourself. Refer all servicing to qualified personnel.
- Keep the device away from direct sunlight, heat sources, and strong magnetic fields.
- Unplug the device during lightning storms or when unused for long periods.
Package Contents
Please check that all items are present in the package:
- IMPERIAL DB 6 S HD Receiver
- Remote Control
- Power Adapter (12V DC)
- User Manual (this document)
- 2 AAA Batteries (for remote control)
Product Overview
Familiarize yourself with the components and ports of your IMPERIAL DB 6 S HD receiver.

Figure 1: Front View of the Receiver. This image shows the sleek black design of the IMPERIAL DB 6 S HD receiver from the front. The "HDTV" logo is visible on the left, and "IMPERIAL DB 6 S HD" is printed on the right. A small green indicator light is visible in the center, indicating power status.

Figure 2: Rear View of the Receiver. This image displays the rear panel of the receiver, highlighting its connectivity options. From left to right, you can see the LNB IN (satellite input) port, two USB 2.0 ports, an HDMI output port, and the 12V DC power input. The HDMI logo is also visible on the right side of the panel.

Figure 3: Remote Control. This image shows the black remote control for the IMPERIAL DB 6 S HD receiver. It features standard navigation buttons (up, down, left, right, OK), number keys, volume and channel controls, and dedicated buttons for functions like Menu, Timer, Audio, Zoom, Record, Text, Still, HDMI, EPI, Exit, Info, and TV/Radio mode.
Setup
Follow these steps for the initial setup of your IMPERIAL DB 6 S HD receiver.
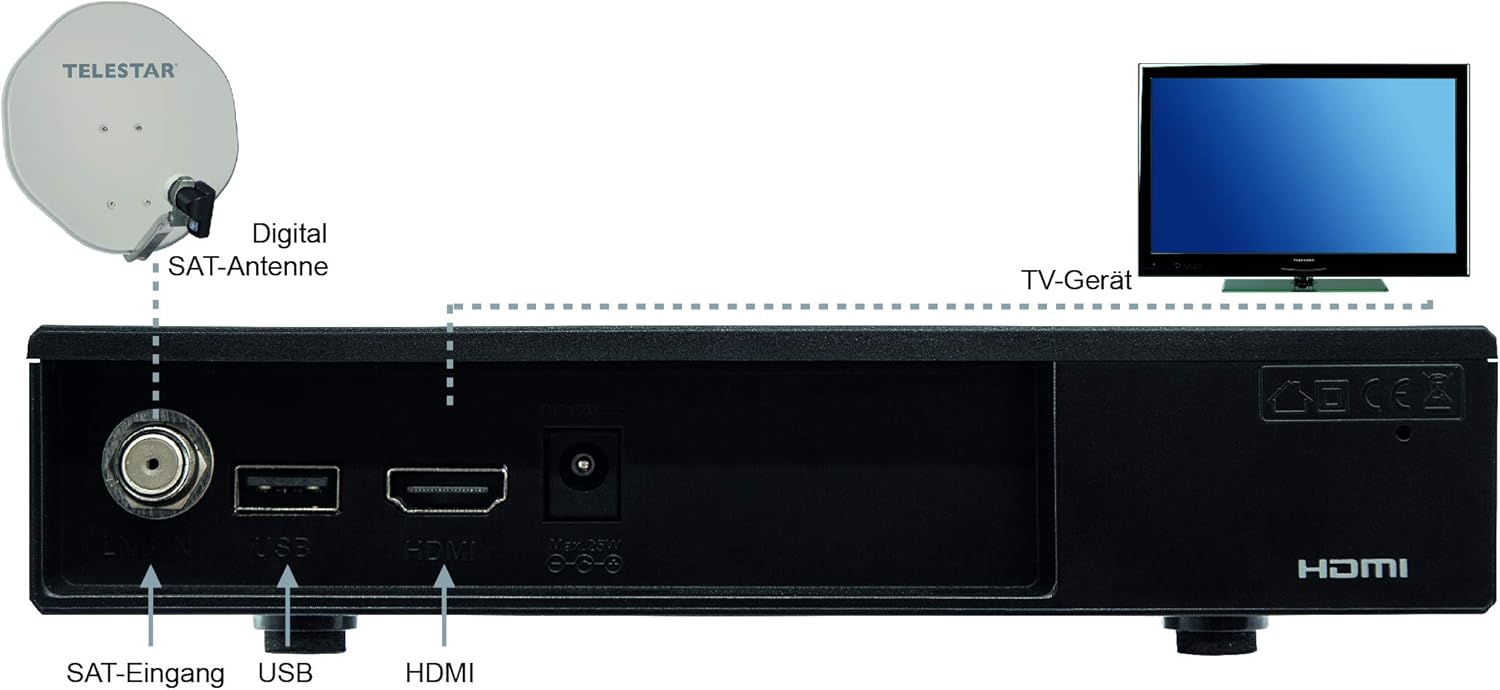
Figure 4: Connection Diagram. This diagram illustrates how to connect the IMPERIAL DB 6 S HD receiver. A digital satellite antenna (SAT-Antenne) is shown connected to the "SAT-Eingang" (SAT Input) port on the receiver. The receiver's HDMI output is connected to a TV (TV-Gerät). The diagram also labels the USB port and the HDMI port on the receiver for clarity.
- Connect the Satellite Antenna: Connect your satellite dish cable to the "LNB IN" port on the rear of the receiver (refer to Figure 2 and Figure 4).
- Connect to TV: Use an HDMI cable (not included) to connect the "HDMI" port on the receiver to an HDMI input on your television (refer to Figure 2 and Figure 4).
- Connect Power: Plug the provided 12V DC power adapter into the "DC 12V" port on the receiver, then plug the adapter into a wall outlet.
- Insert Batteries into Remote: Open the battery compartment on the back of the remote control (Figure 3) and insert the two AAA batteries, ensuring correct polarity.
- Power On: Turn on your TV and select the correct HDMI input. The receiver should power on automatically or can be powered on using the remote control.
- Initial Scan: Follow the on-screen instructions to perform an initial channel scan. This process will detect and store available satellite channels.
Operating Instructions
Basic Operation
- Power On/Off: Press the Power button on the remote control (Figure 3).
- Channel Selection: Use the P+/- buttons or the number keys on the remote to change channels.
- Volume Control: Use the +/- buttons (next to NAV) to adjust the volume.
- Menu Navigation: Press the MENU button to access the main menu. Use the arrow keys (▲ ▼ ◄ ►) to navigate and OK to confirm. Press Exit to return to live TV.
- Program Information (EPI): Press the EPI button to view program information.
Multimedia Playback
The receiver supports multimedia playback via its USB 2.0 ports.
- Insert a USB storage device (e.g., USB flash drive) into one of the USB ports on the rear of the receiver (Figure 2).
- Navigate to the "Multimedia" or "Media Player" section in the main menu.
- Select the type of media you wish to play (e.g., Video, Music, Photo).
- Browse your USB device for the desired file and press OK to play.
Note: Supported file formats may vary. Ensure your media files are compatible for optimal playback.
Maintenance
- Cleaning: Disconnect the power before cleaning. Use a soft, dry cloth to wipe the exterior of the receiver. Do not use liquid cleaners or aerosol sprays.
- Ventilation: Ensure that the ventilation slots on the receiver are not blocked by dust or other objects. Regularly check and clean if necessary.
- Software Updates: The receiver supports automatic software updates. Check the system settings menu for options to update the firmware, which can improve performance and add new features.
Troubleshooting
| Problem | Possible Cause / Solution |
|---|---|
| No picture or sound. |
|
| "No Signal" message on screen. |
|
| Remote control not working. |
|
| USB media not playing. |
|
Specifications
| Brand | Imperial |
| Model Number | 77-563-00 |
| Color | Black |
| Connectivity Technology | Audio-Video-Chinch, HDMI |
| Total USB Ports | 2 |
| Total HDMI Ports | 1 |
| Voltage | 12 Volts |
| Video Output Ports | 1 |
| Image Format | 16:9 |
| Power Source | External 12V DC Adapter |
| DVB Standard | DVB-S/S2 |
| Media Player | USB multimedia player for various formats |
| Special Features | EPI program info, automatic software update, child safety, SCR compatible (DIN EN 50494 and 50607) |
Warranty and Support
For warranty information, please refer to the warranty card included with your product or contact your local retailer. Keep your proof of purchase for any warranty claims.
For technical support or further assistance, please visit the manufacturer's official website or contact their customer service department. Contact details are typically provided in the product packaging or on the manufacturer's website.
Manufacturer: TELESTAR-Digital GmbH


