KBS MBF-011
KBS 17-in-1 Bread Maker Instruction Manual
Model: MBF-011
Introduction
Thank you for choosing the KBS 17-in-1 Bread Maker. This appliance is designed to simplify your bread-making process with its advanced features and versatile programs. Please read this manual thoroughly before first use to ensure safe and optimal operation.

Image: The KBS 17-in-1 Bread Maker in stainless steel finish, shown with a freshly baked loaf of bread, a jar of jam, and fresh strawberries, highlighting its versatility.
Important Safety Instructions
Always follow basic safety precautions when using electrical appliances to reduce the risk of fire, electric shock, and/or injury to persons, including the following:
- Read all instructions.
- Do not touch hot surfaces. Use handles or knobs.
- To protect against electric shock, do not immerse cord, plugs, or bread maker in water or other liquid.
- Close supervision is necessary when any appliance is used by or near children.
- Unplug from outlet when not in use and before cleaning. Allow to cool before putting on or taking off parts.
- Do not operate any appliance with a damaged cord or plug or after the appliance malfunctions, or has been dropped or damaged in any manner.
- The use of accessory attachments not recommended by the appliance manufacturer may cause injuries.
- Do not use outdoors.
- Do not let cord hang over edge of table or counter or touch hot surfaces.
- Do not place on or near a hot gas or electric burner, or in a heated oven.
- Extreme caution must be used when moving an appliance containing hot oil or other hot liquids.
- To disconnect, turn any control to "off", then remove plug from wall outlet.
- Do not use appliance for other than intended use.
Product Components and Accessories
The KBS 17-in-1 Bread Maker comes with essential components and accessories to facilitate your baking experience.
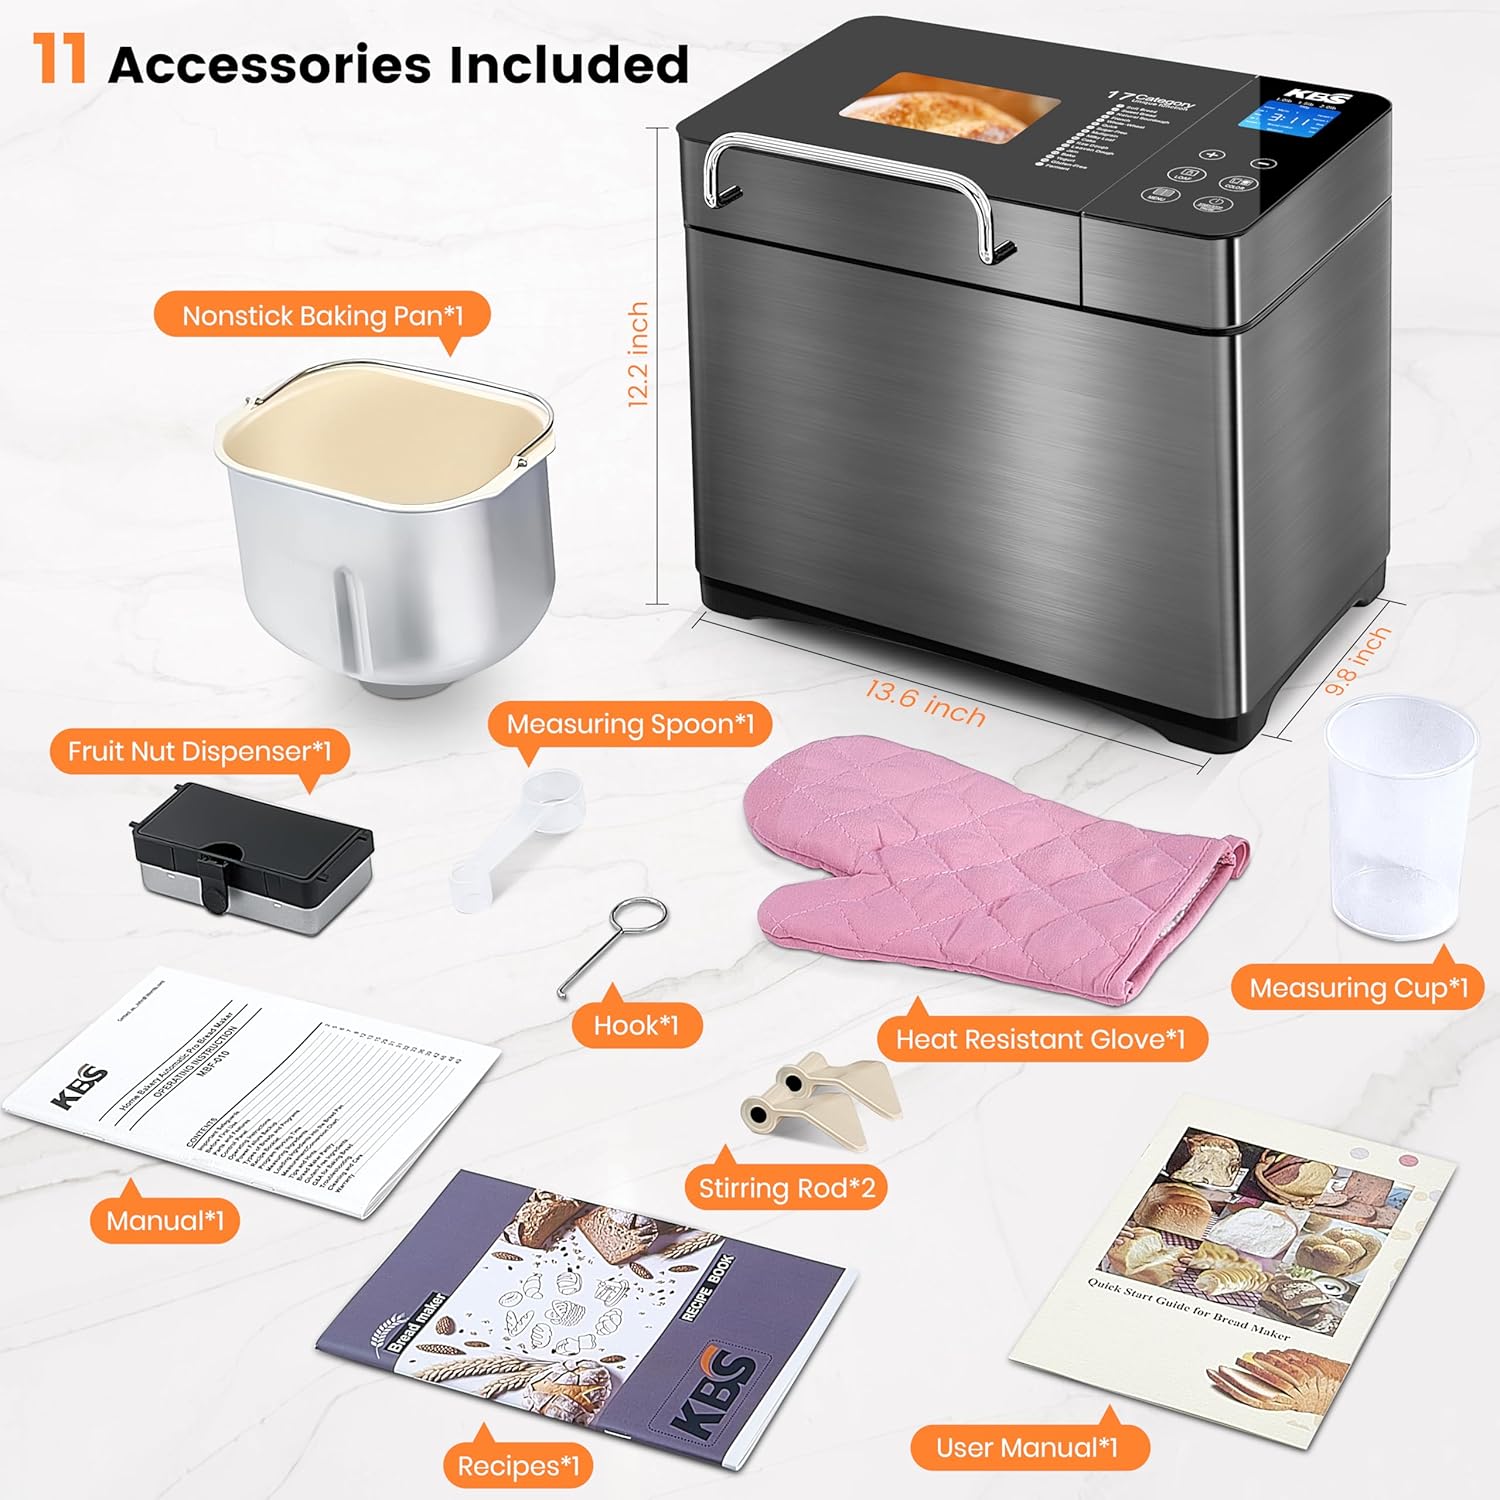
Image: An exploded view of the KBS Bread Maker and its included accessories, such as the nonstick baking pan, automatic fruit and nut dispenser, measuring spoon, hook for paddle removal, heat-resistant glove, and two stirring rods.
Included Accessories:
- Nonstick Baking Pan (1)
- Fruit Nut Dispenser (1)
- Measuring Spoon (1)
- Hook (1) - For removing the kneading paddle from baked bread.
- Heat Resistant Glove (1)
- Stirring Rods (2)
- Measuring Cup (1)
Setup and First Use
- Unpacking: Carefully remove the bread maker and all accessories from the packaging.
- Cleaning: Before first use, wash the bread pan, kneading paddles, measuring cup, and measuring spoon with warm, soapy water. Rinse thoroughly and dry all parts. Wipe the exterior of the bread maker with a damp cloth.
- Placement: Place the bread maker on a stable, flat, heat-resistant surface, away from direct sunlight and heat sources. Ensure adequate ventilation around the appliance.
- Install Kneading Paddle: Insert the kneading paddle onto the shaft inside the bread pan. Ensure it clicks into place securely.
- Insert Bread Pan: Place the bread pan into the bread maker, pressing down firmly until it locks into position.
- Power Connection: Plug the power cord into a grounded electrical outlet. The display will light up, indicating the bread maker is ready for use.

Image: A visual guide demonstrating the three easy steps to operate the bread maker: adding ingredients, selecting settings on the touch panel, and the final baked bread.
Operating Instructions
Control Panel Overview:
Video: An official demonstration of the KBS Bread Maker's control panel and its various functions, including program selection, loaf size, and crust color settings.
The bread maker features an intuitive touch panel for easy operation. Key buttons include:
- MENU: Press to cycle through the 17 automatic programs.
- LOAF: Select 1.0 lb, 1.5 lb, or 2.0 lb loaf size.
- COLOR: Choose light, medium, or dark crust color.
- +/-: Adjust the delay timer.
- START/STOP/PAUSE: Start, pause, or stop the baking cycle.
Baking Process:
- Add Ingredients: Add ingredients to the bread pan in the order specified by your recipe (typically liquids first, then dry ingredients, with yeast last). Ensure the kneading paddle is correctly installed.
- Select Program: Press the MENU button to select the desired program (e.g., Basic, French, Whole Wheat, Gluten-Free). The bread maker offers 17 programs, including options for dough, jam, and yogurt.
- Choose Loaf Size and Crust Color: Use the LOAF and COLOR buttons to set your preferences.
- Automatic Nut Dispenser: If your recipe includes nuts or fruits, place them in the automatic nut dispenser. The dispenser will release them into the dough at the optimal time during the kneading cycle.
- Start Baking: Press the START/STOP/PAUSE button to begin the cycle. The bread maker will automatically knead, rise, and bake.
- Delay Timer (Optional): To delay the start of the baking process, use the +/- buttons to set the desired delay time (up to 15 hours).
- Keep Warm Function: After baking, the bread maker will automatically switch to a 1-hour keep warm function to maintain freshness.
- Remove Bread: Once the cycle is complete, unplug the bread maker. Using the heat-resistant glove, carefully remove the bread pan. Invert the pan to release the bread onto a wire rack to cool. Use the hook to remove the kneading paddle if it remains embedded in the bread.

Image: A visual representation of the bread maker's automated process, from adding ingredients and selecting a program to the machine kneading the dough and producing a finished loaf.

Image: This graphic illustrates the 15-hour delay timer and 1-hour keep warm functions, enabling users to schedule baking for fresh bread at their convenience, such as in the morning.
Care and Maintenance
Proper care and maintenance will extend the life of your KBS Bread Maker.
- Cleaning the Bread Pan and Kneading Paddle: After each use, remove the bread pan and kneading paddle. Wash them with warm, soapy water. The ceramic nonstick coating is designed for easy cleaning. Avoid abrasive cleaners or scouring pads that could damage the nonstick surface. These parts can be machine washed.
- Cleaning the Exterior: Wipe the exterior of the bread maker with a soft, damp cloth. Do not use harsh chemicals or abrasive cleaners. Never immerse the main unit in water or any other liquid.
- Cleaning the Lid and Viewing Window: Wipe the inside of the lid and the viewing window with a damp cloth. For stubborn stains, use a mild detergent.
- Storage: Ensure the bread maker is clean and completely dry before storing. Store it in a cool, dry place.

Image: A cross-section view highlighting the five layers of the healthy ceramic bread pan, designed for superior nonstick performance and durability, processed at 3,000°F.
Troubleshooting Guide
If you encounter issues with your bread maker, refer to the following common problems and solutions:
| Problem | Possible Cause | Solution |
|---|---|---|
| Bread does not rise | Expired yeast, incorrect water temperature, too much salt/sugar, wrong flour type. | Check yeast expiration date. Use water between 105-115°F (40-46°C). Ensure correct ingredient measurements. Use bread flour for best results. |
| Bread is too dense/heavy | Too much flour, not enough liquid, low room temperature. | Measure ingredients precisely. Increase liquid slightly if dough appears too dry. Ensure room temperature is not too cold. |
| Bread collapses during baking | Too much liquid, too much yeast, high humidity. | Reduce liquid slightly. Reduce yeast amount. Avoid opening the lid during baking. |
| Kneading paddle stuck in bread | Common occurrence. | Use the provided hook to carefully remove the paddle after the bread has cooled slightly. |
| Machine not starting | Not plugged in, power outage, incorrect program selection. | Ensure power cord is securely plugged in. Check household circuit breaker. Re-select program and press START. |
Product Specifications
| Feature | Detail |
|---|---|
| Brand | KBS |
| Model Number | MBF-011 |
| Color | Stainless Steel |
| Product Dimensions | 9.8"D x 13.6"W x 12.2"H |
| Item Weight | 14.7 pounds |
| Wattage | 710 watts (Dual Heaters) |
| Number of Programs | 17 (including Gluten-Free, French, Whole Wheat, Sourdough, Pizza Dough, Jam, Yogurt, Cake) |
| Loaf Sizes | 1 lb, 1.5 lb, 2 lb |
| Crust Colors | Light, Medium, Dark |
| Pan Material | Ceramic Nonstick (PTFE/PFOA/lead-free) |
| Timer Function | 15-hour delay timer |
| Keep Warm Function | 1-hour automatic keep warm |
| Power Failure Backup | 15 minutes |
| Certifications | ETL, FCC |
| Country of Origin | China |

Image: The control panel displaying the 17 automatic programs, including options for various bread types, dough, jam, and yogurt.

Image: This graphic illustrates the three available loaf sizes (1lb, 1.5lb, 2lb) and three crust color options (light, medium, dark) that can be selected on the bread maker.
Warranty and Customer Support
KBS stands behind the quality of its products. The KBS Bread Maker comes with a 3-year after-sales support and free lifetime technical assistance.
The product is certified by ETL and FCC, ensuring high safety and quality standards.
For any inquiries, technical support, or warranty claims, please contact our customer service team. We aim to respond to all inquiries within 12 hours.
For further assistance, please visit the official KBS Store: KBS Official Store
Ask a question about this manual
Ask about setup, troubleshooting, compatibility, parts, safety, or missing instructions. Manuals+ will review the question and use this page’s manual context to help answer it.