1. Introduction
This manual provides essential information for the safe operation, maintenance, and troubleshooting of your Bucktool BG2600 Combo 2"x42" Belt Sander and 6" Bench Grinder. Please read and understand all instructions before operating the machine to ensure personal safety and optimal performance.
The Bucktool BG2600 is a versatile tool designed for various sanding, grinding, and sharpening tasks on materials such as metal, wood, and plastics. It features a powerful induction motor, adjustable belt and grinding wheel, and two dedicated worktables for enhanced precision.
2. Safety Instructions
General Safety Rules:
- Always wear appropriate personal protective equipment (PPE), including safety glasses, hearing protection, and a dust mask.
- Ensure the work area is clean, well-lit, and free from obstructions.
- Keep children and bystanders away from the operating machine.
- Do not operate the machine in damp or wet conditions.
- Disconnect power before making adjustments, changing accessories, or performing maintenance.
- Securely fasten the machine to a workbench to prevent movement during operation.
- Never wear loose clothing, gloves, or jewelry that could get caught in moving parts.
- Use the correct belt and grinding wheel for the material and task.
- Do not force the tool; allow the machine to work at its intended speed.
- Regularly inspect the power cord for damage.
3. Components and Features
Familiarize yourself with the main components of your Bucktool BG2600.
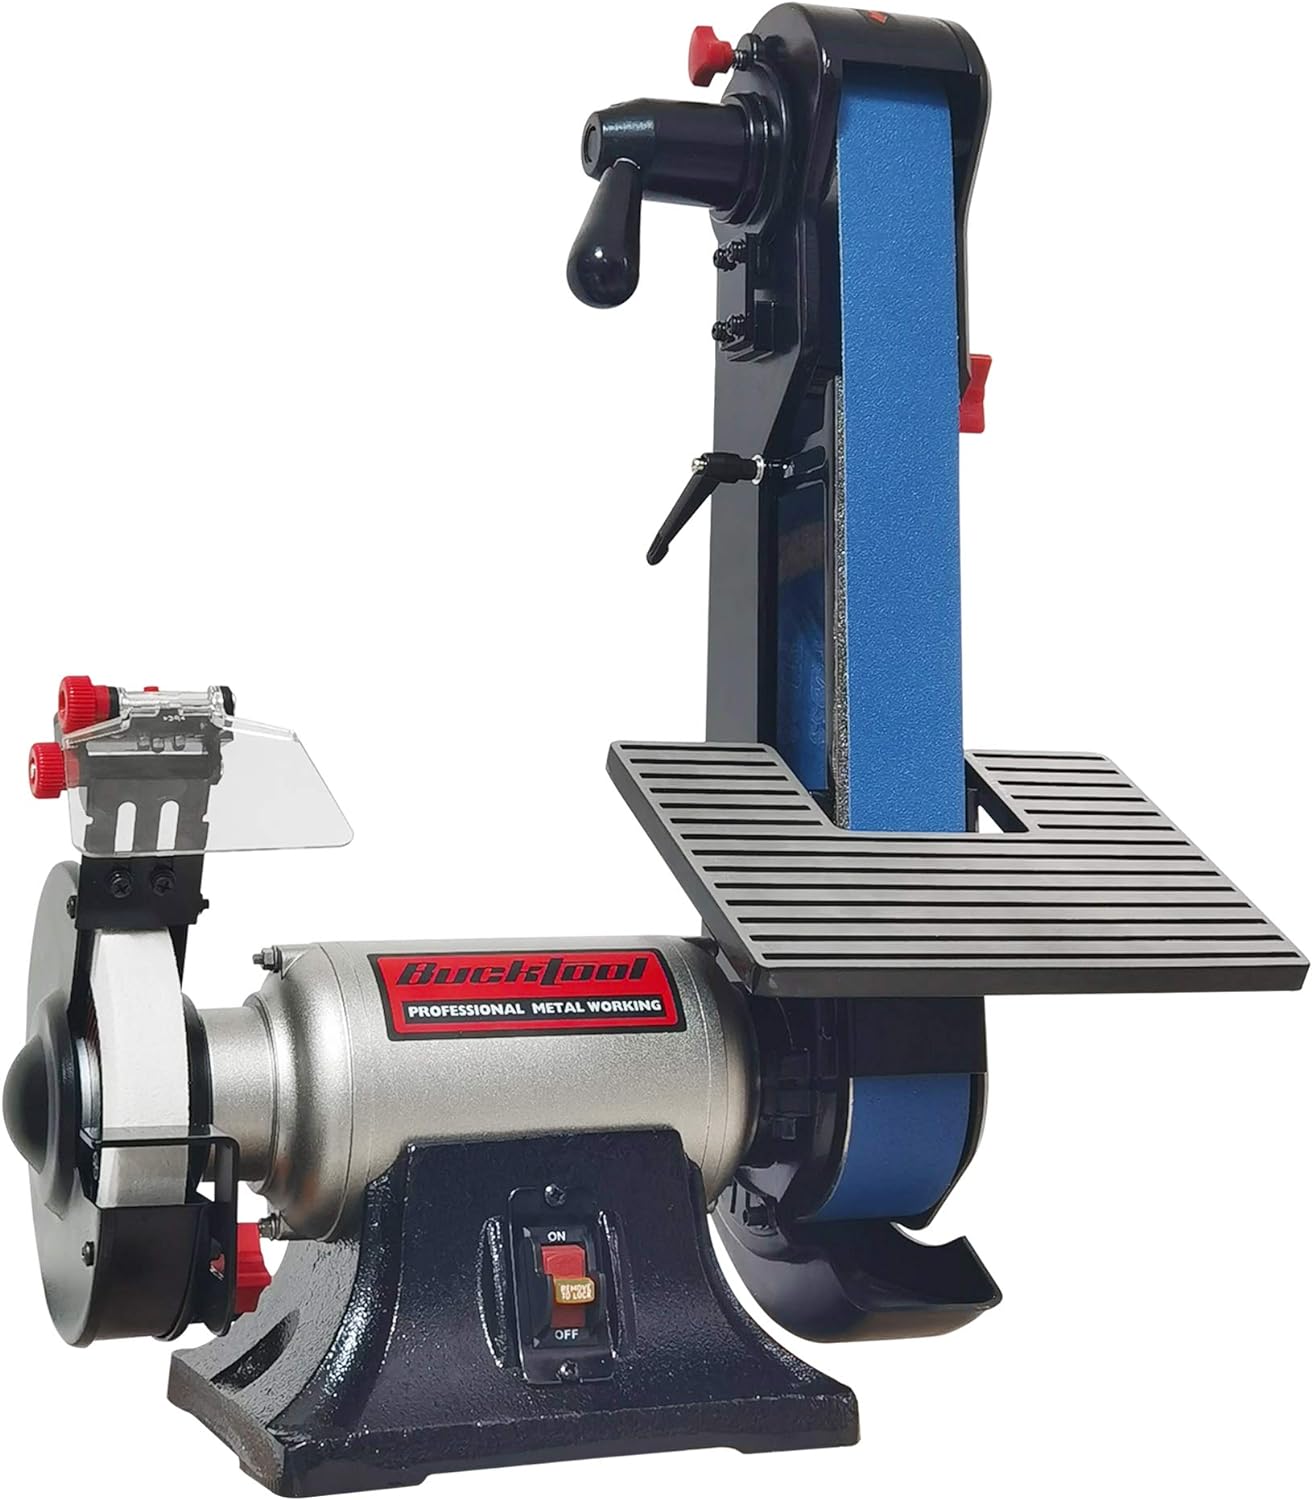
Figure 3.1: Overview of the Bucktool BG2600 Combo Belt Sander and Bench Grinder.
- Belt Sander Assembly: Includes the sanding belt, drive wheel, idler wheel, and belt tension/tracking mechanism.
- Bench Grinder Assembly: Features a 6-inch grinding wheel, adjustable eye shield, and LED work light.
- Motor: 1/2 HP, 3.5 Amp induction motor providing consistent power.
- Worktables: Two interchangeable worktables – one cast iron for metalworking and one cast aluminum for woodworking.
- Base: Sturdy cast iron base with rubber feet to minimize vibration.
- Power Switch: On/Off switch for controlling the machine.

Figure 3.2: The two included worktables: cast aluminum for woodworking (left) and cast iron for metalworking (right).

Figure 3.3: The quick-release tension and tracking mechanism for easy belt changes.

Figure 3.4: The 6-inch 60 grit white grinding wheel, featuring an adjustable eye shield and LED light for improved visibility and safety.
4. Setup
Follow these steps for initial setup and assembly.
- Unpacking: Carefully remove all components from the packaging. Inspect for any shipping damage. Retain packaging for future transport or storage.
- Mounting: Securely fasten the machine to a stable workbench using appropriate bolts and washers. The cast iron base is designed to minimize vibration, but proper mounting is crucial for safety and stability.
- Worktable Installation: Attach the desired worktable (cast iron for metal, cast aluminum for wood) to the belt sander assembly. Ensure it is firmly secured and adjusted to the correct angle for your task.
- Eye Shield and Spark Deflector: Install the adjustable eye shield and spark deflector on the bench grinder. Adjust the eye shield for optimal protection and visibility.
- Power Connection: Connect the power cord to a grounded 120V AC outlet. Ensure the power switch is in the 'OFF' position before plugging in.
5. Operating Instructions
This section details how to operate the belt sander and bench grinder functions.
5.1. Belt Sander Operation
- Belt Installation/Change:
- Ensure the machine is unplugged.
- Use the quick-release tension mechanism to loosen the belt.
- Remove the old belt and slide on the new 2"x42" sanding belt, ensuring the directional arrow on the belt matches the rotation direction of the machine.
- Re-engage the tension mechanism.
- Adjust the belt tracking knob until the belt runs centrally on the wheels without rubbing against the housing.
- Adjusting Belt Angle:
- The belt assembly can tilt from 0 to 90 degrees. Loosen the locking knob, adjust to the desired angle, and re-tighten.
- The belt housing can also swivel from horizontal to vertical positions to accommodate long workpieces.

Figure 5.1: The belt sander assembly can be adjusted from a vertical (0°) to a horizontal (90°) position.
- Sanding:
- Turn on the machine. Allow the belt to reach full speed.
- Gently apply the workpiece to the moving belt. Use light, even pressure.
- Move the workpiece consistently across the belt to ensure even material removal and prevent overheating.
5.2. Bench Grinder Operation
- Grinding Wheel: The machine is equipped with a 6-inch, 60 grit white grinding wheel suitable for various grinding and sharpening tasks.
- Adjusting Eye Shield and LED Light: Adjust the clear eye shield to protect your eyes from sparks and debris. The integrated LED light can be positioned to illuminate the grinding area.
- Grinding/Sharpening:
- Turn on the machine. Allow the grinding wheel to reach full speed (3450 RPM).
- Carefully bring the workpiece into contact with the rotating wheel. Maintain a consistent angle and light pressure.
- Avoid applying excessive pressure, which can overheat the workpiece or damage the wheel.
6. Maintenance
Regular maintenance ensures the longevity and safe operation of your tool.
- Cleaning: After each use, disconnect power and clean the machine. Remove dust and debris from the motor vents, belt assembly, and grinding wheel area using a brush or compressed air.
- Belt Replacement: Replace sanding belts when they become worn or clogged. Refer to Section 5.1 for belt changing instructions.
- Grinding Wheel Inspection: Regularly inspect the grinding wheel for wear, cracks, or damage. Replace a damaged wheel immediately. Ensure the wheel is properly balanced and securely mounted.
- Lubrication: The motor is typically sealed and requires no lubrication. Refer to the manufacturer's guidelines for any specific lubrication points if indicated.
- Base Stability: Periodically check that the machine is securely mounted to the workbench and that all fasteners are tight.
7. Troubleshooting
This section addresses common issues you might encounter.
| Problem | Possible Cause | Solution |
|---|---|---|
| Machine does not start | No power supply; Faulty switch; Motor issue | Check power cord and outlet; Ensure switch is ON; Consult qualified technician. |
| Sanding belt slips or tracks improperly | Belt tension too loose; Improper tracking adjustment; Worn belt | Adjust belt tension; Adjust tracking knob; Replace worn belt. |
| Excessive vibration | Loose mounting; Unbalanced grinding wheel; Damaged belt | Tighten mounting bolts; Inspect/replace grinding wheel; Inspect/replace belt. |
| Motor overheats | Excessive load; Blocked ventilation; Prolonged use | Reduce workpiece pressure; Clear motor vents; Allow machine to cool down. |
8. Specifications
Technical details for the Bucktool BG2600 Combo Belt Sander and Bench Grinder.

Figure 8.1: Key specifications of the Bucktool BG2600.
| Specification | Value |
|---|---|
| Model Number | BG2600 |
| Motor | 1/2 HP, 3.5 Amp Induction Motor |
| Voltage | 120 Volts |
| Belt Size | 2" x 42" |
| Belt Speed (No Load) | 4480 FPM (Feet Per Minute) |
| Grinding Wheel Diameter | 6 inches |
| Grinding Wheel Grit | 60 Grit (White) |
| Wheel Speed (No Load) | 3450 RPM (Revolutions Per Minute) |
| Product Dimensions (L x W x H) | 17.99" x 11.3" x 24.53" |
| Item Weight | 39.9 pounds |
| Power Source | Corded Electric |
| Safety Standards | CSA Compliant |
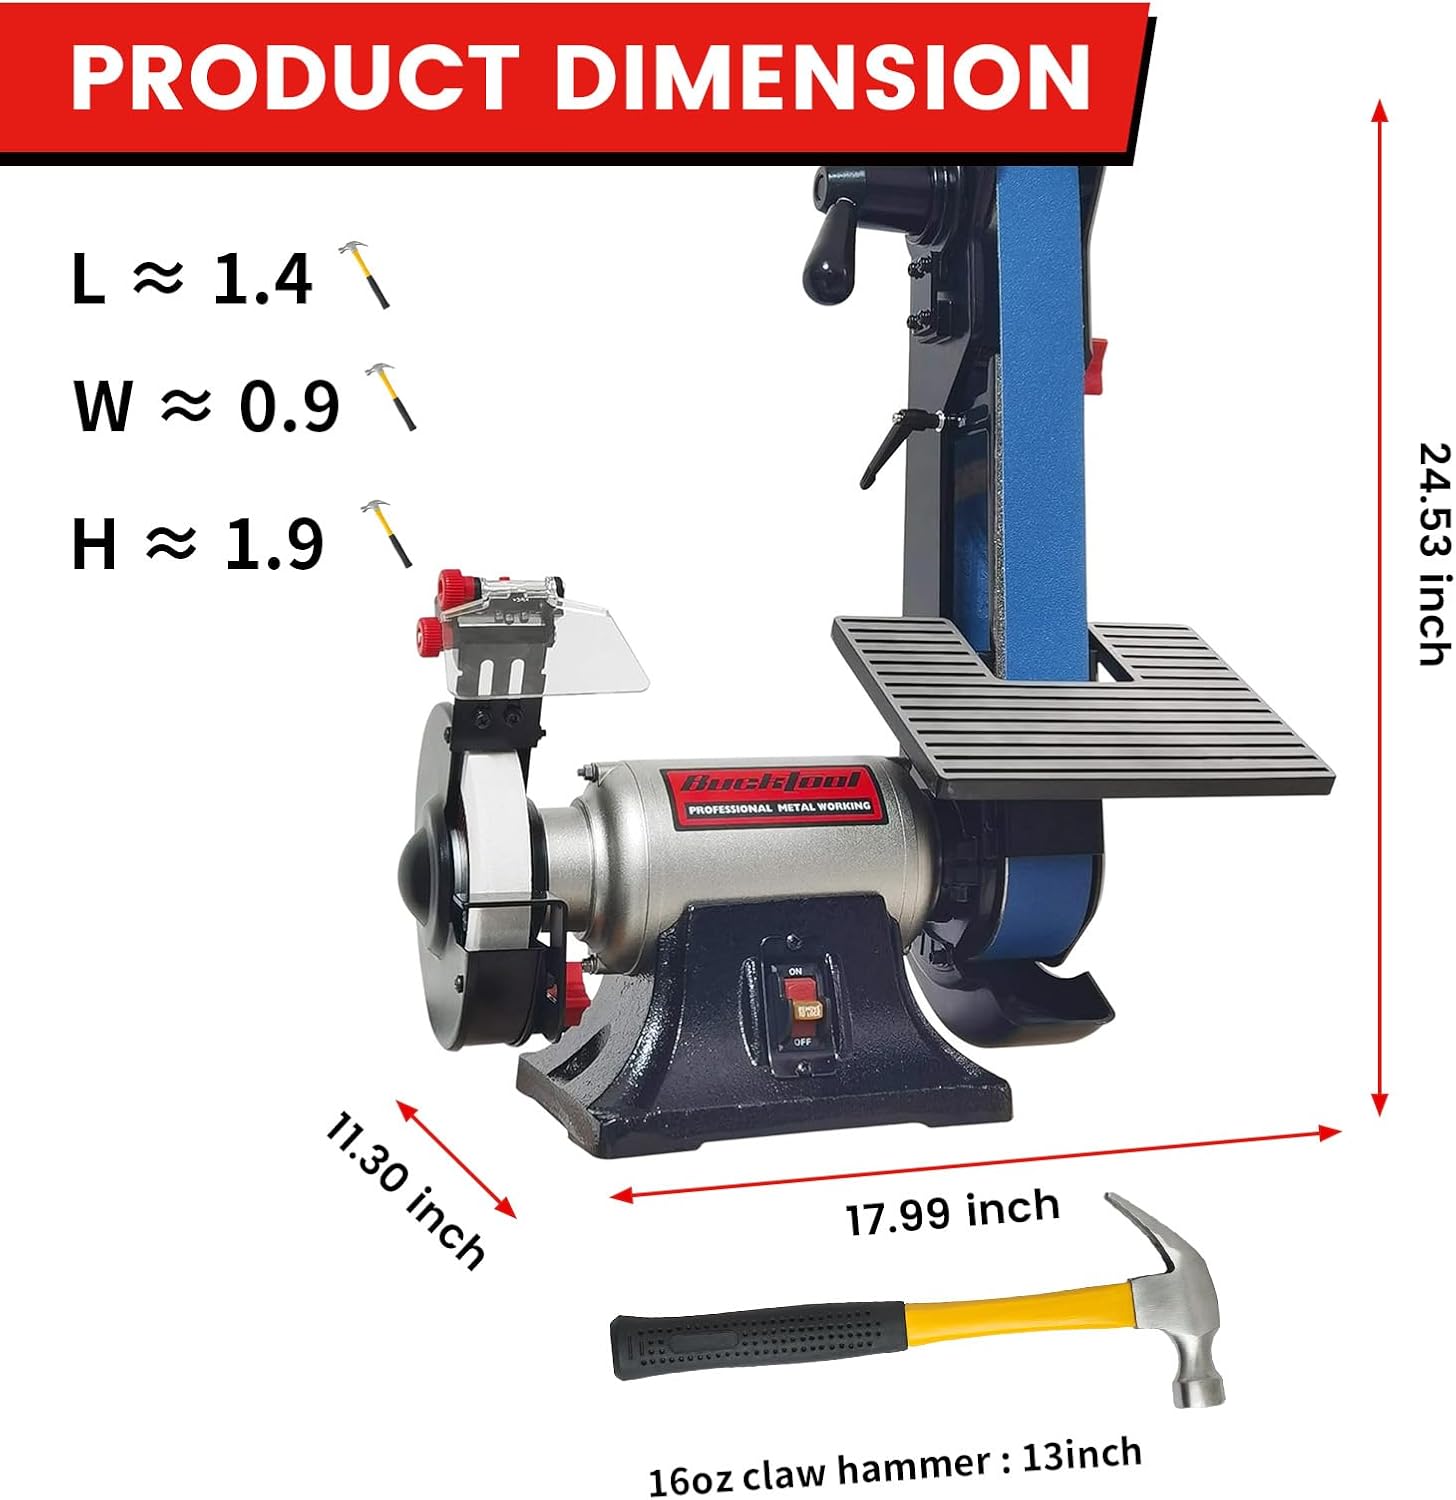
Figure 8.2: Detailed product dimensions of the Bucktool BG2600.
9. Warranty and Support
For warranty information, technical support, or to purchase replacement parts, please refer to the official Bucktool website or contact their customer service department. A digital version of this user manual is available for download here.


