
1. Safety Instructions
Please read all safety warnings and instructions before using this appliance. Failure to follow the warnings and instructions may result in electric shock, fire, and/or serious injury.
- This appliance is for household use only. Do not use outdoors or on wet surfaces.
- Do not allow children to operate the vacuum cleaner. Close supervision is necessary when used near children.
- Do not pick up flammable or combustible liquids, such as gasoline, or use in areas where they may be present.
- Do not pick up anything that is burning or smoking, such as cigarettes, matches, or hot ashes.
- Do not use without the dust cup and/or filters in place.
- Turn off the appliance before connecting or disconnecting the motorized brush, extension wand, or other accessories.
- Use only as described in this manual. Use only manufacturer's recommended attachments.
- Do not handle the charger or appliance with wet hands.
- If the charging cable is damaged, it must be replaced by the manufacturer, its service agent, or similarly qualified persons to avoid a hazard.
- Store the appliance indoors in a cool, dry place.
2. Package Contents
Carefully unpack your Proscenic P8 Max and check that all items are present and in good condition. Refer to the diagram below for component identification.

Image: Diagram showing all components of the Proscenic P8 Max vacuum cleaner. Each part is numbered and labeled for easy identification.
- Vacuum motor (Main Unit)
- Main brush (Floor brush with roller)
- Mini round brush
- 2-in-1 bristled brush
- Brush storage tool
- Wall bracket
- Adapter (Charger)
- Vacuum pipe (Extension wand)
- Hard Roller Brush (for carpets)
- Soft Roller Brush (for hardwood floors)
3. Assembly
Follow these steps to assemble your vacuum cleaner:
- Attach the Extension Wand: Insert the metal vacuum pipe (8) into the main vacuum motor unit (1) until it clicks securely into place.
- Attach the Floor Brush: Connect the main brush (2) to the other end of the vacuum pipe (8) until it clicks. Ensure the chosen roller brush (9 or 10) is already installed in the main brush.
- Install Battery: Slide the removable battery into the slot on the bottom of the main vacuum motor unit until it locks.
- Wall Mount Installation (Optional): Choose a suitable location near a power outlet. Secure the wall bracket (6) to the wall using appropriate screws and anchors (not included).

Image: A close-up view of the Proscenic P8 Max main unit, illustrating the removable 2200mAh Li-ion battery being inserted. This image highlights the battery's easy installation and removal.
4. Charging the Battery
Before first use, fully charge the battery. A full charge typically takes 4-5 hours.
- Connect the adapter (7) to the charging port on the main vacuum motor unit.
- Plug the adapter into a wall outlet.
- The battery indicator lights on the main unit will show the charging status. They will typically stop blinking or change color when fully charged.
- The battery can be charged while installed in the vacuum or separately.
Image: This image displays the removable 2200mAh Li-ion battery, along with icons indicating 4-5 hours charging time and 20-40 minutes max endurance. It emphasizes the battery's specifications and charging duration.
5. Operating Instructions
5.1 Powering On/Off and Speed Modes
- Press the power button on the main unit to turn the vacuum on.
- Press the power button again to switch between the two available speed modes (Standard and Max).
- Press and hold the power button to turn the vacuum off.
5.2 Using Different Attachments
The P8 Max comes with various attachments for different cleaning needs:
- Main Brush with Roller:
- Soft Roller Brush (10): Ideal for hardwood floors and delicate surfaces.
- Hard Roller Brush (9): Designed for carpets and rugs.

Image: A comparison of the Soft Roller Brush, suitable for hardwood floors, and the Hard Roller Brush, suitable for carpets. This image demonstrates the versatility of the main brush for various surfaces.
- Mini Round Brush (3): Use for upholstery, curtains, and delicate surfaces.
- 2-in-1 Bristled Brush (4): Versatile tool for cleaning crevices, corners, and dusting.

Image: A collage demonstrating the Proscenic P8 Max in different cleaning modes: as a handheld vacuum for a laptop, cleaning a car interior, as a stick vacuum on a floor, and using the extension wand for high areas like curtains.
5.3 LED Headlights and Maneuverability
The main brush is equipped with LED headlights to illuminate dark areas, helping to spot hidden dust. The flexible brush head allows for easy maneuverability around furniture and into tight spaces, rotating 180 degrees horizontally and 90 degrees vertically.
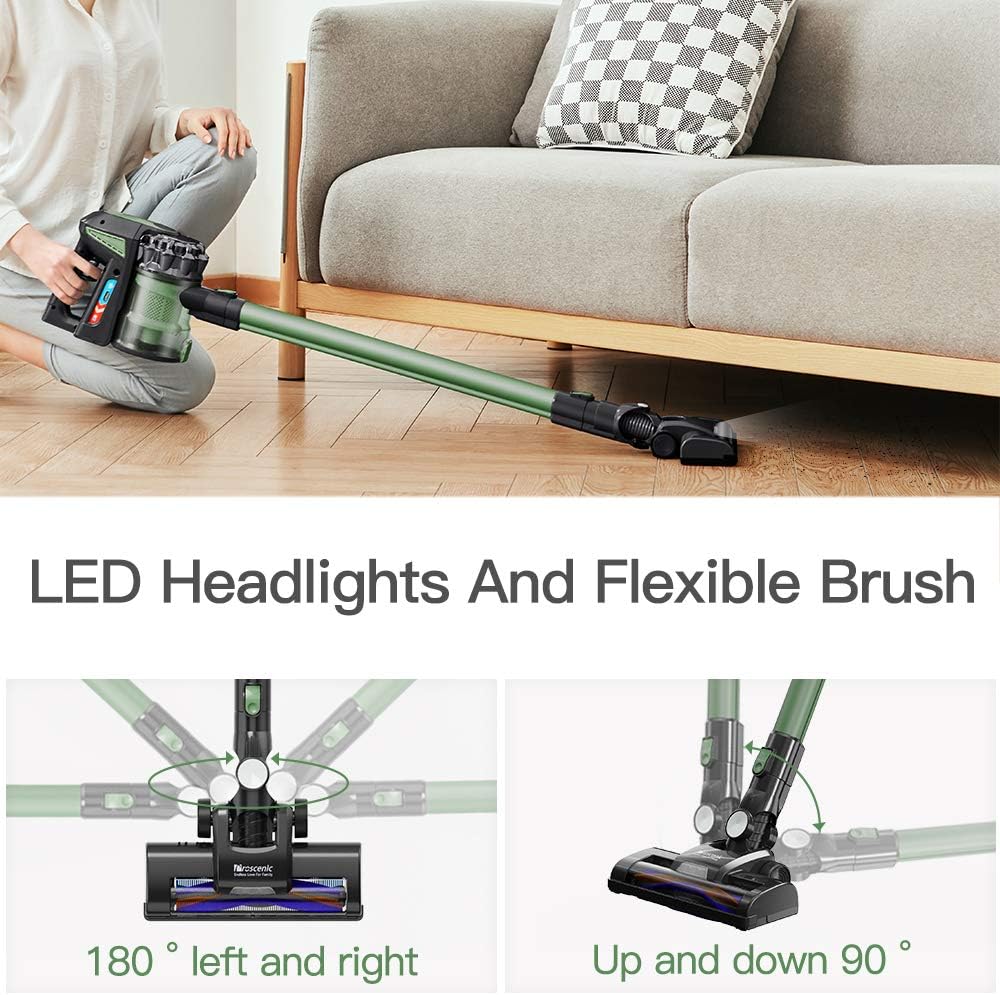
Image: This image highlights the LED headlights on the main brush and demonstrates the flexible movement of the brush head, showing 180-degree left and right rotation and 90-degree up and down movement.
6. Maintenance
Regular maintenance ensures optimal performance and extends the lifespan of your vacuum cleaner.
6.1 Emptying the Dust Cup
- Press the dust cup release button to detach the dust cup from the main unit.
- Hold the dust cup over a trash bin and press the bottom release latch to open the dust cup and empty its contents.
- Close the dust cup bottom securely after emptying.
6.2 Cleaning Filters
The P8 Max uses a HEPA filter system. Clean filters regularly to maintain suction power.
- Twist and pull to remove the filter assembly from the dust cup.
- Separate the HEPA filter and the mesh filter.
- Tap off loose dirt. Rinse both filters under cold running water until the water runs clear.
- Allow filters to air dry completely for at least 24 hours before reassembling and placing back into the vacuum. Do not use a hairdryer or other heating methods.
- Replace filters if they are damaged or if suction power remains low after cleaning.
6.3 Cleaning Roller Brushes
- Turn off the vacuum and detach the main brush from the extension wand.
- Locate the brush roll release tab on the side of the main brush head. Open it to remove the roller brush.
- Use scissors or the provided brush storage tool (5) to cut and remove any hair or debris wrapped around the roller brush.
- Clean the brush housing and ensure no blockages.
- Reinsert the clean roller brush and secure the release tab.
7. Troubleshooting
If you encounter issues with your vacuum cleaner, refer to the following table for common problems and solutions.
| Problem | Possible Cause | Solution |
|---|---|---|
| Vacuum does not turn on. | Battery is not charged or not properly installed. | Ensure battery is fully charged and correctly inserted. |
| Low suction power. | Dust cup is full, filters are clogged, or brush roll is blocked. | Empty dust cup. Clean or replace filters. Remove any blockages from the brush roll or air ducts. |
| Brush roll not spinning. | Hair or debris tangled in brush roll, or brush roll is not properly installed. | Clean the brush roll. Ensure it is correctly reinserted and locked. |
| Short battery life. | Using Max power mode frequently, or battery is old. | Use Standard mode for longer runtime. Consider replacing the battery if it's significantly degraded. |
8. Specifications
| Feature | Detail |
|---|---|
| Model | P8 MAX |
| Brand | Proscenic |
| Suction Power | Up to 22000 Pa |
| Speed Modes | 2 (Standard, Max) |
| Filter Type | HEPA Filter |
| Dust Cup Capacity | 1.2 Liters |
| Battery Type | Lithium-ion (2200mAh) |
| Charging Time | 4-5 hours |
| Runtime | Up to 1 hour (Standard mode) |
| Rated Power | 180 Watts |
| Voltage | 220 Volts |
| Noise Level | 75 Decibels |
| Weight | 2 Kilograms |
9. Warranty and Support
Proscenic products are manufactured to the highest quality standards. This product is covered by a limited warranty from the date of purchase. Please refer to the warranty card included in your package for specific terms and conditions.
For technical support, warranty claims, or general inquiries, please contact Proscenic customer service through their official website or the contact information provided in your product packaging. When contacting support, please have your model number (P8 MAX) and purchase date available.
Official Website: www.proscenic.com (Note: This is a placeholder URL, please refer to your product documentation for the correct support website.)


