
1. Introduction
Thank you for choosing the SEBSON Outdoor Motion Detector. This device is designed to provide reliable and efficient motion detection for various outdoor applications, enhancing security and convenience. Its robust IP65 rating ensures durability in outdoor environments, while its adjustable settings allow for customized performance. Please read this manual carefully before installation and operation to ensure proper use and to maximize the lifespan of your product.

Image 1.1: The SEBSON Outdoor Motion Detector, designed for reliable outdoor use.
2. Key Features
- Wide Detection Range: Covers an area of 20 meters with a 360° detection angle, ensuring comprehensive coverage.
- Adjustable Sensor Head: The sensor can be vertically adjusted by 180° to optimize the detection area.
- Programmable Operating Time: The duration for which the connected light stays on after detection can be set from 10 seconds to 30 minutes.
- Adjustable Ambient Light Sensitivity: The sensor can be configured to activate at specific ambient light levels, ranging from 3 to 2000 lux, allowing for day and night operation.
- High Load Capacity: Supports incandescent bulbs up to 2000W and LED or other energy-saving lamps up to 1000W.
- Durable Outdoor Design: IP65 rated for protection against dust and water jets, making it suitable for outdoor installation.
- Versatile Mounting: Designed for surface mounting on both walls and ceilings.
- Triple Infrared Sensors: Equipped with 3 integrated sensors for precise and targeted detection.

Image 2.1: Overview of the motion detector's key specifications and capabilities.

Image 2.2: The sensor head can be adjusted vertically by 180 degrees for optimal coverage.
3. Installation
3.1 Safety Instructions
- Installation must be carried out by a qualified electrician in accordance with local wiring regulations.
- Ensure the power supply is disconnected before commencing any installation or maintenance work.
- Do not install the device near heat sources, air conditioning units, or in direct sunlight, as this may affect performance.
- Avoid installing in areas with strong electromagnetic interference.
3.2 Mounting
The motion detector can be surface mounted on a wall or ceiling. Choose a location that provides the desired detection coverage and is within the recommended mounting height of 2.2m to 6m.
- Carefully detach the mounting plate from the main unit.
- Mark the drilling points on the wall or ceiling using the mounting plate as a template.
- Drill holes and insert appropriate wall plugs (if necessary).
- Secure the mounting plate to the surface using screws.
- Connect the electrical wires as described in the wiring section.
- Attach the main unit to the mounting plate, ensuring it clicks securely into place.
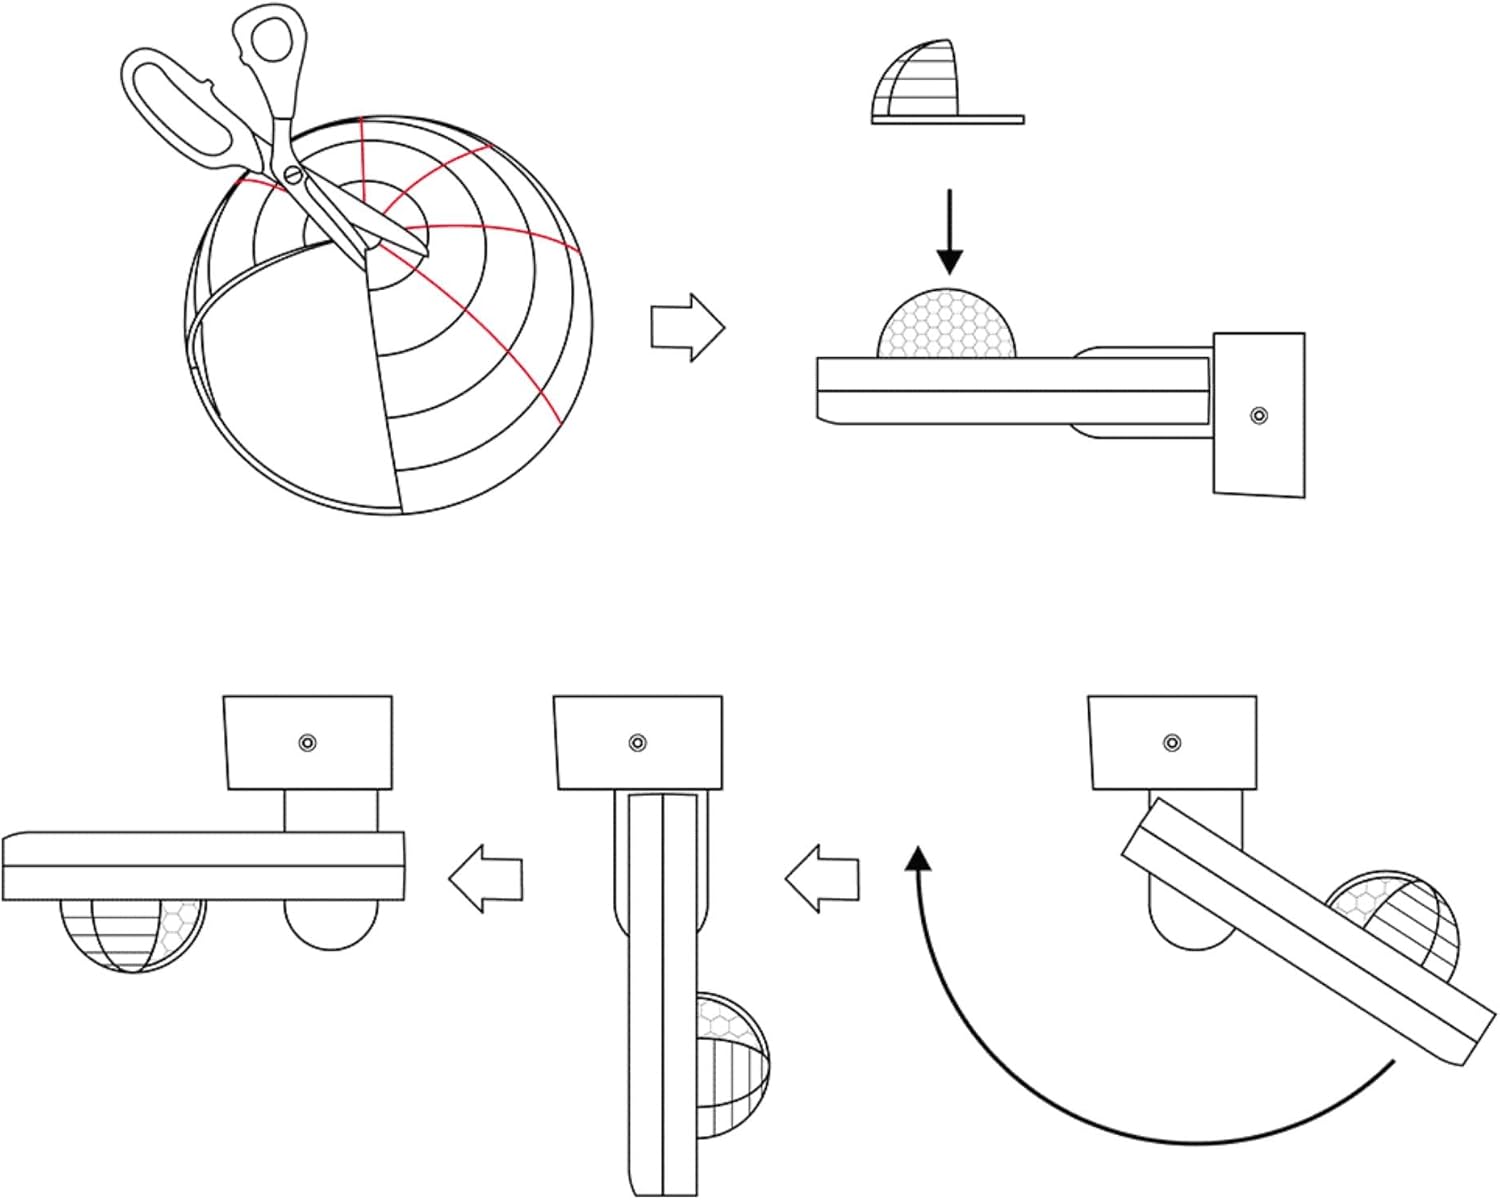
Image 3.1: Rear view of the motion detector, illustrating the mounting plate and connection points.

Image 3.2: Detection area diagrams for both wall and ceiling mounting configurations.
3.3 Wiring
The motion detector requires a 3-wire connection (Live, Neutral, Switched Live). Refer to the wiring diagram on the product or in the packaging for precise connections. Ensure all connections are secure and insulated.
- L (Live): Connect to the main power supply live wire.
- N (Neutral): Connect to the main power supply neutral wire.
- L' (Switched Live): Connect to the live input of the light fixture.
4. Operation and Settings
The motion detector features two adjustable dials for customizing its operation: TIME and LUX.

Image 4.1: The TIME and LUX adjustment dials on the motion detector.
4.1 TIME Setting (Operating Duration)
This dial controls how long the connected light remains on after motion is detected and no further motion is sensed. Rotate the dial to set the desired duration:
- Min (10s): Light stays on for approximately 10 seconds.
- Max (30min): Light stays on for approximately 30 minutes.
4.2 LUX Setting (Ambient Light Sensitivity)
This dial determines the ambient light level at which the motion detector will activate. Rotate the dial to set the desired sensitivity:
- Sun Symbol (2000 lux): The sensor will activate regardless of ambient light (day and night operation).
- Moon Symbol (3 lux): The sensor will only activate in low light conditions (dusk to dawn operation).
4.3 Adjusting Detection Area (Optional)
The detection range can be shortened or specific areas can be masked using the included modified cover. This allows for precise control over where motion is detected.

Image 4.2: Instructions for customizing the detection area using the provided masking cover.
5. Maintenance
The SEBSON Outdoor Motion Detector is designed for minimal maintenance due to its durable construction and IP65 rating. However, regular cleaning can help ensure optimal performance.
- Cleaning: Periodically wipe the sensor lens and housing with a soft, damp cloth to remove dust, dirt, or debris that may obstruct the sensor. Do not use abrasive cleaners or solvents.
- Inspection: Occasionally check the mounting and wiring for any signs of wear or damage. If any issues are found, disconnect power and consult a qualified electrician.
6. Troubleshooting
If you encounter issues with your motion detector, please refer to the following common problems and their solutions:
| Problem | Possible Cause | Solution |
|---|---|---|
| Light does not turn on when motion is detected. |
|
|
| Light stays on continuously. |
|
|
| Light turns on too frequently. |
|
|
7. Technical Specifications

Image 7.1: Detailed dimensions of the SEBSON Outdoor Motion Detector.
| Specification | Value |
|---|---|
| Brand | SEBSON |
| Model Number | 2_X_IR_OUT_C |
| Dimensions (L x W x H) | 170 x 85 x 55 mm |
| Weight | 540 grams |
| Power Source | AC (Alternating Current) |
| Voltage | 230 Volts |
| Max. Power (Incandescent) | 2000 Watts |
| Max. Power (LED/Energy Saving) | 1000 Watts |
| Detection Range | 20 meters |
| Detection Angle | 360° |
| Mounting Type | Ceiling Mount, Wall Mount (Surface) |
| Operating Time Adjustment | 10 seconds to 30 minutes |
| Ambient Light Adjustment (LUX) | 3 - 2000 lux |
| IP Rating | IP65 |
| Operating Temperature | Not specified (typical outdoor range) |
| Frequency | 60 Hz |
8. Warranty and Support
SEBSON products are designed and manufactured to high-quality standards. For any questions, technical support, or warranty claims, please contact SEBSON customer service through the retailer where you purchased the product or visit the official SEBSON website for contact information. Please retain your proof of purchase for warranty purposes.