GameMax GMX-V4.0-HUB-B
GameMax V4.0 PWM ARGB Hub Controller User Manual
Model: GMX-V4.0-HUB-B
1. Product Overview
The GameMax V4.0 PWM ARGB Hub is a versatile 3-in-1 intelligent fan controller designed to manage fan functionality, customize ARGB lighting, and simplify installation within your PC system. It supports up to eight 3-pin DC or 4-pin PWM fans and one CPU cooler. This hub offers comprehensive control over fan speed and lighting, with up to 368 built-in LED lighting modes, or allows for software control via a single motherboard header. Featuring a SATA power connector and an integrated magnet, the hub ensures easy and secure installation, providing complete control over your system's cooling and aesthetics.
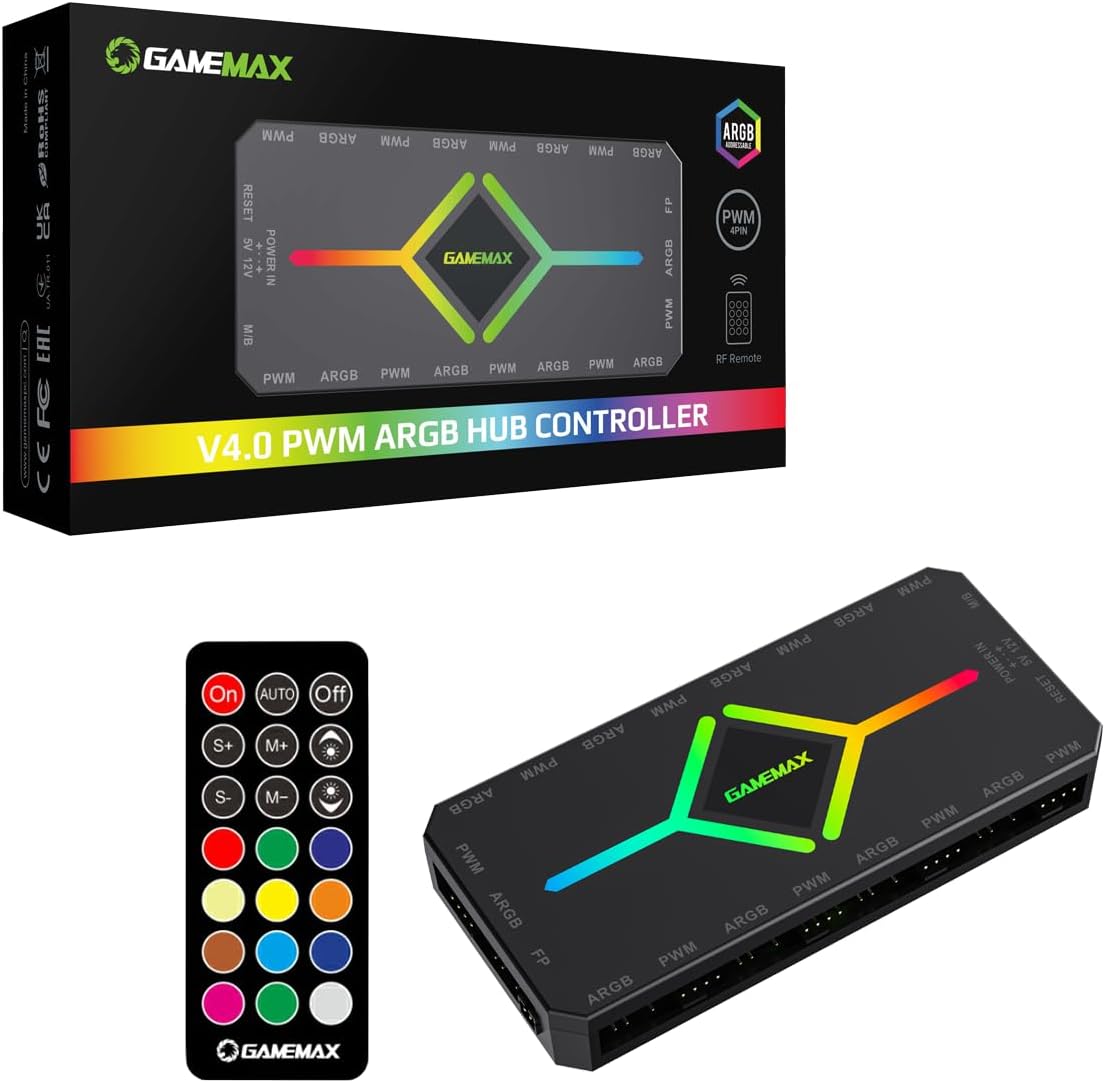
Figure 1.1: GameMax V4.0 PWM ARGB Hub Controller and included RF Remote, shown with product packaging.
2. Key Features
- Multiple Interfaces: Supports up to 9 sets of Addressable RGB (3-pin) and PWM headers, allowing expansion for more devices. Integrates PWM temperature control and AURA Sync interface for efficient heat dissipation and vibrant LED lighting.
- Motherboard Software Compatibility: Compatible with AURA Sync, MSI Mystic Light, Gigabyte Fusion 2.0, and ASRock via a 5V 3-pin Addressable RGB header. Offers 16.7 million static modes and 12 preset lighting effects.
- Intelligent PWM Temperature Control: Connects to the CPU fan interface on your motherboard to access temperature readings. Fan speed automatically adjusts based on CPU temperature, increasing for cooling and slowing down to reduce noise when temperatures drop.
- RF Remote Control: Includes a 21-key RF remote (433.92 MHz) with 368 built-in LED modes. Allows switching between static and dynamic color modes, and adjusting speed and brightness.
- Integrated Magnet: Compact hub with a strong magnetic surface for easy and secure installation onto any metal surface inside your PC case.
3. Package Contents
Please verify that all items are present in your package:
- GameMax V4.0 PWM ARGB Hub Controller
- RF Remote Control (21-key)
- SATA Power Cable
- Motherboard Sync Cable (5V 3-pin ARGB)
- PWM Temperature Cable

Figure 3.1: Cables included with the GameMax V4.0 PWM ARGB Hub, typically comprising a SATA power cable, motherboard sync cable, and PWM temperature cable.
4. Setup and Installation
Follow these steps to properly install your GameMax V4.0 PWM ARGB Hub:
- Placement: Choose a suitable location inside your PC case. The hub features an integrated magnet, allowing it to be securely attached to any metal surface.
- Power Connection: Connect the provided SATA power cable from your power supply unit (PSU) to the "POWER IN" port on the hub. Ensure a secure connection.
Important: Do not plug into the wrong power supply interface, otherwise it will burn out equipment!
- Fan Connections: Connect your 3-pin DC or 4-pin PWM fans to the "PWM" and "ARGB" ports on the hub. The hub supports up to 8 fans. Ensure correct orientation for both power (PWM) and lighting (ARGB) connections.
- CPU Cooler Connection: If using a CPU cooler fan, connect it to the dedicated "CPU Cooler Fan Link 1st PWM Port (Red)" on the hub.
- Motherboard Sync (Optional): For motherboard software control (e.g., ASUS AURA, MSI Mystic Light, Gigabyte Fusion 2.0, ASRock), connect the 5V 3-pin ARGB motherboard sync cable from the hub's "M/B" port to the corresponding 5V 3-pin Addressable RGB header on your motherboard.
Note: If using motherboard sync, do not also connect the "RESET" cable for manual ARGB control, as this can cause conflicts. Only link one method.
- PWM Temperature Cable (Optional): Connect the PWM temperature cable from the hub's "FP" port to a CPU fan header on your motherboard to enable intelligent temperature control.
- Front Panel Reset Button (Optional): If you wish to use your PC case's front panel reset button for manual ARGB control, connect the case's reset cable to the "RESET" port on the hub. This allows cycling through lighting modes via the reset button.
Note: This option is mutually exclusive with motherboard sync. Choose either motherboard sync or manual reset button control for ARGB.

Figure 4.1: Detailed connection diagram for the GameMax V4.0 PWM ARGB Hub, illustrating connections for fans, CPU cooler, SATA power, motherboard sync, and manual control.
5. Operating Instructions
5.1. Using the RF Remote Control
The included 21-key RF remote control provides comprehensive control over the hub's lighting and fan functions. Ensure the hub is powered on.

Figure 5.1: The 21-key RF remote control for the GameMax V4.0 PWM ARGB Hub.
| Button | Function |
|---|---|
| On/Off | Turns the LED lighting on or off. |
| M/B (Motherboard Sync) | Switches between remote control mode and motherboard software sync mode. |
| AUTO | Cycles through the 368 built-in LED lighting modes automatically. |
| S+ / S- | Adjusts the speed of dynamic lighting effects (S+ for faster, S- for slower). |
| M+ / M- | Cycles through the built-in LED lighting modes manually (M+ for next mode, M- for previous mode). |
| Brightness Up / Down | Adjusts the brightness of the LED lighting. |
| Color Buttons | Selects static colors for the LED lighting. |
5.2. Motherboard Software Control (AURA Sync, Mystic Light, Fusion 2.0, ASRock)
If you have connected the hub to your motherboard's 5V 3-pin ARGB header, you can control the lighting effects directly through your motherboard's proprietary software. Ensure the remote control is set to M/B mode (if applicable, or simply ensure the hub is not in manual reset button mode).
- Open your motherboard's RGB control software (e.g., ASUS Aura Sync, MSI Mystic Light Sync, GIGABYTE RGB Fusion 2.0, ASRock Polychrome Sync).
- The connected ARGB devices should be detected.
- Use the software interface to customize lighting effects, colors, and synchronization with other compatible components.
5.3. Intelligent PWM Temperature Control
When the PWM temperature cable is connected to your motherboard's CPU fan header, the hub will automatically adjust fan speeds based on CPU temperature readings. This ensures optimal cooling performance while minimizing noise when the system is under light load.
- As CPU temperature increases, fan speeds will automatically ramp up to provide more airflow.
- As CPU temperature decreases, fan speeds will automatically reduce, leading to quieter operation.
6. Maintenance
The GameMax V4.0 PWM ARGB Hub requires minimal maintenance. To ensure optimal performance and longevity:
- Cleaning: Periodically clean the hub and its connections using a soft, dry cloth or compressed air to remove dust buildup. Ensure the PC is powered off and unplugged before cleaning.
- Connections: Occasionally check all cable connections to ensure they are secure and free from damage.
- Environment: Operate the hub in a well-ventilated PC case to prevent overheating.
7. Troubleshooting
If you encounter issues with your GameMax V4.0 PWM ARGB Hub, refer to the following common problems and solutions:
| Problem | Solution |
|---|---|
| Fans or LEDs are not working. |
|
| LEDs are not synchronizing with motherboard software. |
|
| Fan speeds are not adjusting automatically. |
|
| Remote control is not responding. |
|
8. Specifications
| Feature | Detail |
|---|---|
| Model Number | GMX-V4.0-HUB-B |
| Dimensions (L x W x H) | 11.8 x 5.5 x 1.8 cm (approximately 4.65 x 2.17 x 0.71 inches) |
| Weight | 100 grams (approximately 0.22 lbs) |
| Fan Ports | Up to 8 (3-pin DC or 4-pin PWM) |
| ARGB Ports | Up to 9 (5V 3-pin Addressable RGB) |
| Power Input | SATA Power Connector |
| Motherboard Sync | 5V 3-pin ARGB (ASUS AURA, MSI Mystic Light, Gigabyte Fusion 2.0, ASRock) |
| Remote Control | 21-key RF Remote (433.92 MHz) |
| LED Modes | 368 built-in modes, plus motherboard software control |
| Installation | Integrated Magnet |
9. Warranty and Support
GameMax products are designed for reliability and performance. For warranty information and technical support, please refer to the official GameMax website or contact your local retailer.
- Official Website: www.gamemaxpc.com (Please note: This is a general placeholder for a brand's website, actual link may vary. Users should consult product packaging for precise support details.)
- Customer Service: Refer to the contact information provided with your product or on the GameMax official website for assistance with technical issues, warranty claims, or product inquiries.
Please retain your proof of purchase for warranty purposes.
Related Documents - GMX-V4.0-HUB-B
 |
GAMEMAX CLAW 460 ATX Gaming Case Installation Guide Comprehensive installation guide for the GAMEMAX CLAW 460 ATX Gaming Case, detailing hardware components, I/O panel setup, and step-by-step instructions for installing PSU, storage drives (HDD/SSD), motherboard, GPU, cooling fans, and liquid coolers, along with ARGB hub configuration. |
 |
GAMEMAX GMX V1.4 PWM Passive Splitter: Design Specifications and Features Detailed design specifications for the GAMEMAX GMX V1.4 PWM Passive Splitter, explaining its input requirements, functional description, connection modes, and physical dimensions for PC fan control. |
 |
GAMEMAX HYPE-M Modern Aesthetic Case User Manual This user manual provides comprehensive instructions for installing and using the GAMEMAX HYPE-M Modern Aesthetic Case, including package contents, connector details, exploded views, and installation guides for cooling systems and PWM ARGB HUB. |
 |
GAMEMAX VISTA 2 MATX Gaming Case Installation Guide This guide provides detailed instructions for installing components into the GAMEMAX VISTA 2 MATX Gaming Case, including hardware, PSU, drives, motherboard, GPU, and cooling systems. It also covers the setup and remote control functions of the V5.0 PWM ARGB HUB. |
 |
GAMEMAX HYPE-M Modern Aesthetic Case User Manual User manual and installation guide for the GAMEMAX HYPE-M Modern Aesthetic PC Case, covering package contents, component identification, installation steps, and cooling system compatibility. |
 |
GAMEMAX V5.0 PWM ARGB HUB User Manual and Demo Link Guide User manual and connection guide for the GAMEMAX V5.0 PWM ARGB HUB, detailing its features, connections, and remote control functions for PC lighting and fan control. |