1. Product Overview
The AURSINC MMDVM Hotspot Hat Board (V1.5.2) is designed for digital amateur radio communication, supporting various modes such as DMR, YSF, P25, NXDN, DSTAR, and POCSAG. This board integrates with Raspberry Pi devices (including Pi 3, 4, 3B, 3B+, Zero W, Zero 2W) to create a personal digital hotspot. It features a UHF 433MHz antenna, an OLED display, and comes with an aluminum case for protection and portability. The high-quality TCXO ensures stable performance and low Bit Error Rate (BER).

Figure 1.1: AURSINC MMDVM Hotspot Hat Board (V1.5.2) with antenna and OLED display.
2. What's in the Box
Verify that all components are present in your package:
- MMDVM Hotspot Board (V1.5.2)
- Antenna (UHF 433MHz)
- OLED Display Aluminium Case

Figure 2.1: Included components: MMDVM Hotspot Board, antenna, and an elbow connector.
3. Technical Specifications
| Feature | Specification |
|---|---|
| Model Name | AURSINC MMDVM Hotspot Board (V1.5.2) |
| Supported Raspberry Pi Models | Raspberry Pi 4, 3B, 3B+, Pi Zero W, Pi Zero 2W |
| Frequency Range | UHF: 420MHz-475MHz, 842MHz-950MHz; VHF: 144MHz-148MHz (ADF7021 and TCXO dependent) |
| Supported Digital Modes | DMR, YSF, P25, NXDN, DSTAR, POCSAG |
| Display | OLED Display |
| Antenna Type | UHF 433MHz Antenna |
| Case Material | Aluminum |
| Operating System Compatibility | Linux (e.g., Pi-Star, WPSD) |
| Connectivity | GPIO, USB, Wi-Fi (via Raspberry Pi) |
| Item Weight | 3.2 ounces |
| Dimensions | 4.7 x 4.2 x 1.5 inches (Package) |
4. Setup Instructions
4.1. Assembly
The MMDVM Hotspot Hat Board is designed to be mounted on a compatible Raspberry Pi. Ensure the Raspberry Pi is powered off before assembly.
- Carefully align the MMDVM Hotspot Hat Board with the GPIO pins of your Raspberry Pi.
- Gently press the board onto the GPIO header until it is securely seated.
- Attach the 433MHz antenna to the SMA connector on the MMDVM board. An elbow connector is provided for flexible antenna positioning.
- Install the assembled board and Raspberry Pi into the provided aluminum case, ensuring proper alignment of ports and display.
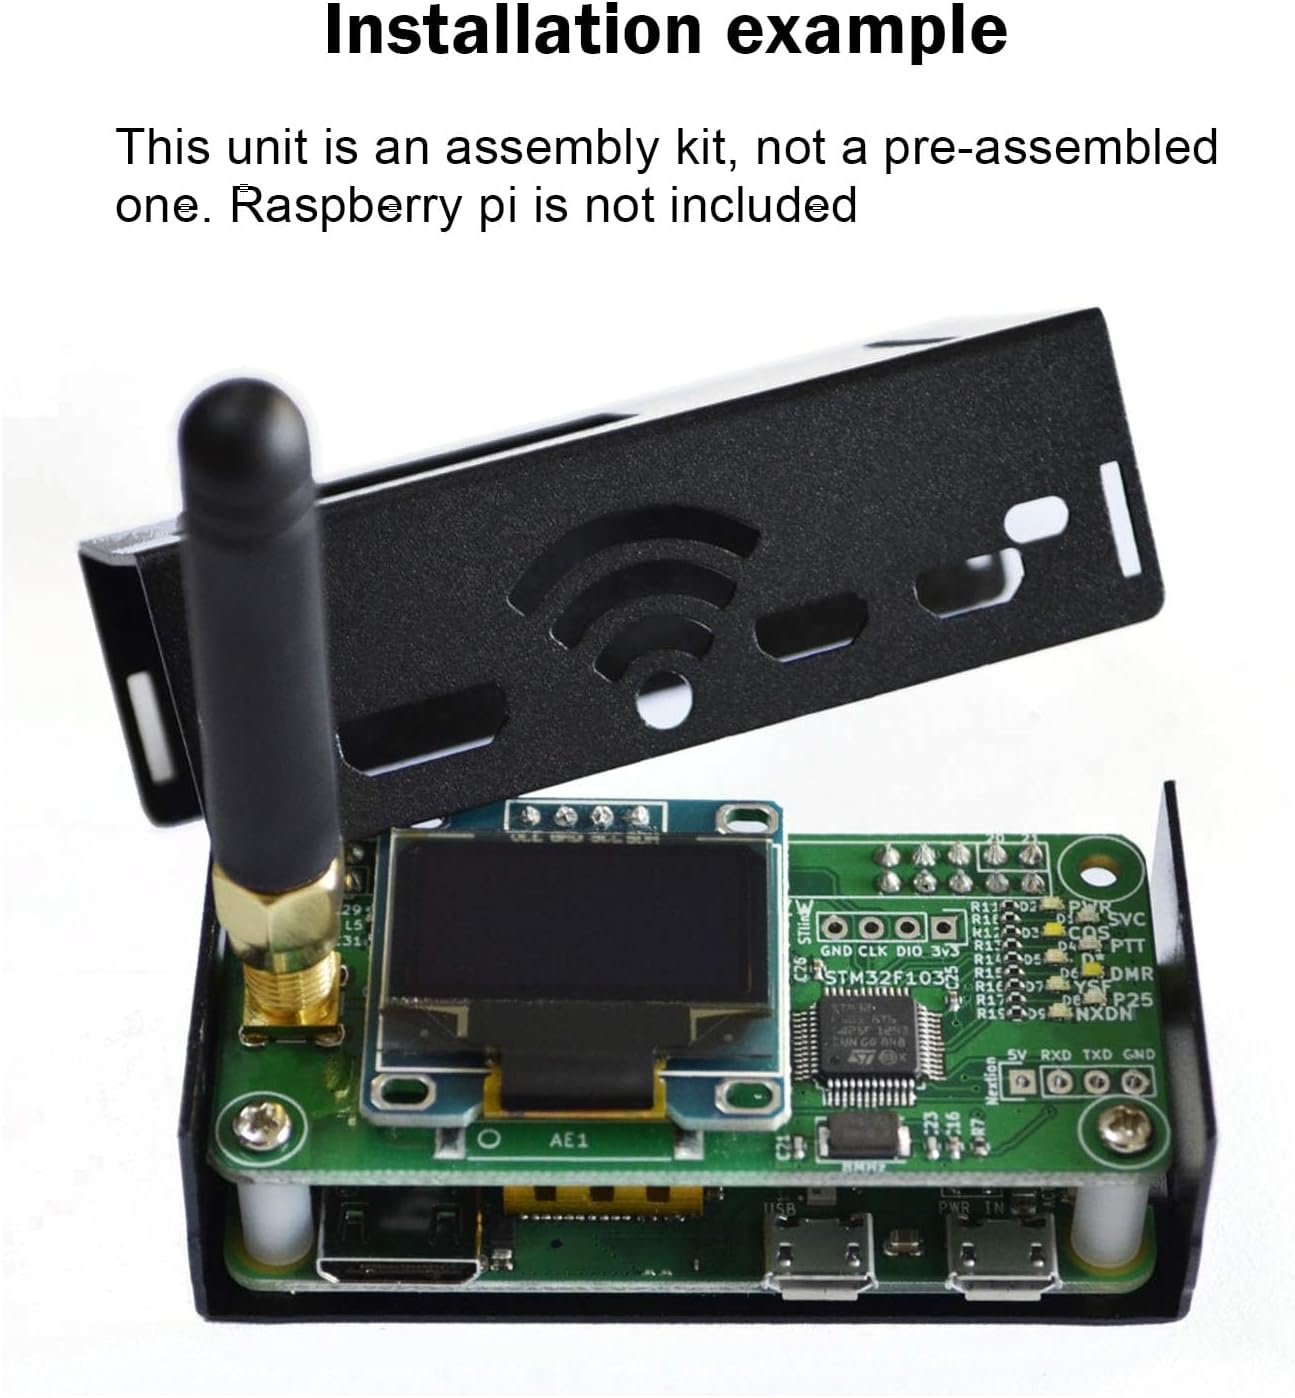
Figure 4.1: Example of the MMDVM Hotspot Hat Board installed on a Raspberry Pi within the aluminum case. Note that the Raspberry Pi is not included.
4.2. Raspberry Pi 4 Compatibility
When connecting the MMDVM board to a Raspberry Pi 4, observe the SVC indicator. If it does not flash, indicating a potential conflict, choose one of the following methods to ensure proper operation:
- Option 1: Remove the R1 resistor on the hotspot board.
- Option 2: Cut off the two Raspberry Pi pin headers located on the corners of the board that may interfere.
Refer to the diagram below for visual guidance.

Figure 4.2: Diagram illustrating the OLED connection and options for Raspberry Pi 4 compatibility adjustments (removing R1 or cutting pins).
4.3. Software Configuration (Pi-Star/WPSD)
For initial software setup, it is recommended to use Pi-Star or WPSD. When configuring the hotspot software:
- Set the screen type to "OLED Type 3".
- Set the connection type for the MMDVM modem to "Modem".
- Ensure a stable 5V power supply, rated for at least 2.5A, is used for the Raspberry Pi to prevent underpowered issues.
- Avoid GPIO conflicts. If using other HATs or accessories, ensure they do not interfere with the MMDVM board's GPIO pins.
5. Operating Instructions
Once the hardware is assembled and the software (e.g., Pi-Star or WPSD) is configured on your Raspberry Pi, your MMDVM hotspot is ready for operation.
5.1. Digital Mode Support
The hotspot supports multiple digital amateur radio modes:
- DMR (Digital Mobile Radio)
- YSF (Yaesu System Fusion)
- P25 (Project 25)
- NXDN
- DSTAR
- POCSAG
The frequency range supported includes 144MHz-148MHz (VHF), 420MHz-475MHz (UHF), and 842MHz-950MHz (UHF), depending on the ADF7021 chip and TCXO, and amateur radio brand license restrictions.
5.2. Using the Hotspot
- Power on your Raspberry Pi with the MMDVM board attached.
- Access the web interface of your chosen hotspot software (e.g., Pi-Star dashboard) via a web browser on a computer connected to the same network.
- Configure your desired digital mode, frequencies, and network settings (e.g., Brandmeister for DMR).
- Ensure your amateur radio is configured with the correct frequencies and talkgroups to communicate through the hotspot.

Figure 5.1: The MMDVM Hotspot in operation, showing DMR activity on its OLED display.
Figure 5.2: Example of a Pi-Star Digital Voice Dashboard, used for configuring and monitoring the hotspot.
6. Firmware Update
Regularly updating the firmware of your MMDVM hotspot board is recommended to ensure optimal performance and access to the latest features. If your Raspberry Pi fails to connect to the hotspot board, a firmware update may resolve the issue.
To update the firmware (e.g., for WPSD 1.6.1), follow these steps via SSH to your Raspberry Pi:
sudo pistar-mmdvmhshatflash hs_hatFor detailed instructions on updating MMDVM_HS for WPSD 1.6.1, refer to the guide available at: jumbo5566.github.io.

Figure 6.1: Example of the command line output during a firmware update process for the MMDVM_HS Hat.
7. Troubleshooting
| Problem | Possible Cause / Solution |
|---|---|
| SVC indicator does not flash (Raspberry Pi 4) | This indicates a potential GPIO conflict. Refer to Section 4.2 for solutions: either remove the R1 resistor on the hotspot board or cut the two interfering Raspberry Pi pin headers on the board corners. |
| Device cannot connect to network after setup | Verify your network configuration on the Raspberry Pi. Ensure correct Wi-Fi credentials or Ethernet connection. Test if your device can receive or transmit signals using m7spi.co.uk/mmdvmcal/. |
| Poor audio quality or high Bit Error Rate (BER) | This can be caused by incorrect frequency offsets. Use the MMDVMCal tool (available in Pi-Star/WPSD) to calibrate the hotspot's RF function and adjust TX/RX offsets. For example, some Anytone 878 HTs may require offsets around -475 to -500. |
| OLED screen remains black | Ensure the OLED screen type is correctly configured in your hotspot software (e.g., "OLED Type 3" in Pi-Star). Check for proper seating of the MMDVM board on the Raspberry Pi's GPIO pins and ensure no physical obstructions or shorts. |
| Hotspot not detected by Raspberry Pi | Verify the MMDVM board is securely connected to the Raspberry Pi's GPIO header. Ensure the Raspberry Pi is receiving adequate power. Try updating the hotspot board firmware as described in Section 6. |

Figure 7.1: The MMDVMCal tool can be accessed via the Pi-Star dashboard to check BER and adjust TX levels.
8. Maintenance
To ensure the longevity and optimal performance of your AURSINC MMDVM Hotspot Hat Board, consider the following maintenance guidelines:
- Keep Clean: Regularly clean the exterior of the aluminum case with a soft, dry cloth. Avoid using harsh chemicals or abrasive materials.
- Environmental Conditions: Operate the hotspot in a dry, well-ventilated area, away from extreme temperatures, direct sunlight, and excessive dust or moisture.
- Power Supply: Always use a stable and appropriate power supply for your Raspberry Pi to prevent damage to the board.
- Firmware Updates: Periodically check for and apply firmware updates for both the MMDVM board and your chosen hotspot software (e.g., Pi-Star, WPSD) to benefit from improvements and bug fixes.
- Antenna Care: Ensure the antenna is securely connected and not bent or damaged. Avoid overtightening the connector.
9. Warranty and Support
AURSINC is committed to providing quality products and customer satisfaction.
9.1. Warranty Information
- 30-Day Exchange or Return: If you are not satisfied with your purchase, you may be eligible for an exchange or return within 30 days.
- 365-Day Warranty: The product is covered by a 365-day warranty against manufacturing defects.

Figure 9.1: AURSINC's commitment to customer satisfaction, including warranty and support details.
9.2. Customer Support
For any questions, concerns, or technical assistance, please contact AURSINC customer service. Our dedicated support team is available to assist you.
- Response Time: We aim to respond to inquiries within 24 hours.
- Contact Information: Please refer to your purchase documentation or the official AURSINC website for the most current contact methods.


