
ANSIO ANSIO 1540
Contents
ANSIO 22L/Day Dehumidifier
User Manual
Introduction
Thank you for choosing the ANSIO 22L/Day Dehumidifier. This appliance is designed to effectively remove excess moisture from the air, helping to control dampness, condensation, and mould growth in your home. By maintaining optimal humidity levels, it contributes to a healthier and more comfortable living environment. This manual provides essential information for the safe and efficient operation, maintenance, and troubleshooting of your dehumidifier.
Please read this manual thoroughly before operating the unit and retain it for future reference.
Safety Information
To ensure safe operation, always adhere to the following precautions:
- Ensure the power supply matches the voltage specified on the rating label.
- Do not operate the dehumidifier with a damaged cord or plug.
- Keep the unit upright during transport and operation to prevent refrigerant leakage.
- Do not block air inlets or outlets. Maintain at least 20cm clearance around the unit.
- Unplug the unit before cleaning or performing any maintenance.
- Do not immerse the unit, power cord, or plug in water or other liquids.
- This appliance is for indoor residential use only.
- Keep out of reach of children and pets.
- Do not use in areas where flammable gases or liquids are present.
Product Overview and Components

Figure 1: Front view of the ANSIO 22L/Day Dehumidifier, showcasing its compact design and top air outlet.

Figure 2: Key features of the dehumidifier, including 245W power consumption, auto shut-off timer, continuous drainage hose capability, and a 4.5-liter water tank capacity.

Figure 3: Illustrates the dimensions of the dehumidifier: approximately 36 cm (14 inches) in width and 54.8 cm (21.5 inches) in height, shown relative to an average adult figure for scale.
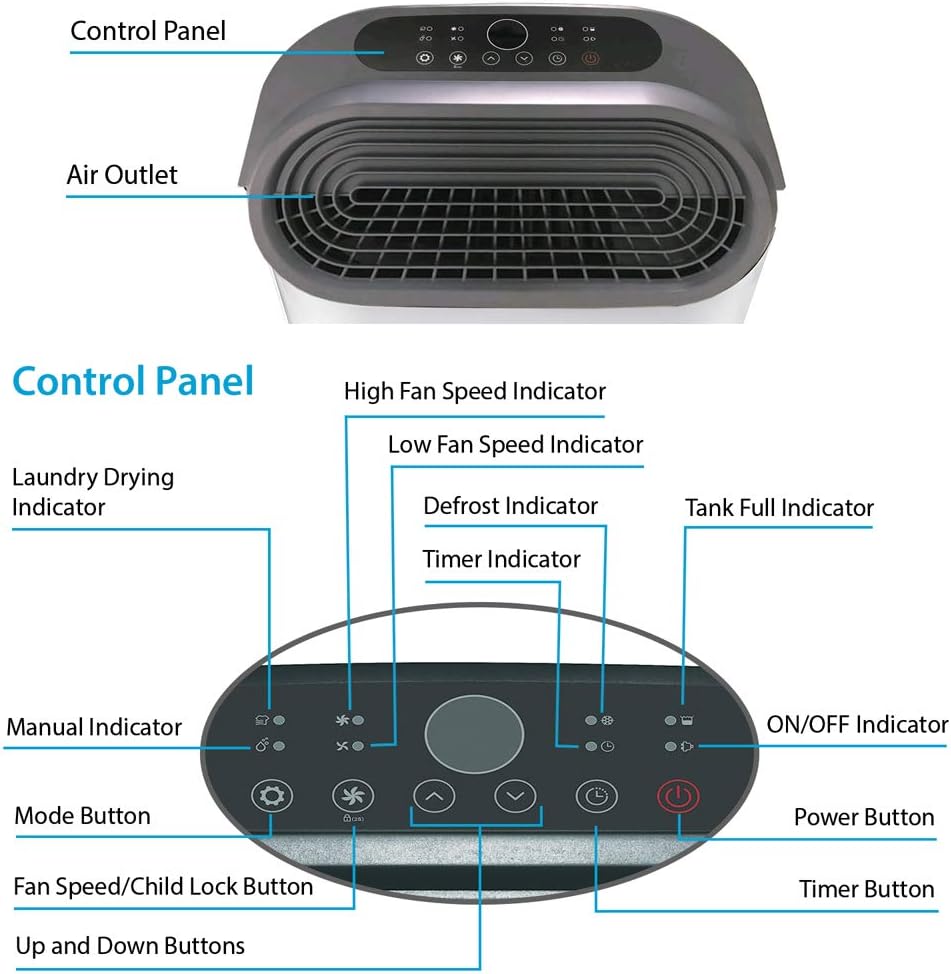
Figure 4: Detailed view of the control panel, identifying buttons and indicators such as Power, Mode, Fan Speed/Child Lock, Timer, Up/Down buttons, and indicators for High/Low Fan Speed, Defrost, Tank Full, Laundry Drying, and Manual operation.

Figure 5: Rear view of the dehumidifier with the 4.5-liter removable water tank detached, showing the handle, rear cover, air inlet grille, and drainage outlet.

Figure 6: Close-up of the integrated wheels located at the base of the unit, designed for easy portability and movement around the house.
Component List:
- Control Panel with Digital Display
- Air Outlet
- Removable 4.5 Litre Water Tank
- Air Inlet Grille / Filter
- Drainage Outlet (for continuous drainage)
- Integrated Wheels
- Handle (for portability)
- Power Cord and Plug
Setup
- Unpacking: Carefully remove the dehumidifier from its packaging. Retain packaging materials for future storage or transport.
- Placement:
Place the unit on a firm, level surface. Ensure there is at least 20 cm (8 inches) of clear space around all sides of the dehumidifier, especially the air inlet (rear) and air outlet (top), to allow for proper airflow.
Avoid placing the unit near heat sources, in direct sunlight, or in areas prone to extreme temperatures.
The integrated wheels (Figure 6) allow for easy repositioning of the unit as needed.
- Power Connection: Insert the power plug into a grounded electrical outlet. Ensure the outlet's voltage matches the unit's requirements (220-240V, 50Hz).
- Water Tank: Ensure the 4.5-liter water tank is correctly inserted into the unit. The unit will not operate if the tank is full or improperly seated.
- Continuous Drainage (Optional):
For continuous operation without manually emptying the water tank, connect a suitable hose (included) to the drainage outlet at the rear of the unit (Figure 5).
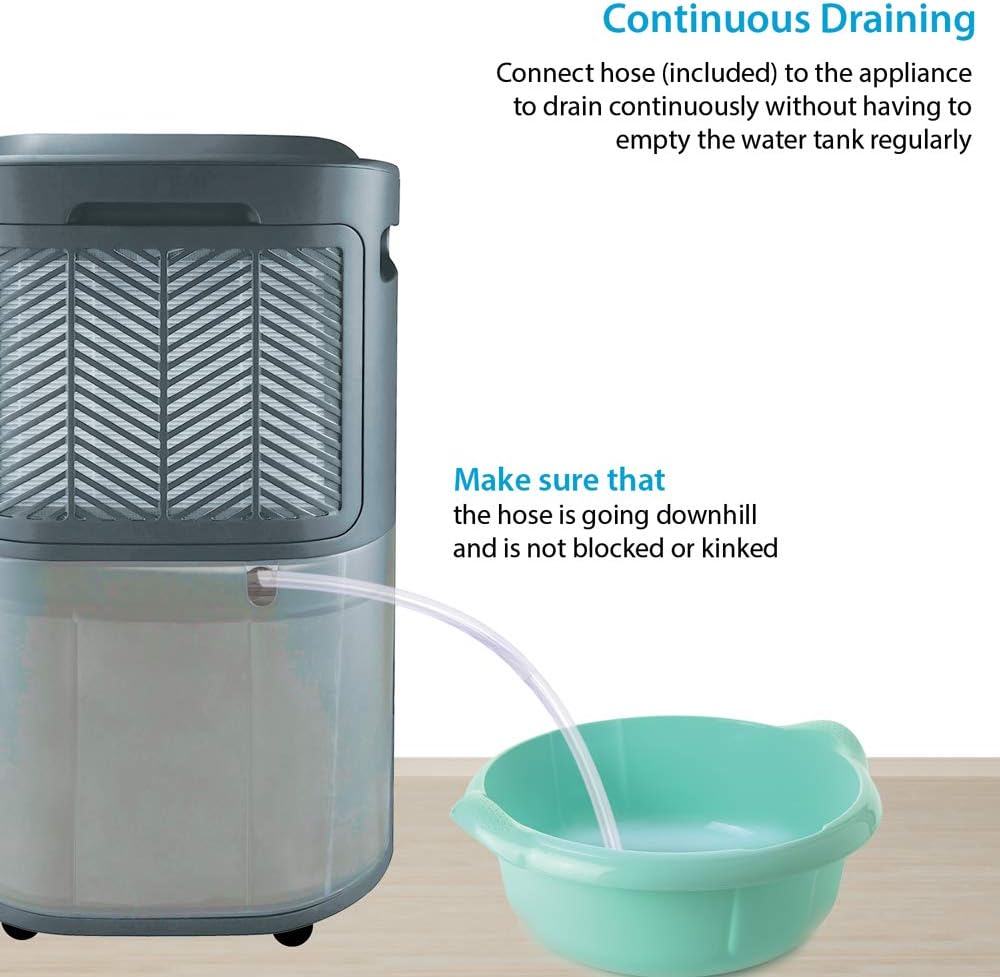
Figure 7: Demonstrates how to set up continuous drainage. Ensure the hose is directed downwards and free from kinks or blockages to allow water to flow into a suitable drain or container.
Ensure the hose is sloped downwards to allow gravity drainage and is not kinked or blocked. Direct the hose to a floor drain or a large container.
Operating Instructions
Control Panel (Refer to Figure 4)
- Power Button (Ⓒ): Press to turn the unit ON or OFF.
- Mode Button (⚙): Cycles through available operating modes.
- Fan Speed/Child Lock Button (☼): Press to adjust fan speed (High/Low). Press and hold for 3 seconds to activate/deactivate Child Lock.
- Timer Button (⏱): Sets the auto shut-off timer (up to 24 hours).
- Up (▲) and Down (▼) Buttons: Adjust desired humidity level or timer settings.
Operating Modes and Features:
- Setting Desired Humidity:
When the unit is ON, the digital screen displays the current room humidity level. Use the Up (▲) and Down (▼) buttons to set your desired humidity level, ranging from 30% to 80% Relative Humidity (RH).
The unit will automatically operate to reach and maintain the set humidity level, turning off when the desired level is achieved and restarting if humidity rises.
- Laundry Drying Mode:
Select this mode to efficiently dry laundry indoors. The unit will operate continuously at a high fan speed to remove moisture from clothes.
- Fan Only Mode:
In this mode, the unit circulates air without dehumidifying. Useful for general air circulation.
- Sleep Mode:
Activates quiet operation and dims the display lights for undisturbed sleep. The unit will continue to dehumidify based on the set humidity level.
- 24-Hour Timer:
Press the Timer button (⏱) to set a specific time (in hours) for the unit to automatically turn ON or OFF. Use the Up (▲) and Down (▼) buttons to adjust the duration.
- Child Lock Mode:
Press and hold the Fan Speed/Child Lock button (☼) for 3 seconds to lock the control panel, preventing accidental changes to settings. Repeat to unlock.
- Auto Defrost Mode:
The unit is equipped with an automatic defrost function. If frost builds up on the evaporator coils, the unit will temporarily stop dehumidifying and run the fan to melt the frost. This is normal operation and ensures efficient performance in cooler environments.
- Auto Shut-Off (Water Tank Full):
When the 4.5-liter water tank is full, the unit will automatically shut off, and the "Tank Full" indicator (Figure 4) will illuminate. Empty the water tank and reinsert it correctly for the unit to resume operation.
Maintenance
Regular maintenance ensures optimal performance and extends the lifespan of your dehumidifier. Always unplug the unit before performing any maintenance.
- Emptying the Water Tank:
When the "Tank Full" indicator lights up, carefully pull out the water tank from the rear of the unit (Figure 5). Empty the collected water and slide the tank back into its position until it clicks securely.
- Cleaning the Air Filter:
The air filter (located behind the rear cover/air inlet grille, Figure 5) should be cleaned every two weeks or more frequently depending on usage and air quality.
- Remove the rear cover and gently pull out the air filter.
- Wash the filter with warm, soapy water. Rinse thoroughly and allow it to air dry completely before reinserting.
- Do not use a dishwasher or expose the filter to direct sunlight for drying.
- Cleaning the Unit Exterior:
Wipe the exterior of the dehumidifier with a soft, damp cloth. Do not use harsh chemicals, abrasive cleaners, or solvents, as these may damage the surface.
- Storage:
If storing the unit for an extended period, ensure the water tank is empty and clean, and the air filter is clean and dry. Coil the power cord neatly. Store the unit in an upright position in a cool, dry place, preferably in its original packaging.
Troubleshooting
Before contacting customer support, please refer to the following common issues and solutions:
| Problem | Possible Cause | Solution |
|---|---|---|
| Unit does not turn on. | No power supply; Power cord not plugged in; Water tank full or improperly seated. | Check power outlet; Ensure power cord is securely plugged in; Empty and reinsert water tank correctly. |
| Dehumidifier not collecting water. | Room humidity is already low; Temperature is too low (below 5°C); Air filter is clogged; Unit is in Fan Only mode. | Increase desired humidity setting; Ensure room temperature is above 5°C; Clean the air filter; Select a dehumidifying mode. |
| Unit is noisy. | Unit not on a level surface; Air filter clogged; Obstruction in fan. | Place on a flat, stable surface; Clean the air filter; Check for and remove any obstructions. |
| "Defrost" indicator is on. | Frost build-up on coils due to low temperature. | This is normal. The unit is in auto-defrost mode. It will resume dehumidifying once defrosting is complete. |
| Child Lock is active. | Control panel is locked. | Press and hold the Fan Speed/Child Lock button for 3 seconds to unlock. |
Specifications
| Feature | Detail |
|---|---|
| Model Number | ANSIO 1540 |
| Dehumidifying Capacity | Up to 22 Litres/Day |
| Water Tank Volume | 4.5 Litres |
| Product Dimensions (L x W x H) | 36 x 24.2 x 54.8 cm |
| Product Weight | 16.48 kg |
| Recommended Use | Residential |
| Special Features | Continuous Draining, Automatic Defrost, Timer, Removable Tank, Automatic Shutoff, Sleep Mode, Child Lock, Laundry Drying Mode, Fan Only Mode |
| Power Supply | 220-240V, 50Hz (Standard UK/EU) |
Warranty and Support
For any queries, technical assistance, or warranty claims, please contact ANSIO customer support. Refer to the product packaging or the ANSIO official website for the most current contact information.
When contacting support, please have your product model number (ANSIO 1540) and purchase details readily available.
Ask a question about this manual
Ask about setup, troubleshooting, compatibility, parts, safety, or missing instructions. Manuals+ will review the question and use this page’s manual context to help answer it.