Important Safety Information
Please read this manual carefully before operating your ANSIO Dehumidifier. Keep it for future reference. Failure to follow these instructions may result in electric shock, fire, or serious injury.
- Always connect the unit to a properly grounded power outlet.
- Do not operate the unit with a damaged power cord or plug.
- Do not block the air inlet or outlet. Ensure at least 20 cm (8 inches) of space around the unit.
- Do not use the unit near water or in excessively wet environments.
- Always turn off and unplug the unit before cleaning or performing any maintenance.
- This appliance is not intended for use by persons (including children) with reduced physical, sensory or mental capabilities, or lack of experience and knowledge, unless they have been given supervision or instruction concerning use of the appliance by a person responsible for their safety.
Setup Instructions
1. Unpacking
- Carefully remove the dehumidifier from its packaging.
- Remove all packing materials, including any tape or protective films.
- Inspect the unit for any signs of damage during transit. If damaged, do not operate and contact customer support.
2. Placement
- Place the dehumidifier upright on a firm, level surface.
- Ensure there is at least 20 cm (8 inches) of clear space around the air inlet and outlet for proper airflow.
- Avoid placing the unit near heat sources or in direct sunlight.

Image: The ANSIO Dehumidifier shown next to an adult for scale, illustrating its compact size suitable for various room placements.
3. Power Connection
- Plug the power cord into a suitable grounded electrical outlet.
4. Water Tank and Continuous Drainage
The unit comes with a 4.5L removable water tank for manual emptying. For continuous operation without manual emptying, you can set up the continuous drainage feature.
- Water Tank: Ensure the 4.5L water tank is correctly inserted into the rear of the unit.
- Continuous Drainage: Connect the included drainage hose to the drainage outlet located at the rear of the appliance. Ensure the hose is routed downwards to allow gravity to drain the water into a suitable receptacle or drain. Avoid kinks or blockages in the hose.

Image: Rear view of the dehumidifier, highlighting the removable 4.5L water tank, the air inlet grille, and the drainage outlet for continuous operation.
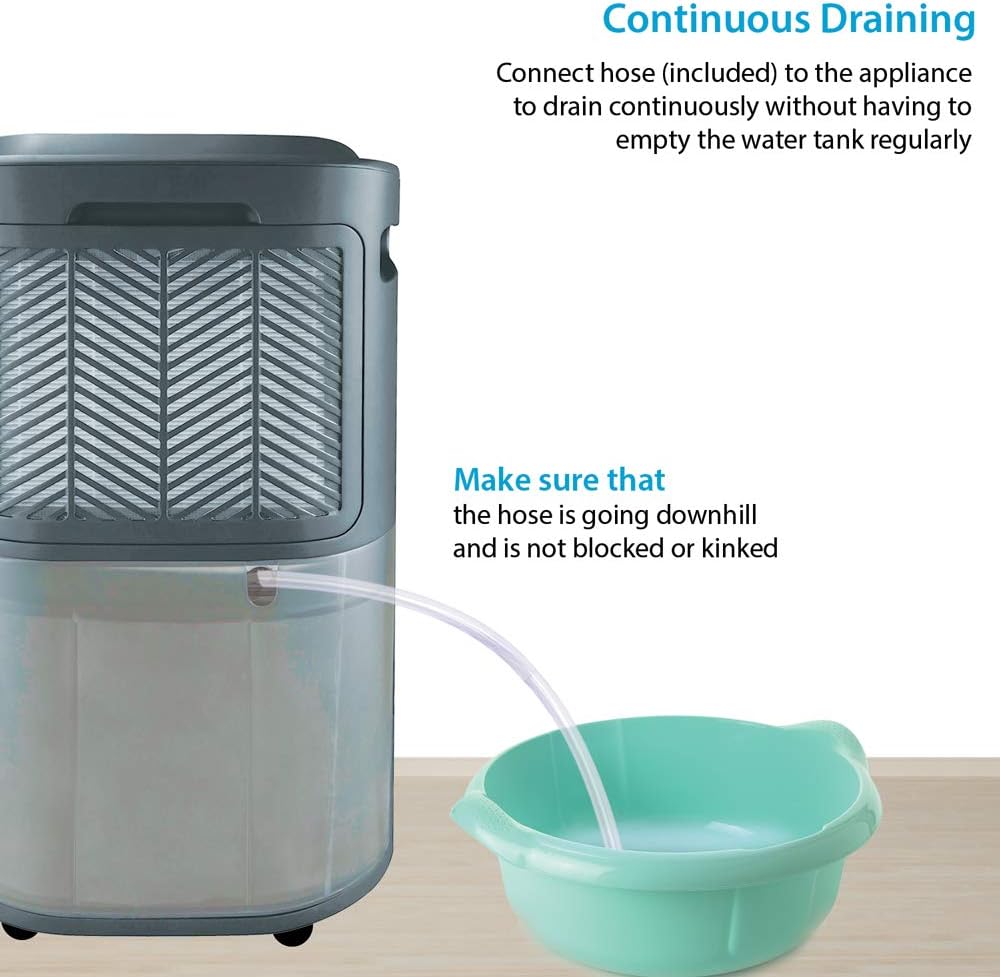
Image: Illustration of the continuous drainage setup, showing the hose connected to the unit and directed downwards into an external container, ensuring uninterrupted operation.
5. Integrated Wheels
The dehumidifier is equipped with integrated wheels for easy portability. You can move the unit between rooms as needed without lifting.

Image: A close-up view of the integrated wheels located at the base of the dehumidifier, designed for effortless movement across different surfaces.
Operating Instructions
Control Panel Overview
Familiarize yourself with the control panel and its indicators before operation.
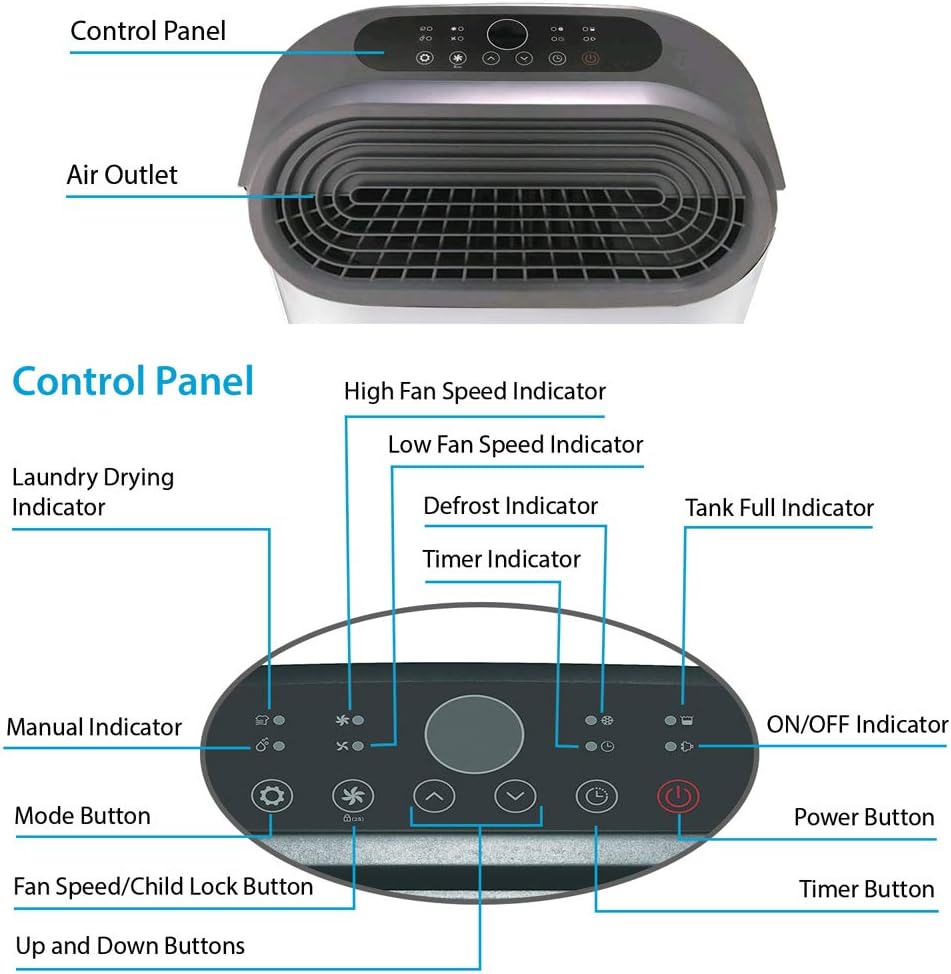
Image: A detailed diagram of the dehumidifier's control panel, clearly labeling each button (Power, Mode, Fan Speed/Child Lock, Timer, Up/Down) and indicator lights (High/Low Fan Speed, Defrost, Tank Full, Timer, Laundry Drying, Manual, ON/OFF).
- Power Button: Turns the unit ON or OFF.
- Mode Button: Cycles through available operating modes.
- Fan Speed/Child Lock Button: Adjusts fan speed (High/Low) or activates/deactivates Child Lock.
- Up/Down Buttons: Adjusts desired humidity level or timer settings.
- Timer Button: Sets the auto-off timer.
- Digital Display: Shows current room humidity and set humidity level.
- Indicators: Lights for High/Low Fan Speed, Defrost, Tank Full, Timer, Laundry Drying, Manual, and ON/OFF status.
1. Power On/Off
- Press the Power Button () to turn the dehumidifier ON. The digital display will show the current room humidity.
- Press the Power Button again to turn the unit OFF.
2. Setting Desired Humidity
- When the unit is ON, use the Up () and Down () buttons to set your desired humidity level. The range is typically from 30% to 80% relative humidity.
- The unit will operate until the set humidity level is reached, then it will automatically stop. It will restart if the humidity rises above the set level.
3. Operating Modes
- Press the Mode Button () to cycle through the following modes:
- Dehumidify Mode: Standard operation to reduce room humidity to the set level.
- Laundry Drying Mode: Operates continuously at high fan speed to help dry clothes faster. The laundry drying indicator will illuminate.
- Fan Only Mode: The unit circulates air without dehumidifying.
4. Fan Speed
- Press the Fan Speed Button () to switch between High and Low fan speeds. The corresponding indicator light will illuminate.
5. Timer Function
- Press the Timer Button () to set an auto-off timer.
- Use the Up and Down buttons to adjust the desired operating duration, up to 24 hours. The timer indicator will light up.
- The unit will automatically turn off after the set time has elapsed.
6. Child Lock
- To activate the Child Lock, press and hold the Fan Speed/Child Lock Button for a few seconds until the child lock indicator illuminates. This will disable all other buttons on the control panel.
- To deactivate, press and hold the same button again until the indicator turns off.
7. Defrost Mode
- The unit features an automatic defrost function. If frost builds up on the evaporator coils, the unit will automatically enter defrost mode, and the defrost indicator will illuminate.
- During defrosting, the dehumidification function will pause, and the fan will continue to run to melt the frost. Once defrosted, the unit will resume normal operation.
8. Water Tank Full Indicator
- When the water tank is full, the Tank Full Indicator will illuminate, and the unit will automatically stop operating to prevent overflow.
- Empty the water tank as described in the Maintenance section, then reinsert it correctly. The unit will resume operation.
Maintenance
Regular maintenance ensures optimal performance and extends the lifespan of your dehumidifier.
1. Cleaning the Air Filter
The air filter, located at the rear of the unit behind the air inlet grille, should be cleaned regularly (e.g., every two weeks or as needed) to prevent dust buildup and maintain efficiency.
- Turn off the dehumidifier and unplug it from the power outlet.
- Remove the rear cover/air inlet grille.
- Carefully pull out the air filter.
- Clean the filter with a vacuum cleaner or wash it gently with warm, soapy water. Rinse thoroughly.
- Allow the filter to air dry completely before reinserting it. Do not use a dryer or direct heat.
- Place the dry filter back into its position and reattach the rear cover/grille.
2. Emptying the Water Tank
When the water tank is full, the unit will stop operating. Empty the tank as follows:
- Gently pull out the water tank from the rear of the unit.
- Carefully carry the tank to a sink or drain.
- Pour out the collected water.
- Rinse the tank with clean water if necessary.
- Slide the empty tank back into the unit until it clicks into place. The unit will then resume operation.
3. Cleaning the Exterior
- Wipe the exterior of the unit with a soft, damp cloth.
- Do not use harsh chemicals, abrasive cleaners, or solvents, as these may damage the surface.
4. Storage
- If storing the unit for an extended period, ensure the water tank is empty and clean, and the air filter is clean and dry.
- Unplug the unit and coil the power cord neatly.
- Store the dehumidifier in an upright position in a cool, dry place, away from direct sunlight and extreme temperatures.
Troubleshooting
Before contacting customer support, please refer to the following troubleshooting guide for common issues.
| Problem | Possible Cause | Solution |
|---|---|---|
| Unit does not turn on. | No power supply. Power cord not properly connected. | Ensure the unit is plugged into a working electrical outlet. Check the power cord connection. |
| No water collected or low dehumidification. | Air filter is dirty. Room temperature is too low. Humidity level is already low. Air inlet/outlet blocked. | Clean the air filter. Dehumidifiers are less effective below 5°C (41°F). The unit will stop if the set humidity is reached. Ensure clear space around the unit. |
| Tank Full indicator is on, but tank is not full. | Water tank not properly inserted. Float switch malfunction. | Remove and reinsert the water tank firmly. Contact customer support if the issue persists. |
| Unit is noisy. | Unit not on a level surface. Air filter dirty. | Place the unit on a flat, stable surface. Clean the air filter. |
Specifications
| Feature | Detail |
|---|---|
| Brand | ANSIO |
| Model Name | 22 Liters/Day |
| Moisture Removal Capacity | 22 Liters per day |
| Water Tank Volume | 4.5 Liters |
| Dimensions (L x W x H) | 41.7 x 28.7 x 56.7 cm |
| Weight | 15.98 kilograms |
| Color | White |
| Special Features | Continuous Drainage, Defrost, Humidistat, Child Lock, Wheels |
| Operating Mode | Automatic |
| Components Included | Reservoir (Water Tank) |
Warranty and Support
For warranty information, technical support, or any questions not covered in this manual, please contact ANSIO customer service. Refer to your purchase documentation for specific warranty terms and contact details.
Note: Information regarding spare parts availability is not provided in the product details.


