1. Introduction
This manual provides essential information for the safe and efficient operation of your Nilox NXGCLI20002X9V2 Line Interactive Uninterruptible Power Supply (UPS). Please read this manual thoroughly before installation and use, and retain it for future reference. The UPS is designed to protect your electronic equipment from power outages, surges, and sags, ensuring continuous operation and data integrity.
2. Important Safety Instructions
- Electrical Safety: This unit contains hazardous voltages. Do not attempt to disassemble the UPS. Servicing should only be performed by qualified personnel.
- Grounding: The UPS must be connected to a grounded AC power outlet. Do not remove the grounding prong from the power cord.
- Environment: Install the UPS in a well-ventilated area, away from direct sunlight, heat sources, and excessive moisture. Avoid placing it near flammable liquids or gases.
- Overload: Do not overload the UPS. Ensure the total power consumption of connected equipment does not exceed the UPS's rated capacity.
- Battery: The UPS contains sealed lead-acid batteries. Do not dispose of batteries in a fire, as they may explode. Follow local regulations for battery disposal.
- Liquid: Do not allow any liquid to enter or spill onto the UPS.
3. Package Contents
Carefully unpack the UPS and check the contents. The package should contain:
- Nilox NXGCLI20002X9V2 UPS Unit
- Power Cord(s)
- USB Communication Cable
- User Manual (this document)
If any items are missing or damaged, please contact your dealer immediately.
4. Product Overview
4.1. UPS Unit
The following images illustrate the Nilox NXGCLI20002X9V2 UPS unit.

Figure 4.1: Overall view of the Nilox NXGCLI20002X9V2 Line Interactive UPS. This image shows the compact, tower-style design of the black UPS unit, highlighting its ventilation grilles and the front panel with indicators and power button.
4.2. Front Panel

Figure 4.2: Front panel of the Nilox NXGCLI20002X9V2 UPS. This image details the front of the UPS, showing the LED indicators (red, orange, blue) and the circular power button, along with the Nilox brand logo at the bottom.
The front panel features LED indicators and a power button:
- LED Indicators: These lights provide status information about the UPS operation, battery level, and potential warnings. Refer to the 'Operating' section for detailed explanations.
- Power Button: Used to turn the UPS ON or OFF.
4.3. Rear Panel
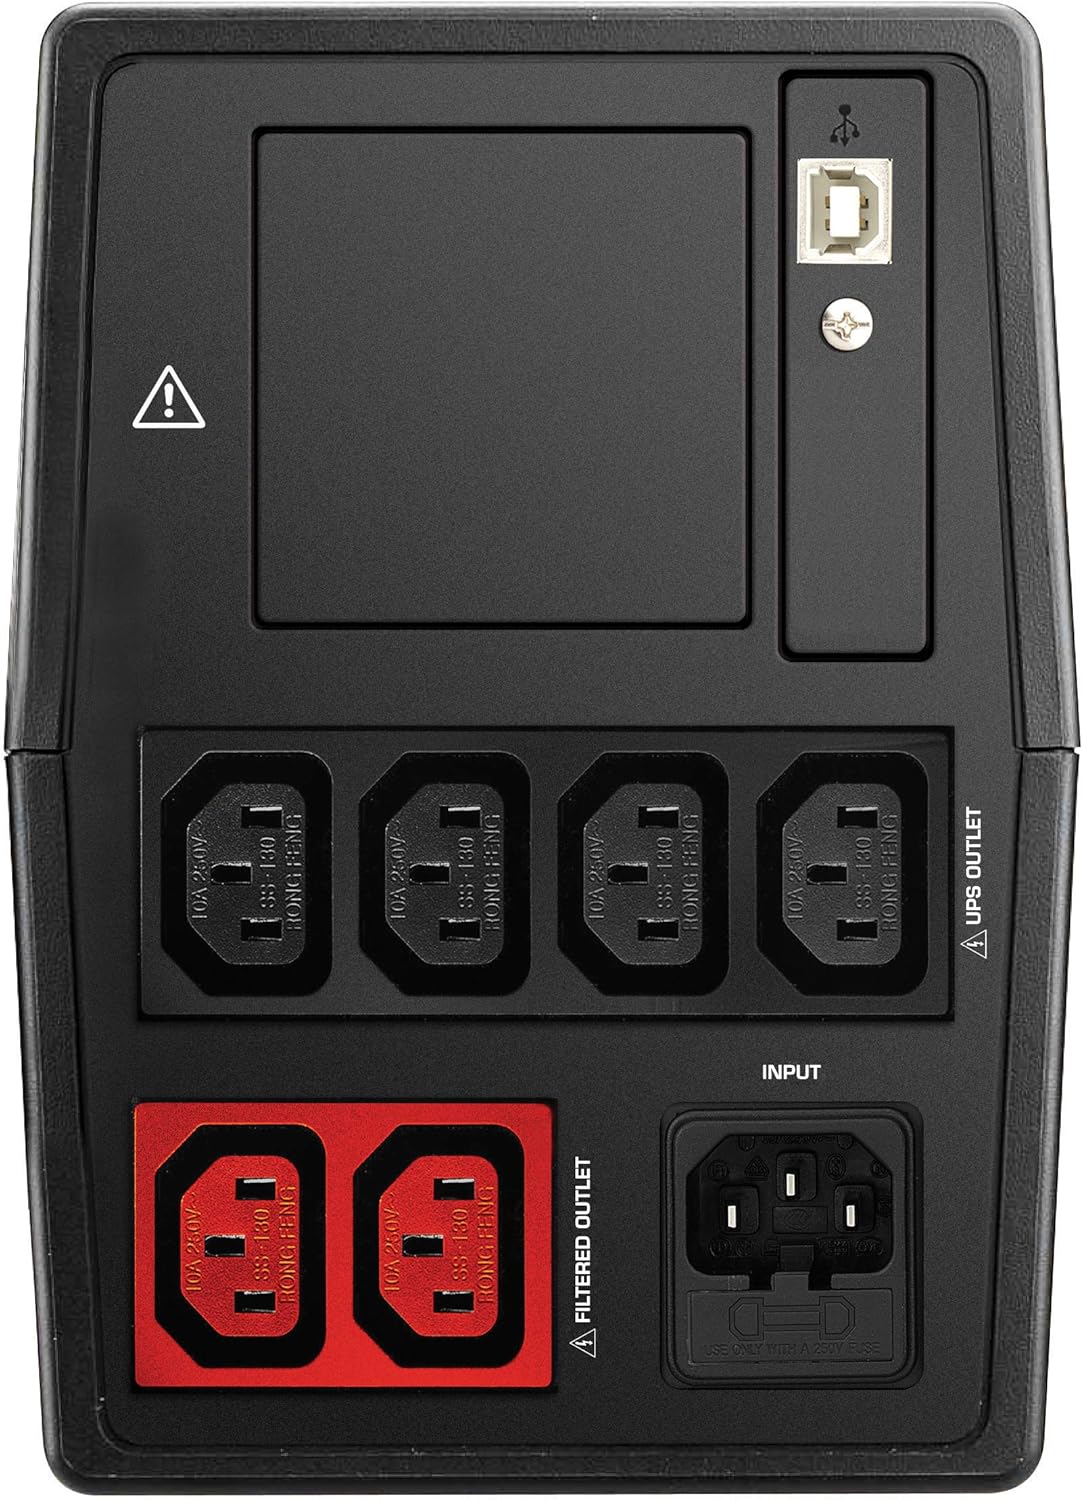
Figure 4.3: Rear panel of the Nilox NXGCLI20002X9V2 UPS. This image displays the back of the UPS, showing the various input and output ports, including the main power input, UPS-protected outlets, filtered outlets, and USB communication ports.
The rear panel includes various connection ports:
- AC Input: Connects the UPS to the main power supply.
- UPS Outlets: Provides battery backup and surge protection for connected devices.
- Filtered Outlets: Provides surge protection only (no battery backup).
- USB Ports: For connecting to a computer for monitoring and management software.
5. Setup
5.1. Placement
Place the UPS on a flat, stable surface in a clean, dry, and well-ventilated area. Ensure there is adequate space around the unit for proper airflow. Avoid placing the UPS near windows or areas with high humidity or dust.
5.2. Initial Charging
Before initial use, connect the UPS to a standard AC power outlet and allow it to charge for at least 8 hours. This ensures the internal batteries are fully charged and ready to provide optimal backup time.
5.3. Connecting Equipment
- Connect your critical equipment (e.g., computer, monitor) to the UPS Outlets on the rear panel. These outlets provide battery backup during power outages.
- Connect non-critical equipment (e.g., printer, scanner) to the Filtered Outlets. These outlets provide surge protection but no battery backup.
- Connect the UPS power cord to a grounded AC wall outlet.
- Optionally, connect the USB communication cable from the UPS to your computer for monitoring software functionality.
6. Operating the UPS
6.1. Turning On/Off
- To Turn On: Press and hold the power button on the front panel for approximately 3 seconds until you hear a beep and the indicators light up.
- To Turn Off: Press and hold the power button for approximately 3 seconds until the indicators turn off.
6.2. LED Indicators
The LED display provides real-time status information:
- Green/Blue LED: Indicates normal operation and AC power availability.
- Orange LED: Indicates battery mode (UPS is providing power from its batteries).
- Red LED: Indicates a fault, overload, or low battery warning. Consult the troubleshooting section if this LED illuminates.
6.3. Battery Backup Function
In the event of a power outage, the UPS will automatically switch to battery mode, providing power to connected equipment. An audible alarm may sound to indicate battery operation. The duration of battery backup depends on the load connected and the battery charge level.
7. Maintenance
7.1. Battery Care
- Recharge: Always recharge the UPS immediately after a discharge.
- Storage: If storing the UPS for an extended period, recharge it every 3 months to prolong battery life.
- Replacement: Batteries have a limited lifespan. If the backup time significantly decreases, the batteries may need replacement. Contact qualified service personnel for battery replacement.
7.2. Cleaning
Disconnect the UPS from the AC power outlet before cleaning. Use a soft, dry cloth to wipe the exterior of the unit. Do not use liquid or aerosol cleaners.
8. Troubleshooting
If the UPS is not functioning correctly, refer to the following table for common issues and solutions:
| Problem | Possible Cause | Solution |
|---|---|---|
| UPS does not turn on | No AC input power; Low battery | Check power cord connection; Charge UPS for 8 hours |
| Short backup time | Batteries not fully charged; Overload; Old batteries | Charge UPS for 8 hours; Reduce connected load; Consider battery replacement |
| Constant alarm sound | Overload; Battery mode; Fault | Reduce connected load; This is normal in battery mode; Contact support if fault persists |
| Red LED is on | Overload; Battery fault; Internal fault | Reduce connected load; Contact support for battery or internal fault |
9. Specifications
| Feature | Detail |
|---|---|
| Model | NXGCLI20002X9V2 |
| Capacity (VA/W) | 2000 VA / 1400 W |
| Technology | Line Interactive |
| Input Voltage | 234 Volt |
| Output Voltage | 234 Volt |
| Battery Type | Sealed Lead-Acid (2 x 9 Ah) |
| Battery Recharge Time | 8 Hours |
| Typical Backup Time | 7 Minutes (at average load) |
| Dimensions (L x W x H) | 39 x 27.5 x 19 cm |
| Weight | 8.6 kg |
| Form Factor | Tower |
| Color | Black |
| USB Ports | 4 x USB 2.0, 2 x USB 3.0 |
| Plug Type | Schuko |
10. Warranty and Support
Nilox products are manufactured to high-quality standards. This product is covered by a standard manufacturer's warranty. For specific warranty terms and conditions, please refer to the warranty card included with your product or visit the official Nilox website.
For technical support, troubleshooting assistance, or service inquiries, please contact your local Nilox dealer or authorized service center. When contacting support, please have your product model number (NXGCLI20002X9V2) and serial number available.


