1. Introduction
This manual provides essential information for the proper setup, operation, and maintenance of your Great Asia TK-E101GC 10-inch Android Tablet. Please read this manual thoroughly before using the device to ensure optimal performance and longevity.

Image 1.1: Front view of the Great Asia TK-E101GC 10-inch Android Tablet, displaying its screen.
2. Package Contents
Verify that all items listed below are included in your product package:
- TK-E101GC Tablet X 1
- USB Cable X 1
- Power adapter X 1
- Reset PIN X 1
- Instruction Manual X 1 (this document)
- Magnetic Charging Cable X 1
- SIM Card Sleeve X 1
- Screen Protector X 1
- Earphone X 1
- Stylus Pen X 1
- OTG Cable X 1
3. Product Overview
Familiarize yourself with the physical components and key features of your tablet.
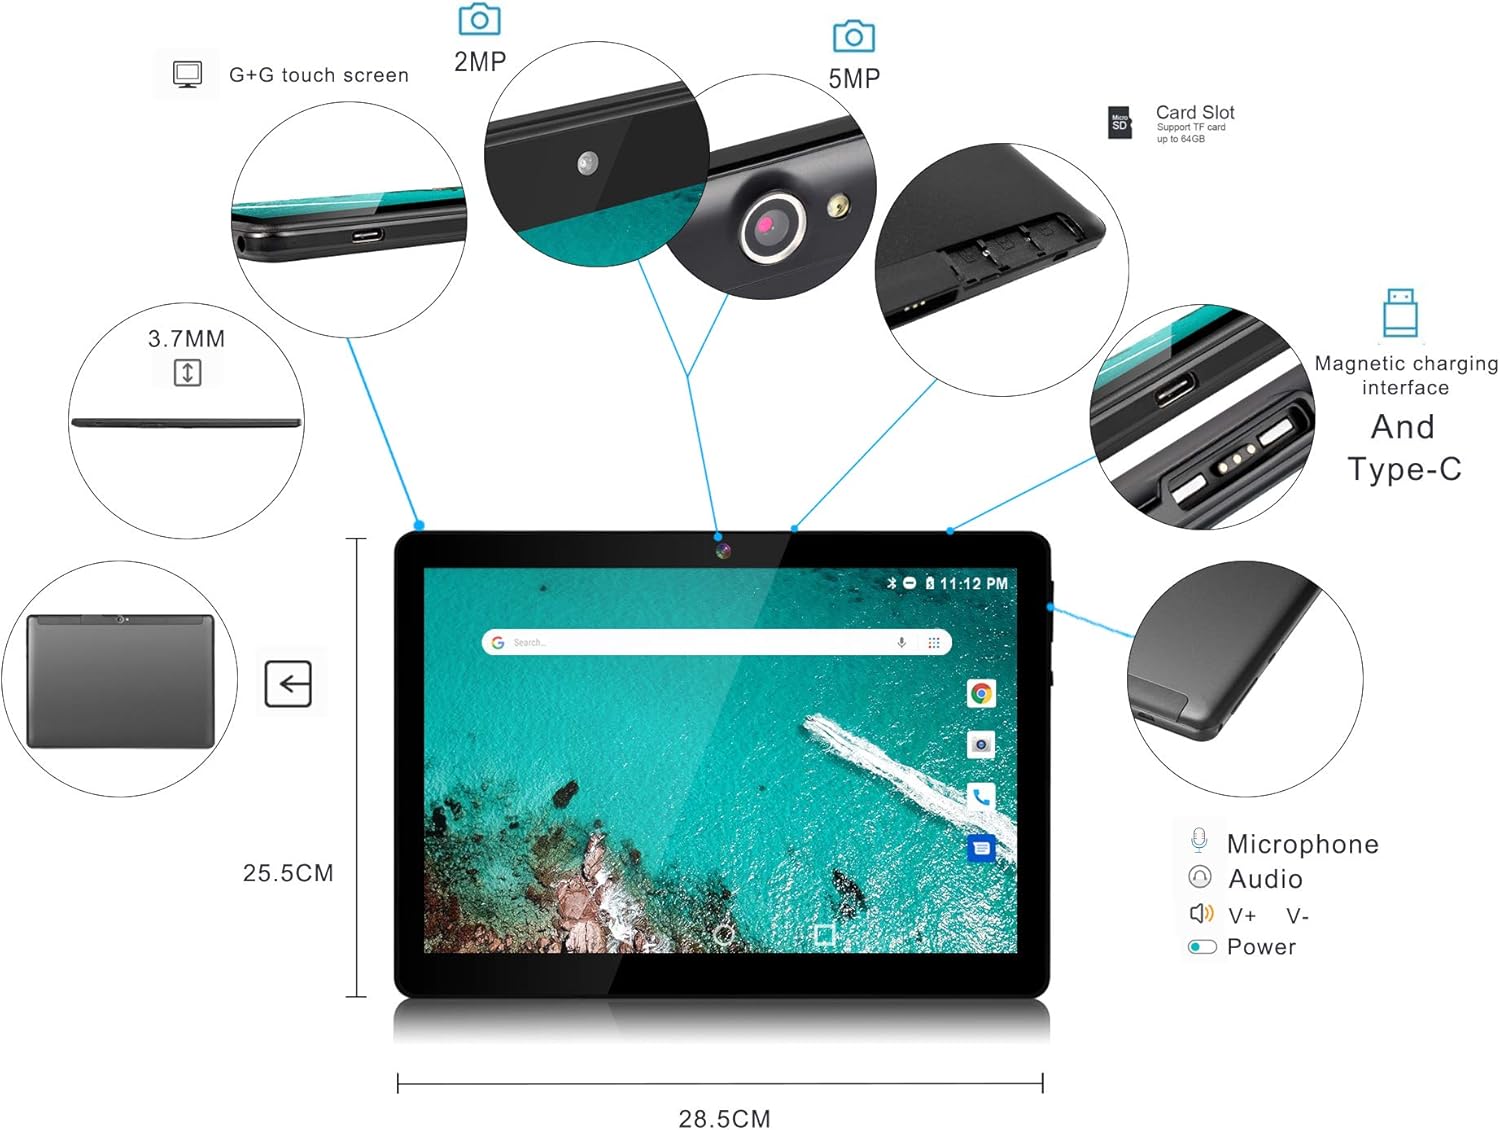
Image 3.1: Detailed diagram highlighting the tablet's physical features including cameras, ports, and dimensions.
Key Features:
- Display: 10.1-inch IPS Capacitive Touch Screen (1280x800 pixels)
- Processor: MTK6580 Quad Core Cortex A7 1.3GHz
- Memory: 2GB RAM, 32GB ROM (expandable up to 128GB via Micro SD card)
- Operating System: Android 7.0
- Cameras: 2MP Front, 5MP Rear
- Connectivity: WiFi (IEEE802.11 b/g/n), Dual SIM Card Slots (2G/3G), Bluetooth (not explicitly listed but common), GPS, FM
- Ports: 5pin Micro USB (2.0 speed), Magnetic Charging port, 3.5mm Audio Jack
- Battery: 6000mAH

Image 3.2: Diagram illustrating the tablet's internal specifications such as RAM, ROM, CPU, and connectivity options.
4. Setup
4.1. Charging the Tablet
Before initial use, fully charge the tablet. Connect the provided power adapter to the tablet's magnetic charging port or the Micro USB port. The charging indicator will illuminate. Disconnect the charger once the battery is full.
4.2. Inserting SIM Cards and Micro SD Card
The tablet supports dual SIM cards and a Micro SD card for expanded storage.
- Locate the SIM/Micro SD card tray on the side of the tablet.
- Use the provided SIM card sleeve or a small pin to gently eject the tray.
- Carefully place your standard SIM cards (SIM1 and SIM2) and Micro SD card into their respective slots on the tray. Ensure the gold contacts face downwards.
- Gently push the tray back into the tablet until it clicks into place.
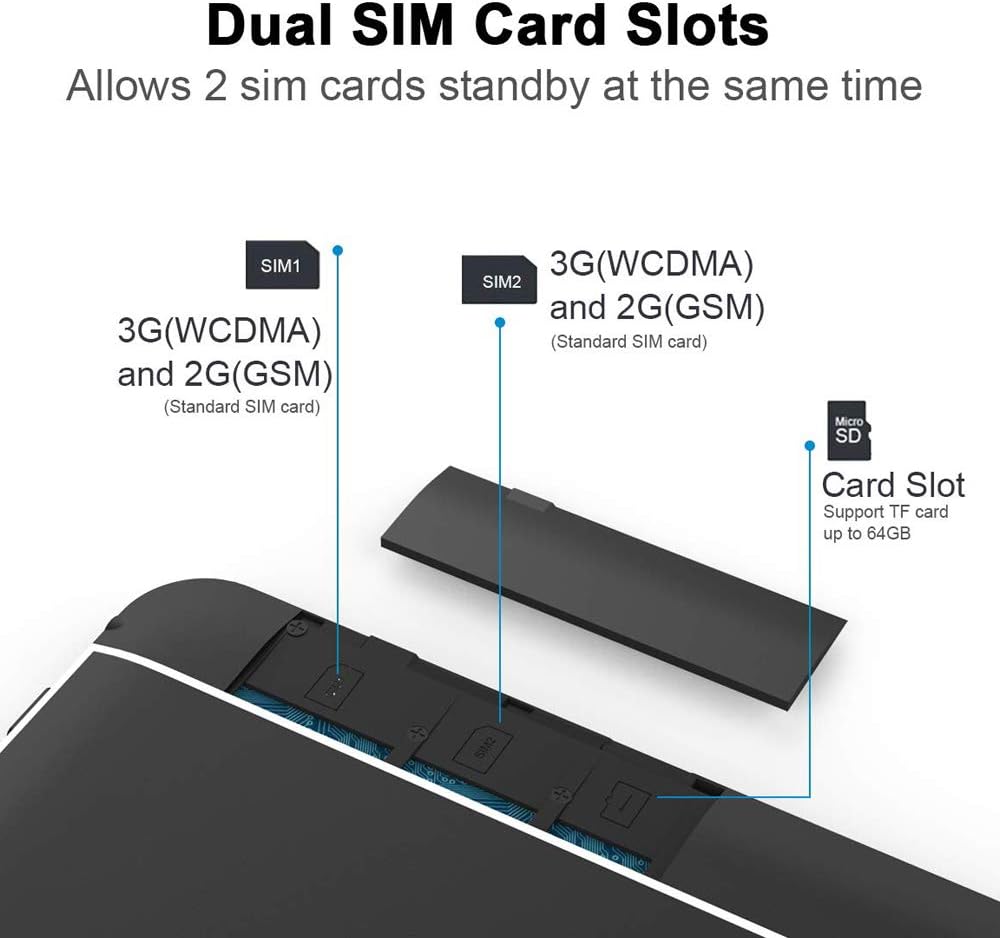
Image 4.1: Illustration demonstrating the correct method for inserting dual SIM cards and a Micro SD card into the tablet's tray.
4.3. Initial Power On
Press and hold the power button located on the side of the tablet until the screen illuminates. Follow the on-screen prompts to complete the initial setup, including language selection, Wi-Fi connection, and Google account setup.
5. Operating Instructions
5.1. Basic Navigation
The tablet features a capacitive touchscreen. Use the following gestures for navigation:
- Tap: Select an item or open an application.
- Swipe: Scroll through lists or switch between home screens.
- Pinch: Zoom in or out on images and web pages.
- Long Press: Access contextual menus or move icons.
5.2. Connecting to Wi-Fi
- Go to Settings > Wi-Fi.
- Toggle Wi-Fi On.
- Select your desired network from the list of available networks.
- Enter the password if prompted and tap Connect.
5.3. Making Calls and Using Mobile Data
With inserted SIM cards, your tablet can make phone calls and access mobile data (2G/3G).
- Open the Phone application to dial numbers or access contacts.
- To enable mobile data, go to Settings > Data usage or Network & internet > Mobile network and toggle mobile data On.
5.4. Using the Cameras
The tablet is equipped with a 2MP front camera and a 5MP rear camera.
- Open the Camera application from the home screen or app drawer.
- Tap the shutter button to take photos.
- Switch between front and rear cameras using the camera toggle icon.
5.5. Connecting Magnetic Charging Cable
The tablet supports magnetic charging for convenience. Align the magnetic charging cable connector with the magnetic charging port on the tablet. The magnetic connection will secure the cable and begin charging.
6. Specifications
| Feature | Specification |
|---|---|
| Operation System | Android 7.0 Nougat |
| CPU | MTK6580 Quad Core Cortex A7 1.3GHz |
| RAM | 2GB |
| ROM | 32GB (Expandable up to 128GB via Micro SD) |
| Display Size | 10.1 inches |
| Display Technology | IPS Capacitive Touch Screen |
| Display Resolution | 1280*800 pixels |
| WiFi | IEEE802.11 b/g/n |
| SIM Card Support | Dual SIM Card Slots (2G GSM: 850/900/1800/1900MHz, 3G WCDMA 2100MHZ) |
| Charging Port | Magnetic Charging port, 5pin Micro USB (2.0 speed) |
| OTG | Supported |
| MIC | Supported |
| GPS | Supported |
| FM | Supported |
| Speaker | Dual Speaker |
| Camera | 2MP Front / 5MP Rear |
| Battery | 6000mAH Lithium Polymer |
| Size | 8.56 X 6.7 X 0.37 inches (21.74 x 17.02 x 0.94 cm) |
| Weight | Approximately 1.22 kg (Package dimensions: 29.9 x 29.3 x 4.9 cm) |
7. Maintenance
- Cleaning: Use a soft, lint-free cloth to clean the screen and body. Avoid abrasive cleaners or solvents.
- Storage: Store the tablet in a cool, dry place away from direct sunlight and extreme temperatures.
- Battery Care: To prolong battery life, avoid fully discharging the tablet frequently. Charge it regularly.
- Software Updates: Periodically check for system updates in Settings > About tablet > System updates to ensure optimal performance and security.
8. Troubleshooting
8.1. Tablet Does Not Turn On
- Ensure the battery is charged. Connect the tablet to the charger for at least 30 minutes.
- Press and hold the power button for 10-15 seconds to perform a hard reset.
8.2. Wi-Fi Connection Issues
- Restart the tablet and your Wi-Fi router.
- Ensure you are within range of the Wi-Fi signal.
- Verify the Wi-Fi password is entered correctly.
8.3. Slow Performance
- Close unnecessary background applications.
- Clear cache data for apps in Settings > Apps > [App Name] > Storage > Clear cache.
- Consider uninstalling unused applications.
8.4. Screen Unresponsive
- Restart the tablet by holding the power button.
- Ensure the screen is clean and free of moisture or debris.
9. Warranty and Support
This product comes with a standard manufacturer's warranty. Please refer to the warranty card included in your package for specific terms and conditions. For technical support or service inquiries, please contact your retailer or the manufacturer's customer service department.