1. Introduction
This user manual provides detailed instructions for the installation, operation, and maintenance of your AUDIOTEK 6.2-inch 2DIN Touchscreen Car Stereo MP5/DVD Player, Model AT-578T. Please read this manual thoroughly before using the product to ensure proper function and to prevent damage. Keep this manual for future reference.
2. Product Overview
The AUDIOTEK AT-578T is a versatile 2DIN car stereo featuring a 6.2-inch digital TFT touchscreen. It supports multiple media formats including MP5 and DVD, offers Bluetooth connectivity for hands-free calling and audio streaming, and includes USB and SD card slots for expanded media options. A remote control is included for convenient operation.
2.1 Main Unit and Remote Control
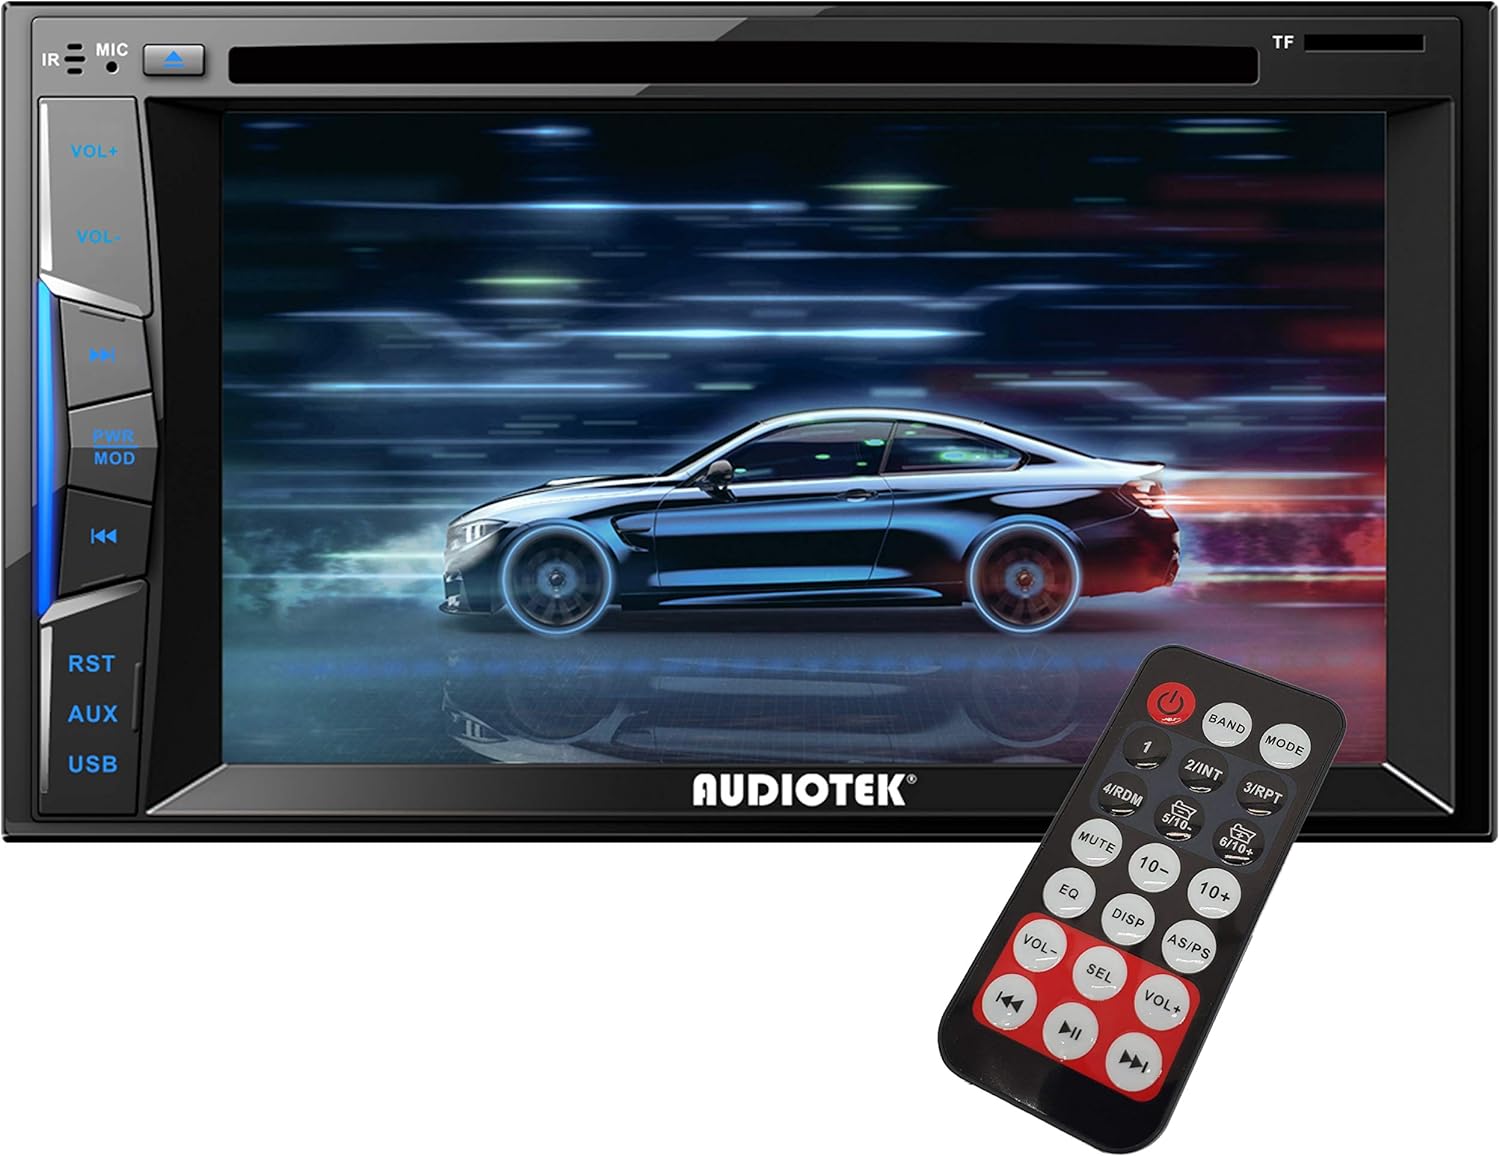
Figure 2.1: Front view of the AUDIOTEK AT-578T car stereo with the included remote control. The unit features a 6.2-inch touchscreen display and physical buttons on the left side for volume, mode, reset, and USB access. The remote control provides comprehensive function access.
2.2 Included Accessories
The package includes the main stereo unit, a remote control, mounting brackets, and a wiring harness for installation.

Figure 2.2: Included accessories for the AUDIOTEK AT-578T, featuring the remote control, mounting brackets, and the main wiring harness.
3. Setup and Installation
Proper installation is crucial for the optimal performance and safety of your car stereo. If you are unsure about any steps, it is recommended to seek professional assistance.
3.1 Wiring Diagram
Refer to the wiring diagram provided on the unit's chassis and in this section for correct electrical connections. Incorrect wiring can cause damage to the unit or your vehicle's electrical system.

Figure 3.1: Detailed wiring diagram located on the top of the AUDIOTEK AT-578T unit. This diagram illustrates connections for power, speakers, antenna, and auxiliary inputs/outputs. Ensure all connections match your vehicle's wiring system.
Key Wiring Connections:
- Yellow (B+): Connect to constant 12V power supply.
- Red (ACC): Connect to switched 12V accessory power.
- Black (GND): Connect to vehicle chassis ground.
- Blue (ANT): Connect to power antenna or amplifier remote turn-on.
- Orange (ILL): Connect to vehicle illumination wire.
- Brown (BRAKE): Connect to parking brake wire for video safety interlock.
- Reverse (BACK): Connect to reverse light trigger for rear camera activation.
- Speaker Wires: Connect to corresponding vehicle speakers (e.g., White/White-Black for Front Left, Gray/Gray-Black for Front Right, Green/Green-Black for Rear Left, Purple/Purple-Black for Rear Right).
3.2 Mounting the Unit
Use the provided mounting brackets to secure the stereo into your vehicle's 2DIN dashboard opening. Ensure the unit is firmly seated and does not obstruct any vehicle controls.
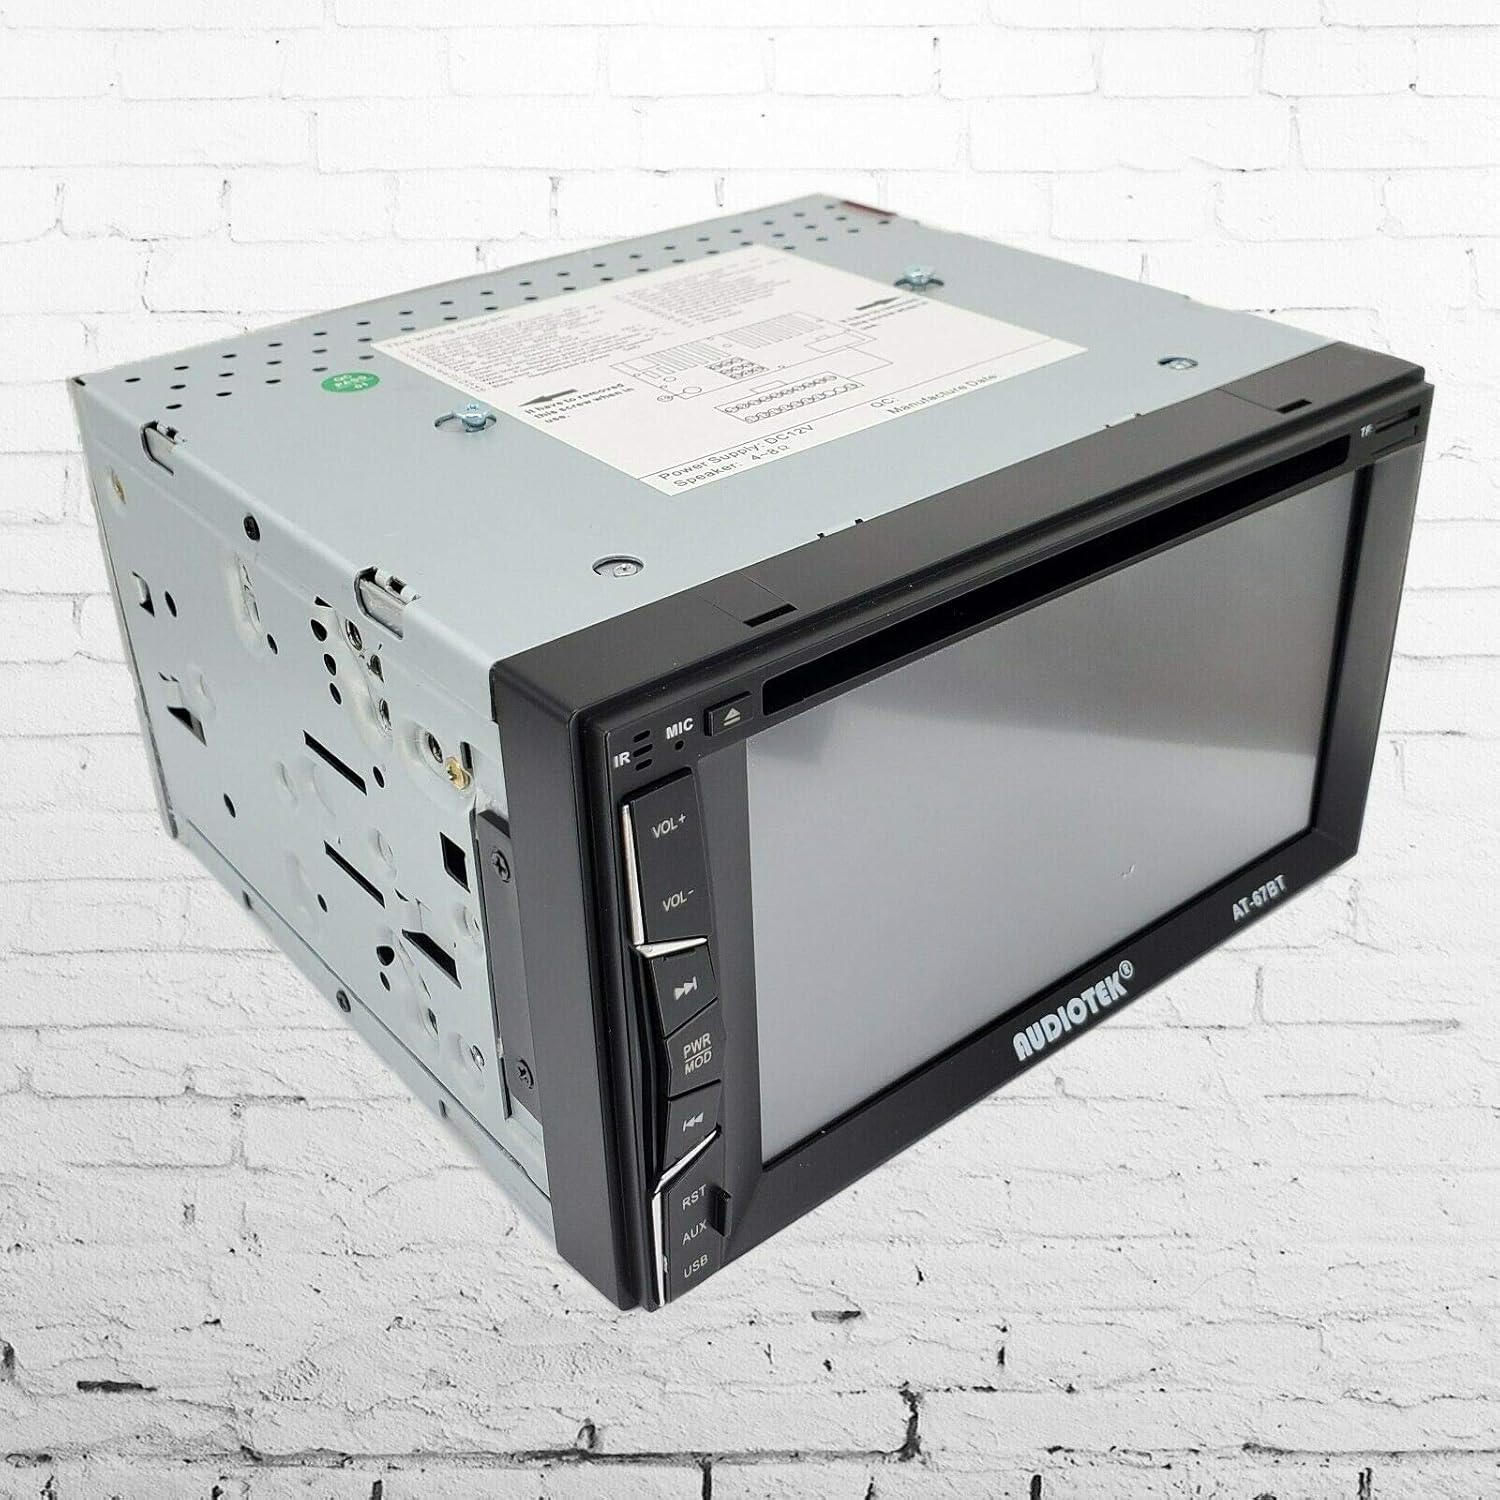
Figure 3.2: Side view of the AUDIOTEK AT-578T car stereo, showing the mounting points and the model number AT-578T on the side panel.
3.3 Connecting Peripherals
Connect your rear camera, external amplifiers, or other AV devices to the appropriate RCA ports on the rear of the unit.
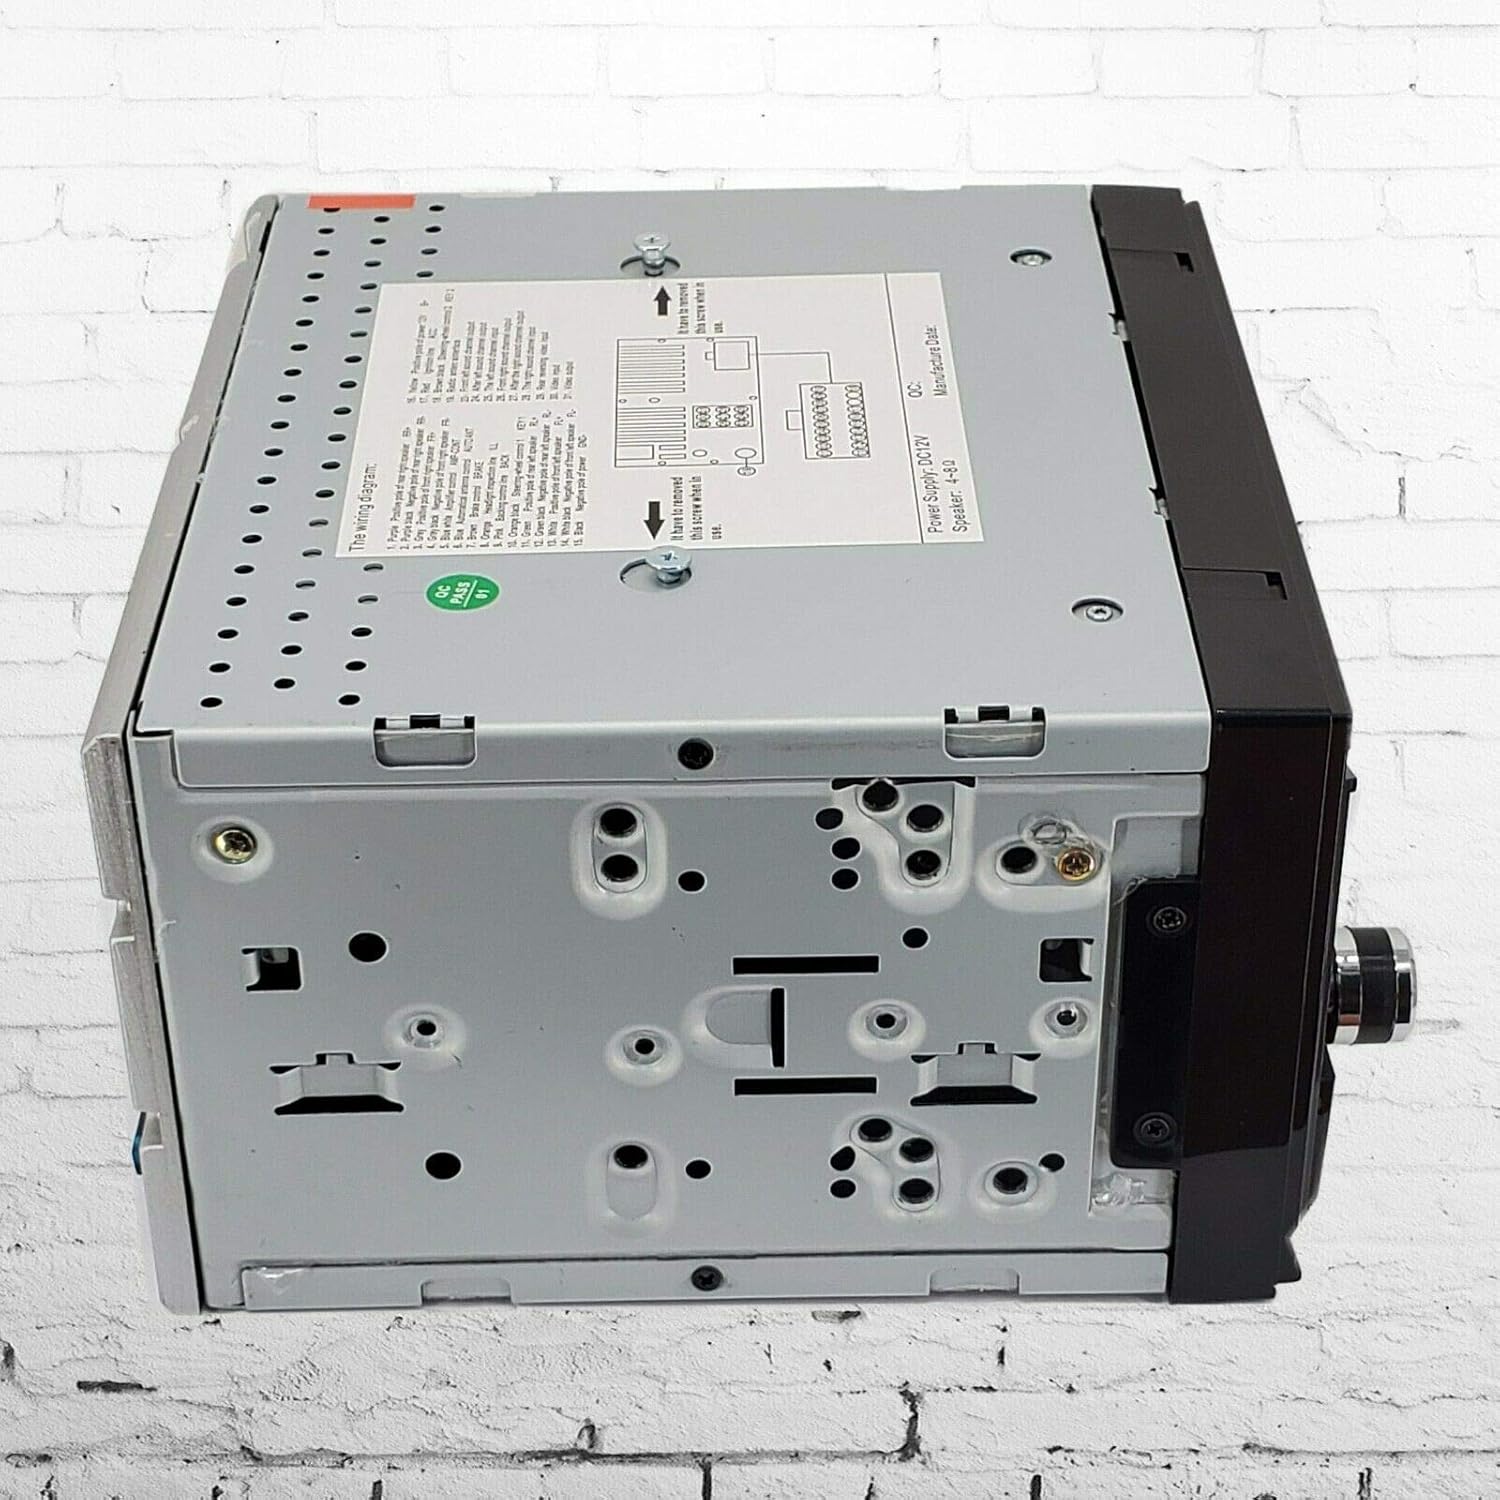
Figure 3.3: Rear view of the AUDIOTEK AT-578T car stereo, displaying various input/output ports including RCA connections for audio/video, antenna input, and the main wiring harness connector.
4. Operating Instructions
4.1 Basic Operations
- Power On/Off: Press the power button on the front panel or remote control.
- Volume Control: Use the VOL+ / VOL- buttons on the front panel or remote.
- Mode Selection: Press the MODE button to cycle through available sources (Radio, DVD, USB, SD, Bluetooth, AV-IN).
- Reset: If the unit malfunctions, press the RST button with a thin object (e.g., pen tip) to reset the system.
4.2 Radio (FM)
- Band Selection: Press the BAND button to switch between FM bands.
- Auto Scan: Press and hold the AS/PS button to automatically scan and store strong stations.
- Manual Tuning: Use the seek buttons (◀◀ / ►►) to manually tune frequencies.
- Preset Stations: Touch the numbered presets on the screen to recall stored stations.
4.3 Media Playback (DVD/MP5, USB, SD)
- DVD Playback: Insert a DVD disc into the slot. The unit will automatically switch to DVD mode and begin playback.
- USB/SD Playback: Insert a USB drive into the USB port or an SD card into the TF slot. The unit will detect the media and display file options. Navigate using the touchscreen.
- Supported Formats: The unit supports various audio and video formats, including MP5.
4.4 Bluetooth Connectivity
- Pairing: Go to the Bluetooth menu. Enable Bluetooth on your mobile device and search for "AUDIOTEK" or similar. Select the device and enter the PIN (usually "0000" or "1234") if prompted.
- Hands-free Calling: Once paired, you can make and receive calls directly through the stereo. Use the touchscreen or remote to answer/end calls.
- Audio Streaming: Play music from your paired device wirelessly through the car stereo.
4.5 Rear Camera Input
When the vehicle is shifted into reverse, the stereo will automatically display the feed from a connected rear camera, provided the reverse trigger wire is correctly connected.
4.6 Remote Control Operation
The included remote control allows for convenient operation of all major functions from a distance. Point the remote control towards the IR receiver on the stereo's front panel.
4.7 Steering Wheel Control
The unit supports steering wheel control functionality. Connect your vehicle's steering wheel control wires to the designated inputs on the stereo's wiring harness. Configuration may be required through the unit's settings menu.
5. Maintenance
- Cleaning the Screen: Use a soft, lint-free cloth to gently wipe the touchscreen. For stubborn marks, slightly dampen the cloth with water or a screen-safe cleaner. Avoid harsh chemicals.
- General Cleaning: Keep the unit free from dust and debris. Use a soft brush or compressed air to clean vents and button areas.
- Disc Care: Handle DVD discs by their edges. Clean discs with a soft, dry cloth, wiping from the center outwards.
- Avoid Extreme Temperatures: Do not expose the unit to extreme heat or cold, as this can affect performance and lifespan.
6. Troubleshooting
If you encounter issues with your AUDIOTEK AT-578T, refer to the following common problems and solutions:
| Problem | Possible Cause | Solution |
|---|---|---|
| No power | Incorrect wiring; Blown fuse; Loose connection | Check power and ground wires. Verify fuse. Ensure all connections are secure. |
| No sound | Speaker wires disconnected; Volume too low; Mute activated | Check speaker wiring. Increase volume. Deactivate mute function. |
| Bluetooth not connecting | Bluetooth not enabled; Incorrect pairing process | Ensure Bluetooth is enabled on both devices. Re-attempt pairing. Check PIN. |
| Disc/USB/SD not playing | Unsupported format; Damaged media; Incorrect insertion | Verify media format. Try a different disc/USB/SD. Ensure media is inserted correctly. |
| Rear camera not displaying | Camera not connected; Reverse trigger wire not connected | Check camera and video input connections. Verify reverse trigger wire connection. |
If the problem persists after trying these solutions, please contact AUDIOTEK customer support.
7. Specifications
Below are the technical specifications for the AUDIOTEK AT-578T car stereo:
- Model: AT-578T
- Screen Size: 6.2 Inches
- Display Type: LCD Touchscreen
- Connectivity Technology: Bluetooth, USB
- Media Type Support: SD, DVD, MP5, MP3
- Item Weight: 4.07 pounds
- Package Dimensions: 9.76 x 9.45 x 6.85 inches
- Manufacturer: Audiotek
8. Warranty and Support
For information regarding warranty coverage and customer support, please refer to the documentation included with your purchase or visit the official AUDIOTEK website. Keep your proof of purchase for warranty claims.

