1. Introduction
Thank you for choosing the HOMVILLA Digital Alarm Clock. This device features a large LED mirror display, temperature indication, dual alarms, voice activation, and adjustable settings for brightness and volume. This manual provides detailed instructions to help you set up and operate your new alarm clock effectively.
2. Package Contents
- HOMVILLA Digital Alarm Clock (Model 8808)
- USB Power Cable
- User Manual
3. Product Overview
Familiarize yourself with the various components and controls of your alarm clock.
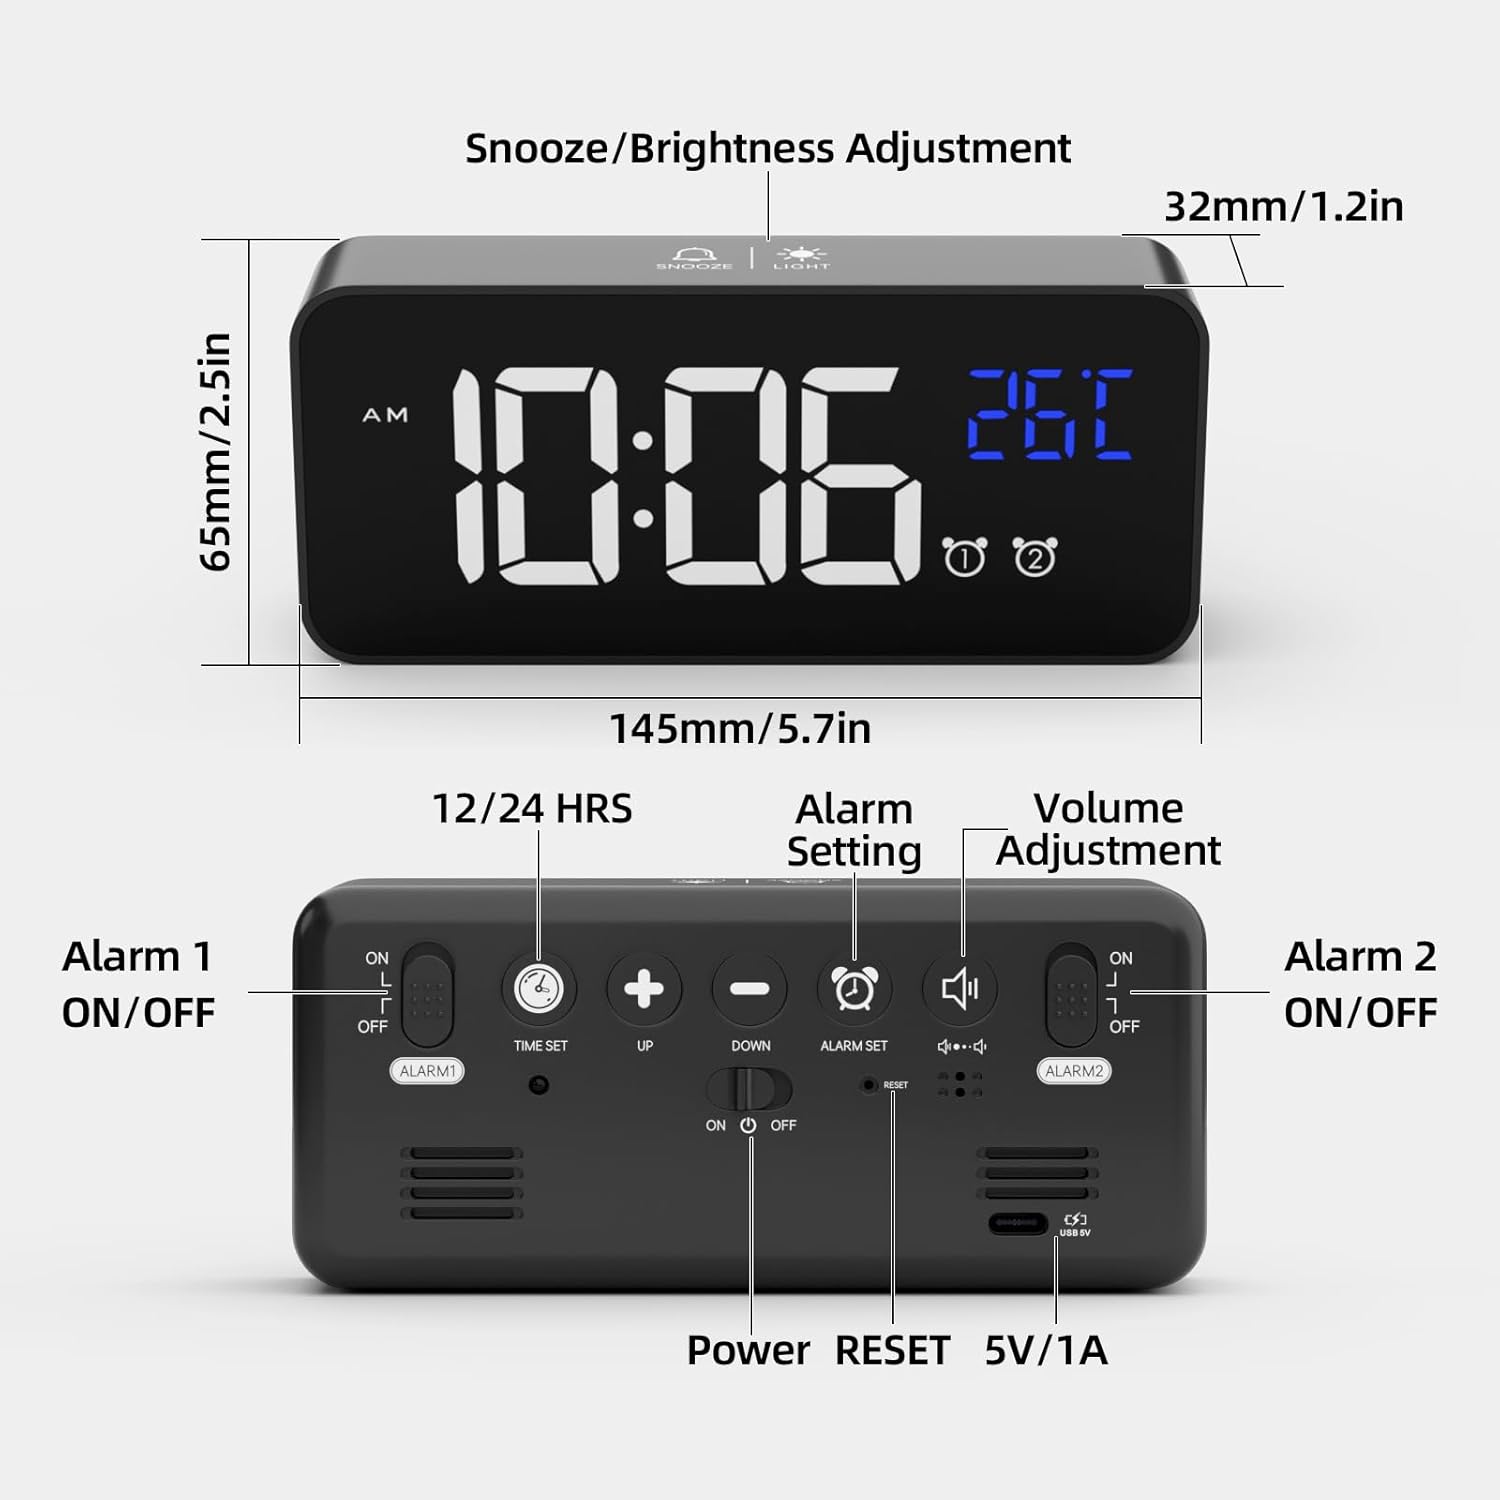
Image 3.1: Front and Rear View of the Alarm Clock. The front features the LED display for time and temperature, along with alarm indicators. The top has buttons for Snooze/Brightness Adjustment. The rear panel includes buttons for Time Set, Up, Down, Alarm Set, Volume Adjustment, Alarm 1 ON/OFF switch, Alarm 2 ON/OFF switch, Power button, Reset button, and a 5V/1A USB power input.
Front Display:
- Time Display: Large LED digits showing current time.
- Temperature Display: Shows ambient temperature in Celsius or Fahrenheit.
- AM/PM Indicator: For 12-hour format.
- Alarm Indicators: Icons for Alarm 1 and Alarm 2.
Top Buttons:
- SNOOZE/LIGHT Button: Activates snooze during an alarm; adjusts brightness.
Rear Buttons and Ports:
- TIME SET Button: Enters time setting mode.
- UP Button (+): Increases values; switches between 12/24-hour format.
- DOWN Button (-): Decreases values; adjusts volume.
- ALARM SET Button: Enters alarm setting mode.
- ALARM 1 ON/OFF Switch: Activates/deactivates Alarm 1.
- ALARM 2 ON/OFF Switch: Activates/deactivates Alarm 2.
- POWER Button: Turns the clock on/off.
- RESET Button: Resets the clock to factory settings.
- 5V/1A USB Port: For power input and charging the internal battery.
4. Setup
4.1 Initial Power On
- Connect the provided USB cable to the 5V/1A USB port on the back of the alarm clock.
- Plug the other end of the USB cable into a 5V/1A or 5V/2A USB adapter (not included) or a USB port.
- The LED display will light up. If using battery power, the display will turn off after 6 seconds unless voice activation is triggered. Ensure the clock is fully charged when relying on battery power.
4.2 Setting the Time
- Press and hold the TIME SET button on the back. The hour digits will start flashing.
- Use the UP (+) or DOWN (-) buttons to adjust the hour.
- Press TIME SET again to confirm the hour and move to minute setting. The minute digits will flash.
- Use the UP (+) or DOWN (-) buttons to adjust the minutes.
- Press TIME SET again to confirm the minutes.
- To switch between 12-hour and 24-hour format, press the UP (+) button once while the time is displayed (not in setting mode). The 'AM' or 'PM' indicator will appear for 12-hour format.
4.3 Temperature Display Calibration
After unpacking, allow the alarm clock to remain stationary for at least 30 minutes to ensure accurate temperature display.
5. Operating Instructions
5.1 Setting Alarms (Alarm 1 & Alarm 2)
The clock features two independent alarms.

Image 5.1: Example of setting two distinct alarms for different daily needs.
- Press and hold the ALARM SET button. The Alarm 1 hour digits will flash.
- Use the UP (+) or DOWN (-) buttons to adjust the Alarm 1 hour.
- Press ALARM SET again to confirm the hour and move to Alarm 1 minute setting. The minute digits will flash.
- Use the UP (+) or DOWN (-) buttons to adjust the Alarm 1 minutes.
- Press ALARM SET again to confirm Alarm 1 minutes.
- Repeat steps 2-5 for Alarm 2.
- After setting both alarms, use the ALARM 1 ON/OFF and ALARM 2 ON/OFF switches on the back to activate or deactivate each alarm. An alarm icon will appear on the display when an alarm is active.
5.2 Selecting Ringtones
The alarm clock offers 10 different ringtones.
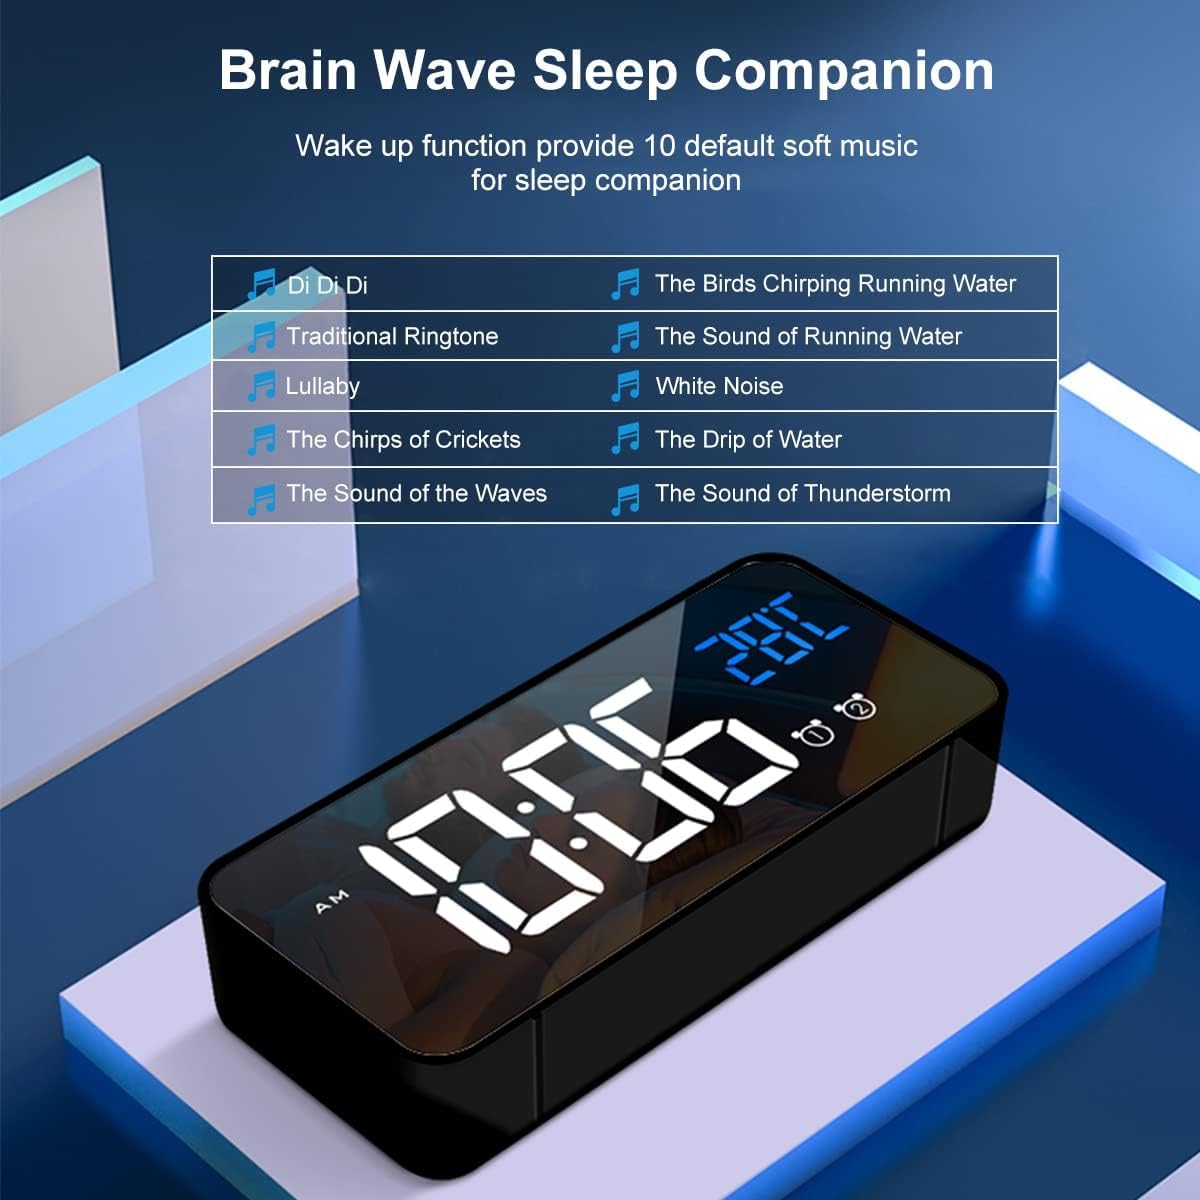
Image 5.2: List of 10 available ringtones, ranging from traditional to nature sounds.
- While in alarm setting mode (after setting minutes for an alarm), press ALARM SET again to cycle through ringtone options.
- Use the UP (+) or DOWN (-) buttons to select your desired ringtone.
- Press ALARM SET to confirm the ringtone.
5.3 Adjusting Alarm Volume
There are three adjustable volume levels for the alarm.

Image 5.3: Visual representation of the alarm volume adjustment.
- While in alarm setting mode (after selecting ringtone), press ALARM SET again to enter volume adjustment.
- Use the UP (+) or DOWN (-) buttons to select one of the three volume levels.
- Press ALARM SET to confirm the volume and exit alarm setting.
5.4 Snooze Function
When an alarm sounds, press the SNOOZE/LIGHT button on the top to activate the snooze function. The alarm will pause for 5 minutes and then sound again. The alarm icon will flash during snooze mode. To turn off the alarm completely, press any other button on the back of the clock.

Image 5.4: Activating the 5-minute snooze by pressing the top button.
5.5 Brightness Adjustment
The clock offers 4 levels of brightness. When powered by USB, the clock can automatically adjust brightness based on time of day. You can also manually adjust it.

Image 5.5: The four adjustable brightness levels of the LED display.
- Press the SNOOZE/LIGHT button on the top to cycle through the 4 brightness levels.
- If connected via USB, the clock may automatically adjust brightness. Manual adjustment will override automatic settings until the next automatic cycle.
5.6 Voice Control Function
When operating on battery power, the display will turn off after 6 seconds to conserve energy. You can activate the display by making a sound (e.g., clapping) or gently knocking on the surface where the clock rests, if the ambient noise reaches approximately 90 decibels. The display will light up for 6 seconds.

Image 5.6: Demonstrating how sound or vibration can activate the display in battery mode.
Note: When the clock is connected via USB for continuous power, the intelligent voice control function is automatically disabled, and the display remains continuously on.
5.7 Temperature Display
The clock displays the ambient temperature. To switch between Celsius (°C) and Fahrenheit (°F), press the UP (+) button once while the temperature is displayed (not in setting mode).

Image 5.7: Switching between Celsius and Fahrenheit temperature units.
5.8 Memory Function
The alarm clock has a built-in memory function. If the clock is sufficiently charged and the power key is turned off, it will retain its time and alarm settings. When powered on again, it will display the correct time without needing to be reset.

Image 5.8: The clock's memory function ensures settings are retained even when powered off, provided it has sufficient charge.
6. Maintenance
- Cleaning: Use a soft, dry cloth to clean the mirror display and casing. Avoid abrasive cleaners or solvents.
- Battery Care: For optimal battery life, avoid fully discharging the internal lithium battery frequently. Recharge the clock when the battery indicator is low.
- Storage: If storing the clock for an extended period, ensure it is fully charged and store it in a cool, dry place.
7. Troubleshooting
| Problem | Possible Cause | Solution |
|---|---|---|
| Display is off or dim (battery mode) | Battery is low or voice activation not triggered. | Connect to USB power to charge. Make a sound (e.g., clap) or gently knock to activate display. |
| Alarm does not sound | Alarm is not activated or volume is too low. | Check ALARM ON/OFF switch on the back. Adjust alarm volume (Section 5.3). |
| Incorrect time/date | Time not set correctly or power interruption. | Reset the time (Section 4.2). If issues persist, use the RESET button on the back. |
| Temperature reading seems inaccurate | Clock recently moved or placed near a heat/cold source. | Allow the clock to stabilize for 30 minutes in its location. Ensure it's not near extreme temperatures. |
8. Specifications
- Brand: HOMVILLA
- Model Number: 8808
- Color: Black
- Product Dimensions (L x W x H): 14.5 x 3.81 x 3 cm (5.7 x 1.5 x 1.2 inches)
- Item Weight: 158 grams (0.35 lbs)
- Material: Plastic
- Display Type: Digital LED
- Special Features: Alarm, Temperature Display, Voice Activation, Snooze, Adjustable Brightness, Adjustable Volume, Memory Function
- Power Source: Battery Powered (internal lithium battery) / USB Powered (5V/1A)
- Room Type: Bedroom
- Shape: Rectangular
- Indoor/Outdoor Usage: Indoor
9. Warranty and Support
For warranty information or technical support, please refer to the product packaging or contact HOMVILLA customer service through your purchase platform. Keep your proof of purchase for any warranty claims.