1. Important Safety Information
Always read and understand all safety warnings, instructions, illustrations, and specifications provided with this power tool. Failure to follow all instructions listed below may result in electric shock, fire, and/or serious injury.
- Personal Protective Equipment (PPE): Always wear appropriate PPE, including safety glasses, hearing protection, gloves, sturdy footwear, and leg protection (chainsaw chaps).
- Work Area Safety: Keep the work area clean and well-lit. Do not operate chainsaws in explosive atmospheres, such as in the presence of flammable liquids, gases, or dust. Keep children and bystanders away while operating a chainsaw.
- Electrical Safety: Avoid body contact with earthed or grounded surfaces. Do not expose power tools to rain or wet conditions.
- Chainsaw Specific Safety:
- Hold the chainsaw firmly with both hands.
- Be aware of kickback. Kickback may occur when the nose or tip of the guide bar touches an object, or when the wood closes in and pinches the saw chain in the cut.
- Never operate the chainsaw with one hand.
- Ensure the chain brake is functional before each use.
- Do not overreach. Maintain proper footing and balance at all times.
- Remove the battery pack before making any adjustments, changing accessories, or storing the chainsaw.
WARNING: Misuse of this chainsaw can cause serious injury or death. Always follow safety guidelines.
2. Product Overview
The Erbauer ECSG18-LI is a cordless electric chainsaw designed for cutting wood. Familiarize yourself with its components before operation.
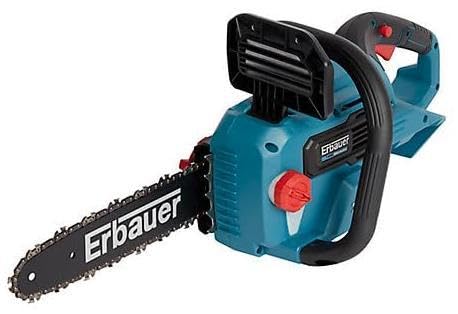
Figure 1: Erbauer ECSG18-LI Cordless Electric Chainsaw. This image shows the main unit of the chainsaw, including the guide bar, saw chain, front handle, rear handle, chain brake, and battery compartment.
Key Components:
- Guide Bar: Supports and guides the saw chain.
- Saw Chain: The cutting element of the chainsaw.
- Front Handle: For stable two-hand operation.
- Rear Handle: Contains the trigger switch and safety lock-off button.
- Chain Brake/Hand Guard: Protects the operator's hand and stops the chain in case of kickback.
- Oil Tank Cap: For chainsaw chain lubricant.
- Battery Pack: Provides power to the motor. (Sold separately or included depending on kit)
- Battery Charger: For recharging the battery pack. (Sold separately or included depending on kit)
3. Setup and Assembly
3.1. Guide Bar and Chain Installation
- Ensure the battery pack is removed from the chainsaw.
- Loosen the chain cover nuts and remove the chain cover.
- Place the saw chain around the sprocket and guide bar, ensuring the cutting edges face the correct direction (refer to chain direction indicator on the chainsaw body).
- Fit the guide bar onto the mounting bolts, ensuring the chain tensioning pin engages with the hole in the guide bar.
- Replace the chain cover and hand-tighten the nuts. Do not fully tighten yet.
- Adjust chain tension using the tensioning screw. The chain should be snug against the guide bar but still able to be pulled freely by hand. There should be no more than 2-3mm of slack at the center of the bar.
- Once tension is correct, fully tighten the chain cover nuts.
3.2. Battery Charging and Installation
- Charging: Connect the charger to a power outlet. Insert the battery pack into the charger. The indicator light will show charging status (e.g., red for charging, green for fully charged). Allow the battery to fully charge before first use.
- Installation: Align the battery pack with the battery port on the chainsaw and slide it in until it clicks securely into place.
- Removal: Press the battery release button and slide the battery pack out.
3.3. Filling Chain Oil
The chainsaw requires chain lubricant to operate safely and efficiently. Use only recommended chain oil.
- Ensure the chainsaw is on a level surface and the battery is removed.
- Unscrew the oil tank cap.
- Carefully pour chain oil into the reservoir, avoiding overfilling.
- Replace and securely tighten the oil tank cap.
- Check oil level regularly during operation.
4. Operating Instructions
4.1. Pre-Operation Checklist
- Ensure all safety equipment (PPE) is worn.
- Check chain tension and sharpness.
- Verify chain oil reservoir is full.
- Inspect the chainsaw for any loose parts or damage.
- Ensure the chain brake is disengaged (pulled back towards the front handle).
4.2. Starting the Chainsaw
- Hold the chainsaw firmly with both hands, one on the front handle and one on the rear handle.
- Press the safety lock-off button (usually on the side of the rear handle).
- Squeeze the trigger switch to start the motor. The chain will begin to move.
- Release the trigger to stop the chainsaw.
4.3. Cutting Techniques
- Stance: Stand with your feet shoulder-width apart, maintaining good balance.
- Cutting: Let the chainsaw do the work. Do not force it. Apply light pressure.
- Avoiding Kickback: Never cut with the tip of the guide bar. Always use the bottom or top edge of the bar. Be especially careful when cutting small branches or limbs under tension.
- Felling Small Trees: For felling, make a directional notch on the side of the desired fall, then make a felling cut from the opposite side, slightly above the notch. Always ensure a clear escape path.
- Limbing: Work from the bottom up, supporting the branch if necessary to prevent pinching.
CAUTION: Always be aware of your surroundings, potential falling objects, and the direction of the cut material.
5. Maintenance
Regular maintenance ensures the longevity and safe operation of your chainsaw. Always remove the battery pack before performing any maintenance.
5.1. Cleaning
- After each use, clean sawdust, chips, and debris from the chain, guide bar, and motor housing.
- Use a brush or compressed air. Do not use water directly on electrical components.
- Clean the oil port to ensure proper lubrication.
5.2. Chain Maintenance
- Sharpening: A dull chain requires more force and increases the risk of kickback. Sharpen the chain regularly using a round file of the correct diameter (refer to chain specifications, typically 4.0mm or 4.5mm). Maintain the correct filing angle.
- Tensioning: Check chain tension frequently. A loose chain can derail, and a too-tight chain can cause premature wear and overheating.
- Lubrication: Ensure the automatic oiler is functioning. The chain should always have a thin film of oil.
5.3. Guide Bar Maintenance
- Clean the guide bar groove to remove sawdust and debris.
- Flip the guide bar periodically to ensure even wear.
- Check for burrs on the guide bar rails and file them smooth if present.
5.4. Storage
- Remove the battery pack before storing.
- Clean the chainsaw thoroughly.
- Apply a light coat of oil to the chain and guide bar to prevent rust.
- Store the chainsaw in a dry, secure place, out of reach of children.
6. Troubleshooting
| Problem | Possible Cause | Solution |
|---|---|---|
| Chainsaw does not start. | Battery not charged or not inserted correctly. Chain brake engaged. Safety lock-off not pressed. | Charge battery and ensure it's fully inserted. Disengage chain brake. Press safety lock-off before trigger. |
| Chain does not move or moves slowly. | Chain tension too tight. Chain dull or damaged. Low battery charge. | Adjust chain tension. Sharpen or replace chain. Recharge battery. |
| Chainsaw cuts poorly or unevenly. | Dull chain. Incorrect chain tension. Guide bar worn. | Sharpen chain. Adjust chain tension. Inspect and replace guide bar if necessary. |
| Excessive vibration. | Loose chain. Damaged chain or guide bar. Loose components. | Adjust chain tension. Inspect and replace damaged parts. Check all fasteners. |
| No chain oil flow. | Oil reservoir empty. Oil port clogged. | Refill oil reservoir. Clean oil port and guide bar groove. |
If the problem persists after attempting these solutions, contact customer support or a qualified service technician.
7. Specifications
- Model: Erbauer ECSG18-LI
- Power Source: Cordless, Battery-powered
- Battery Voltage: 18V (Typical, actual voltage may vary by battery pack)
- Guide Bar Length: Approximately 25-30 cm (10-12 inches) (Typical, specific length not provided)
- Chain Speed: Approximately 5-8 m/s (Typical, specific speed not provided)
- Oil Tank Capacity: Approximately 150-200 ml (Typical, specific capacity not provided)
- Manufacturer: Erbauer
- ASIN: B07YTF4JFB
- Date of First Availability: August 31, 2020
Note: Specific technical specifications such as bar length and chain speed are not provided in the product data and are estimated based on typical cordless chainsaws of this model type. Refer to your product packaging or official Erbauer documentation for precise figures.
8. Warranty and Support
Erbauer products are manufactured to high-quality standards. In the unlikely event of a defect due to faulty materials or workmanship, please refer to the warranty terms provided with your purchase. Keep your proof of purchase for warranty claims.
For technical assistance, spare parts, or service inquiries, please contact Erbauer customer support. Contact details can typically be found on the product packaging or the official Erbauer website.
Online Resources: For additional information, safety videos, or FAQs, visit the official Erbauer Brand Store or their official website.


