
SuperATV RB-CA-DEF-002-00
Contents
SuperATV Sheet Metal Rear Bumper Instruction Manual
Model: RB-CA-DEF-002-00
Introduction
This manual provides detailed instructions for the installation, operation, and maintenance of your SuperATV Sheet Metal Rear Bumper for Can-Am Defender HD 5/8/10/MAX models. This robust bumper is designed to enhance the protection of your vehicle's rear end and offers versatile utility features, including a built-in winch mount and D-ring shackles. Please read this manual thoroughly before beginning installation to ensure proper fitment and safe operation.
Safety Information
Always prioritize safety during installation and operation. Failure to follow these guidelines may result in injury or damage to your vehicle.
- Wear appropriate personal protective equipment (PPE), including safety glasses and gloves, during installation.
- Ensure the vehicle is parked on a level surface, the engine is off, and the parking brake is engaged before beginning any work.
- If lifting the vehicle, use appropriate lifting equipment and secure it with jack stands.
- Do not modify the bumper or its components. Unauthorized modifications can compromise structural integrity and void the warranty.
- Keep all fasteners tightened to the specified torque values. Regularly inspect for loose hardware.
- If you are unsure about any step of the installation process, consult a qualified mechanic or contact SuperATV customer support.
Package Contents
Verify that all components listed below are present in your package before beginning installation. If any parts are missing or damaged, please contact SuperATV customer support immediately.
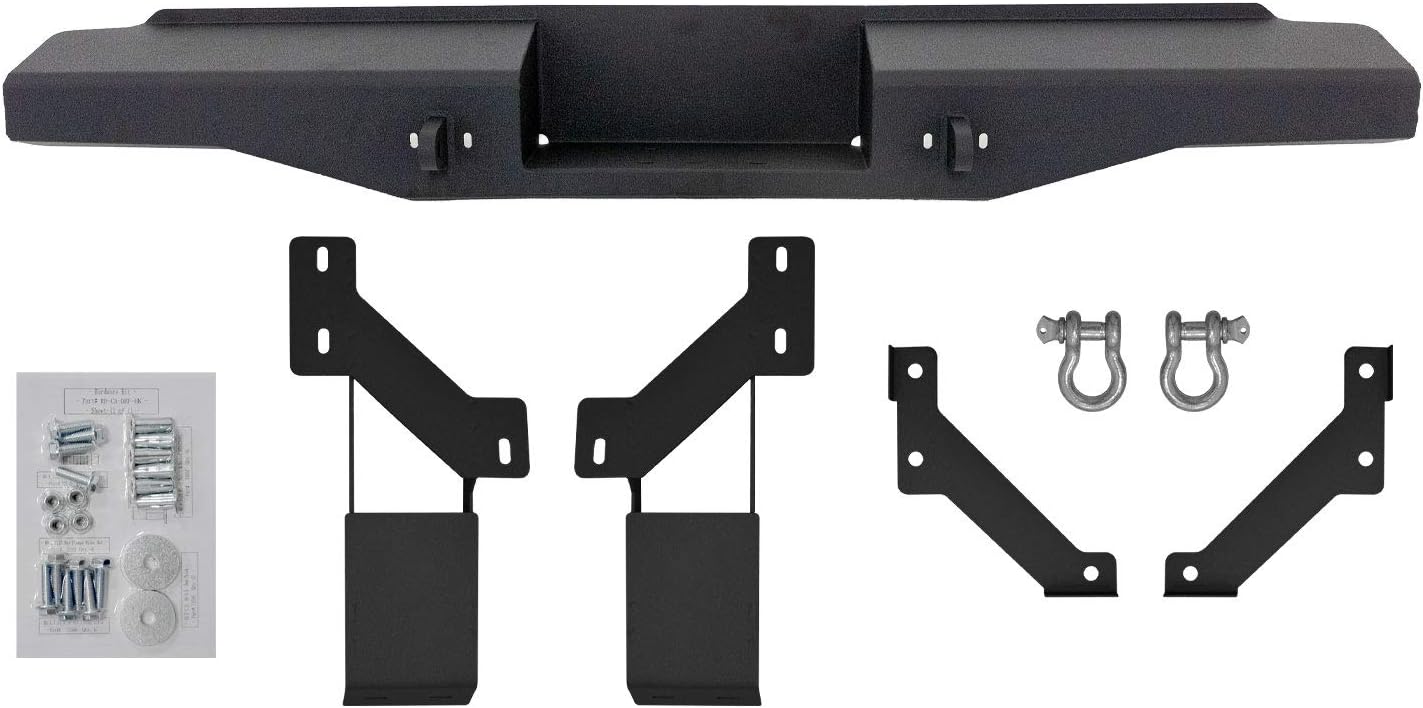
Image: The SuperATV Sheet Metal Rear Bumper, mounting brackets, D-ring shackles, and a hardware packet.
- SuperATV Sheet Metal Rear Bumper (1)
- Mounting Brackets (Specific to vehicle model)
- D-Ring Shackles (2)
- Hardware Kit (Bolts, nuts, washers, rivet nuts if applicable)
Installation Instructions
This section outlines the steps for installing your SuperATV Sheet Metal Rear Bumper. While general steps are provided, specific vehicle models may have minor variations. Refer to the fitment list below for compatibility.
Vehicle Fitment:
- Can-Am Defender HD 5 : 2017-2021
- Can-Am Defender HD 5 DPS : 2017-2021
- Can-Am Defender HD 8 : 2016-2021
- Can-Am Defender HD 8 DPS : 2016-2021
- Can-Am Defender HD 8 XT : 2016-2021
- Can-Am Defender HD 10 : 2016+
- Can-Am Defender HD 10 DPS : 2016+
- Can-Am Defender HD 10 XT : 2016+
- Can-Am Defender HD 10 XT Cab : 2016+
- Can-Am Defender HD 10 XTP : 2018+
- Can-Am Defender HD 10 Mossy Oak : 2018+
- Can-Am Defender HD 10 XMR : 2018+
- Can-Am Defender Limited HD 10 : 2020+
- Can-Am Defender MAX HD 8 : 2017-2021
- Can-Am Defender MAX HD 8 DPS : 2017-2021
- Can-Am Defender MAX HD 8 XT : 2017-2021
- Can-Am Defender MAX HD 10 DPS : 2017+
- Can-Am Defender MAX HD 10 XT : 2017+
- Can-Am Defender MAX HD 10 XT Cab : 2017+
- Can-Am Defender MAX HD 10 XMR : 2019+
- Can-Am Defender MAX HD 10 Lone Star Edition : 2018+
- Can-Am Defender MAX HD 10 Limited : 2020+
Tools Required (Not Included):
- Socket Wrench Set
- Open-End Wrench Set
- Drill (if modifications to existing holes are needed, as reported by some users)
- Torque Wrench
- Measuring Tape
Installation Steps:
- Prepare the Vehicle: Park your Can-Am Defender on a flat, stable surface. Turn off the engine, engage the parking brake, and remove the key. Allow the exhaust system to cool if recently operated.
- Remove Existing Components (if applicable): If your vehicle has an existing rear bumper or any components that obstruct the installation area, carefully remove them according to your vehicle's service manual.
- Attach Mounting Brackets: Secure the provided mounting brackets to the vehicle's frame using the supplied hardware. Ensure all bolts are finger-tight at this stage to allow for adjustment.
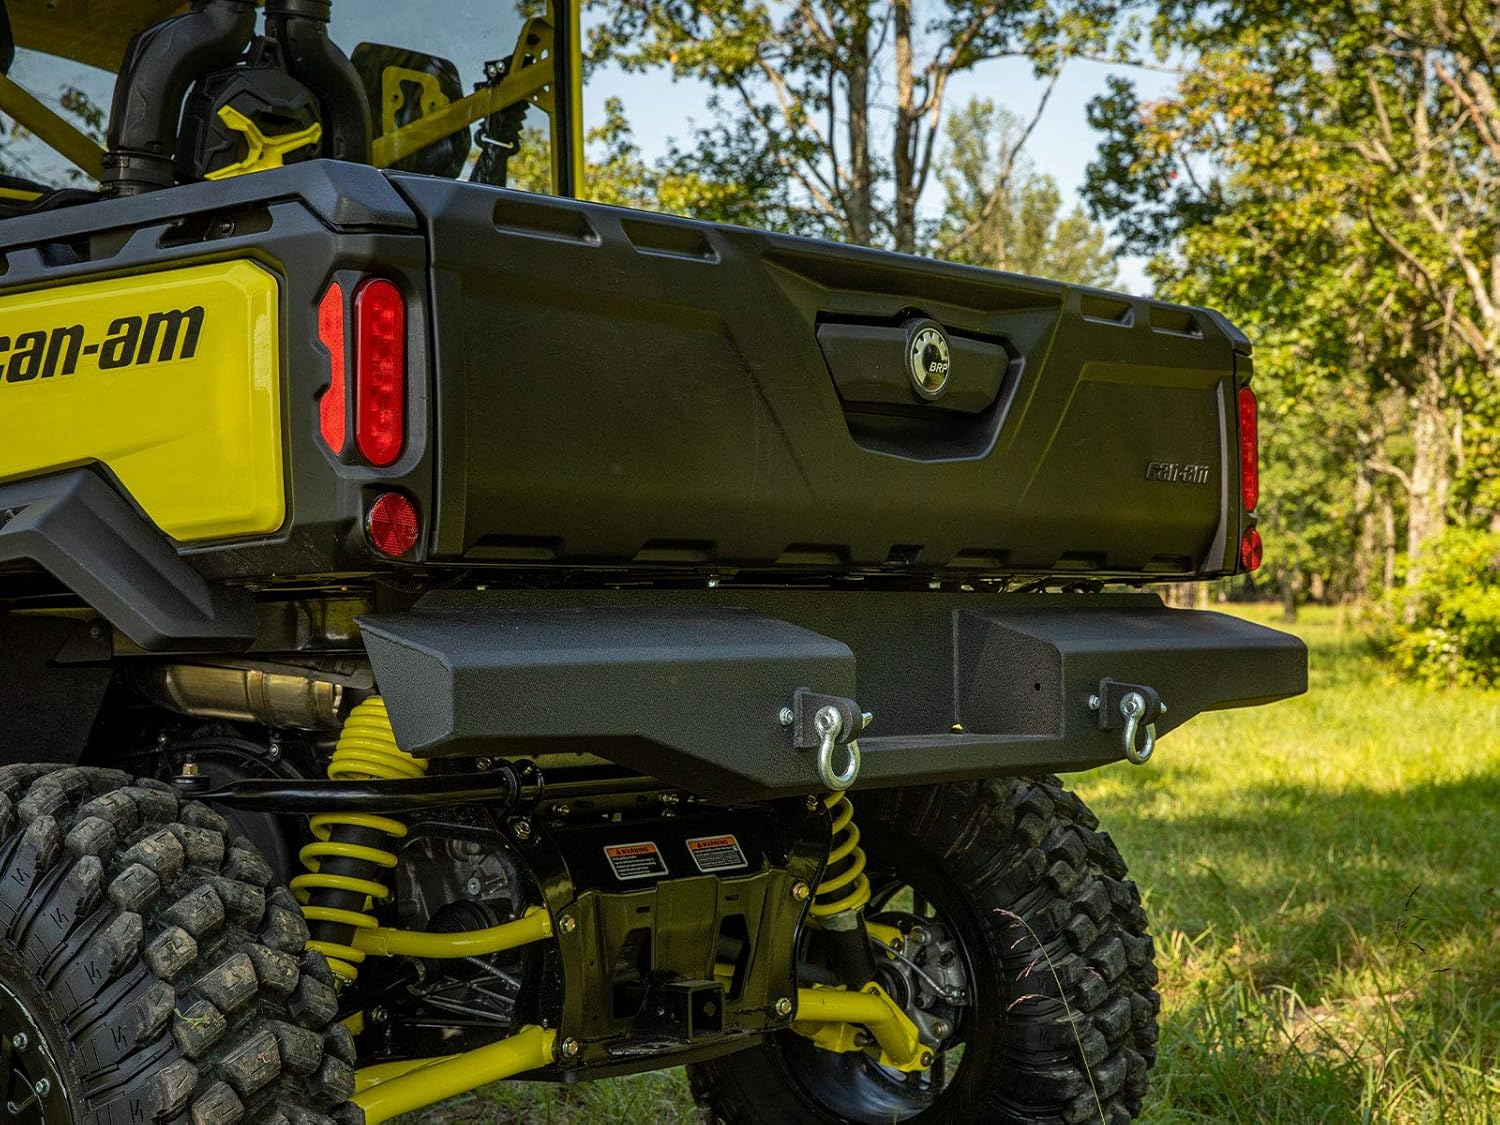
Image: Side view of the SuperATV rear bumper partially installed, showing the mounting points and how it integrates with the vehicle's frame.
- Position the Bumper: With assistance, carefully lift the SuperATV Sheet Metal Rear Bumper and align its mounting points with the attached brackets.

Image: The SuperATV Sheet Metal Rear Bumper fully installed on a Can-Am Defender, viewed from the rear.
- Secure the Bumper: Insert the remaining hardware to connect the bumper to the mounting brackets. Hand-tighten all bolts.
- Align and Torque: Adjust the bumper's position to ensure it is centered and level. Once satisfied with the alignment, progressively tighten all bolts to the manufacturer's specified torque values. Refer to your vehicle's service manual for general torque specifications for similar fasteners, or consult SuperATV's official installation guides if available online.
Note on Hardware: Some users have reported needing to drill existing holes to a larger size (e.g., 1/2 inch) or experiencing issues with rivet nuts. Ensure proper tools are used for drilling if necessary, and verify the integrity of all mounting points. If hardware issues arise, contact SuperATV support for assistance.
- Install D-Ring Shackles: Attach the two heavy-duty D-ring shackles to the designated mounting points on the bumper. Ensure they are securely fastened.

Image: Rear view of the installed bumper, highlighting the D-ring shackles on either side.
- Winch Installation (Optional): The bumper comes pre-fit for SuperATV's 3500 lb. Black Ops Winch and is compatible with many leading winch models (3.0" x 4.87" bolt pattern). Follow your winch manufacturer's instructions for installation into the bumper's integrated winch mount.
- Light Bar Installation (Optional): The bumper features precut holes for a 12" LED light bar. If installing a light bar, follow the light bar manufacturer's instructions for mounting and wiring.
- Final Inspection: Double-check all bolts and connections to ensure they are tight and secure. Verify that the bumper does not interfere with any vehicle functions or components.
Operating the Bumper Features
Your SuperATV Sheet Metal Rear Bumper is designed for both protection and utility.
- D-Ring Shackles: The two heavy-duty D-ring shackles are intended for recovery operations. Always use appropriate recovery straps and follow safe recovery procedures. Ensure the shackles are fully tightened before use.
- Winch Mount: The integrated winch mount provides a secure location for a compatible winch. When using a winch, always follow the winch manufacturer's safety guidelines and operating procedures. Ensure the winch is properly spooled and maintained.
- Light Bar Mount: The precut holes allow for the installation of a 12" LED light bar, enhancing visibility during night riding or in low-light conditions. Ensure any installed light bar is properly wired and aimed.
Maintenance
Regular maintenance will ensure the longevity and performance of your SuperATV Sheet Metal Rear Bumper.
- Regular Inspection: Periodically inspect the bumper and all mounting hardware for signs of wear, damage, or looseness. Tighten any loose bolts immediately.
- Cleaning: Clean the bumper regularly with mild soap and water to remove dirt, mud, and debris. Avoid abrasive cleaners or harsh chemicals that could damage the finish.
- Corrosion Prevention: The bumper is made of thick steel plating. While durable, inspect for any chips or scratches in the powder coat finish that could lead to rust. Touch up any damaged areas with appropriate paint to prevent corrosion.
- D-Ring Shackles: Ensure D-ring shackles are free of rust and operate smoothly. Lubricate threads if necessary.
Troubleshooting
This section addresses common issues that may arise during or after installation.
| Issue | Possible Cause | Solution |
|---|---|---|
| Missing Instructions | Packaging damage during shipping or not included in box. | Instructions can be found on the official SuperATV website. This manual also provides comprehensive steps. |
| Hardware issues (missing, incorrect size, difficult to install rivet nuts) | Manufacturing variation, shipping damage, or specific vehicle model requirements. | Verify all hardware against the package contents list. If missing, contact SuperATV customer support for replacements. If holes require modification (e.g., drilling to 1/2 inch), use appropriate tools and proceed carefully. For rivet nut issues, ensure proper installation technique or consult a professional. |
| Bumper paint chipped upon arrival | Shipping damage. | Contact SuperATV customer support to report damage. For minor chips, touch up with rust-inhibiting paint to prevent corrosion. |
| Bumper does not align correctly | Mounting brackets not fully tightened, vehicle frame variations. | Ensure all mounting bolts are loose enough to allow for adjustment. Carefully shift the bumper until aligned, then progressively tighten all hardware. |
Specifications
| Feature | Detail |
|---|---|
| Brand | SuperATV |
| Model Number | RB-CA-DEF-002-00 |
| Auto Part Position | Rear |
| Material | Thick Steel Plating (3mm / 1/8") |
| Exterior Finish | Alloy Steel, Black Powder Coat |
| Color | Black |
| Item Weight | Approximately 52 Pounds |
| Product Dimensions | 12"D x 61"W x 10"H (Approximate) |
| Winch Compatibility | Pre-fit for SuperATV 3500 lb. Black Ops Winch; compatible with winches using 3.0" x 4.87" bolt pattern. |
| Light Bar Compatibility | Precut holes for 12" LED light bar. |
| Additional Features | Two heavy-duty D-ring shackles included. |
Warranty and Support
For specific warranty information regarding your SuperATV Sheet Metal Rear Bumper, please refer to the warranty documentation included with your purchase or visit the official SuperATV website. SuperATV offers customer support for product inquiries, technical assistance, and warranty claims.
Contact SuperATV Support:
- Website: www.superatv.com (Check for online installation guides and FAQs)
- Phone: Refer to the SuperATV website for current contact numbers.
When contacting support, please have your product model number (RB-CA-DEF-002-00) and purchase information readily available.
Documents and downloads
Ask a question about this manual
Ask about setup, troubleshooting, compatibility, parts, safety, or missing instructions. Manuals+ will review the question and use this page’s manual context to help answer it.