1. Introduction
This manual provides essential information for the safe and efficient operation, installation, and maintenance of your Awoco RH-S10-36 Supreme Under Cabinet Range Hood. Please read all instructions carefully before installation and use. Retain this manual for future reference.

Figure 1: Awoco RH-S10-36 Under Cabinet Range Hood with Remote Control. This image displays the stainless steel range hood mounted under a cabinet, with its control panel visible and a remote control shown below.
2. Important Safety Information
To reduce the risk of fire, electric shock, or injury, observe the following:
- Installation must be performed by a qualified technician in accordance with all applicable codes and standards.
- Always disconnect power to the range hood before servicing or cleaning.
- Maintain a minimum distance of 24 inches and a maximum of 30 inches between the cooking surface and the bottom of the range hood. The recommended installation height is 27 inches.
- Ensure proper ventilation. This range hood is designed for ducted exhaust to the outside.
- Clean grease filters and oil collector regularly to prevent grease fires.
- Do not operate any fan with a damaged cord or plug. Discard fan or return to an authorized service facility for examination and/or repair.
3. Product Features
- High-Quality Construction: Made from 1mm thick stainless steel with a brushed finish, ensuring durability and a sleek appearance.
- Powerful Ventilation: Features 2 centrifugal squirrel cage blowers with 4-speed settings, offering up to 1000 CFM airflow to effectively remove smoke and odors.
- Efficient Filtration: Equipped with 3 dishwasher-safe stainless steel baffle filters and an internal oil collector for easy maintenance and effective grease capture.
- User-Friendly Controls: Includes a touch sensor panel and a remote control for convenient operation of fan speeds and lighting.
- Integrated Lighting: Two 3W twist-lock removable energy-saving cold bright LED lights illuminate the cooking surface. The light button operates independently.
- Automatic Shut-Off: Features a 1-15 minute timer delayed auto shut-off function and an automatic 3-hour shut-off for safety and convenience.
- Ducted Exhaust: Designed for ducted ventilation with an 8-inch round top vent and an included air damper.

Figure 2: Key features of the Awoco RH-S10-36 Range Hood, including the internal oil collector, 3W LED lights, 4-speed remote control, and easy-to-remove stainless steel baffle filters.
4. Package Contents
Verify that all items are included in your package:
- Awoco RH-S10-36 Range Hood Unit
- Remote Control
- LED Lights (pre-installed)
- Baffle Filters (pre-installed)
- Power Cord with 110V Plug
- Air Damper (pre-installed on top vent)
- Installation Hardware (screws, anchors)
5. Specifications
| Specification | Detail |
|---|---|
| Model Number | RH-S10-36 |
| Dimensions (W x D x H) | 35.5" x 22" x 10" |
| Weight | 62.9 lbs |
| Material | Stainless Steel (1mm thick) |
| Air Flow Capacity | 1000 CFM |
| Number of Speeds | 4 |
| Noise Level (Low/High) | 46 dB (4.0 sones) / 64 dB (12.0 sones) |
| Lights | 2 x 3W LED (Cold Bright) |
| Controls | Touch Sensor Panel, Remote Control |
| Voltage / Frequency | 120V / 60Hz |
| Power Rating | 200W Min. / 246W Max. |
| Ventilation Type | Ducted (8" Round Top Vent) |
| Certifications | ETL Certified |
6. Installation Guide
Proper installation is crucial for the performance and safety of your range hood. It is recommended that installation be performed by a qualified professional.
6.1 Pre-Installation Steps
- Measure and Plan: Determine the optimal mounting location. The recommended installation height is 27 inches above the cooking surface, with a minimum of 24 inches and a maximum of 30 inches. Ensure sufficient clearance and access for ductwork.
- Prepare Cabinet and Wall: Mark the locations for mounting screws, power cord access, and the 8-inch round top vent opening. Cut the necessary holes in the cabinet and wall as per the provided template or measurements.
- Ductwork Preparation: Install the 8-inch round ducting from the range hood's top vent to the outside of your home. Ensure all connections are sealed to prevent air leaks.
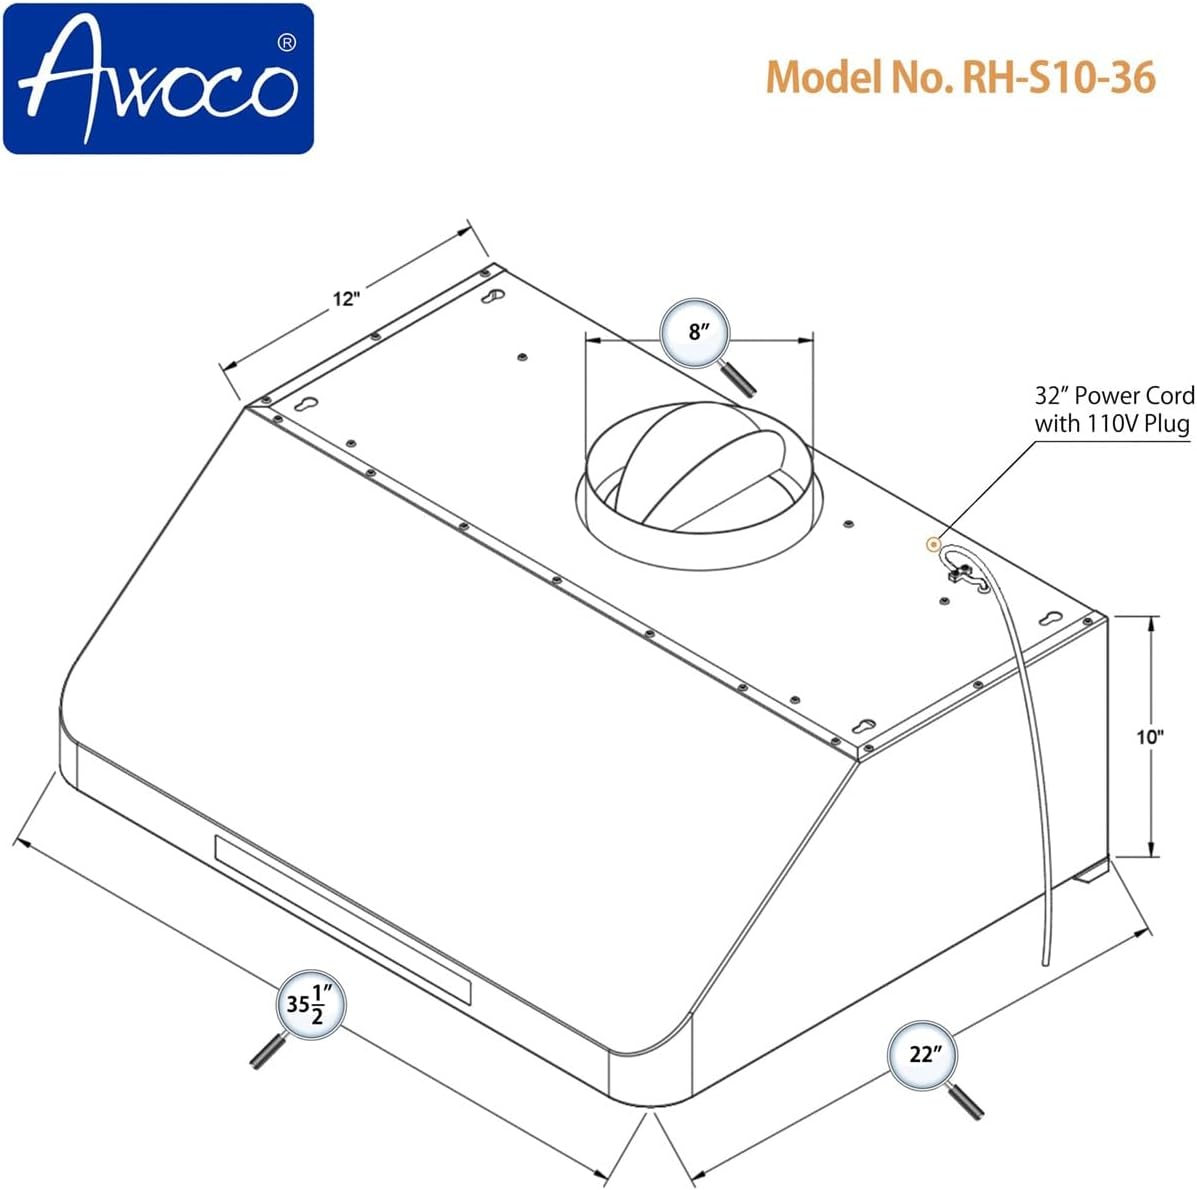
Figure 3: Detailed dimensions of the Awoco RH-S10-36 Range Hood, showing width (35.5"), depth (22"), and height (10"), along with the 8-inch round top vent and power cord location.

Figure 4: A guide illustrating different range hood types and recommended installation heights (24-30 inches, 27 inches recommended) above the stove top.
6.2 Mounting the Range Hood
- Secure the Unit: With assistance, lift the range hood into position under the cabinet. Align the mounting holes on the hood with the pre-drilled holes in the cabinet. Secure the hood using the provided screws.
- Connect Ductwork: Attach the flexible ducting to the 8-inch round top vent of the range hood. Ensure a tight and secure connection to prevent air leakage.
- Electrical Connection: Plug the range hood's power cord into a grounded 110V outlet. Ensure the electrical connection complies with local codes.

Figure 5: Top view of the range hood, illustrating the 8-inch round top vent with an integrated air damper and the 32-inch power cord with a 110V plug.
6.3 Installation Video (General Reference)
Video 1: This video demonstrates general installation steps for an under cabinet range hood (RC11 model). While not specific to RH-S10-36, it provides a visual guide to the process.
7. Operating Instructions
Your Awoco RH-S10-36 range hood can be operated using the touch sensor panel or the included remote control.
7.1 Control Panel Overview

Figure 6: Close-up of the touch sensor panel on the Awoco RH-S10-36, showing controls for fan speeds, lights, and the 1-15 minute auto shut-off timer.
7.2 Fan Operation
- Power On/Off: Press the power button on the touch panel or remote to turn the fan on or off.
- Adjust Speed: Use the speed control buttons (usually indicated by +/- or fan icons) on the touch panel or remote to cycle through the 4 fan speeds (385/590/815/1000 CFM).
- Timer Function: Press the timer button to activate the auto shut-off feature. You can set it for 1 to 15 minutes. The range hood will also automatically shut off after 3 hours of continuous operation.
7.3 Lighting Operation
- Turn Lights On/Off: Press the light button on the touch panel or remote. The LED lights operate independently of the fan.
- LED Indicator: An LED light indicator will illuminate on the LCD display when the lamps are turned on.
7.4 Product Overview Video
Video 2: This video provides an overview of the Awoco RH-S10-S Series range hood, demonstrating its features and operation, including the touch controls and baffle filters.
8. Maintenance and Cleaning
Regular cleaning and maintenance will ensure optimal performance and longevity of your range hood.
8.1 Cleaning Baffle Filters
The stainless steel baffle filters are designed to be easily removable and dishwasher safe.
- Remove Filters: Locate the latches on each baffle filter. Push the latch and pull down the filter to remove it.
- Clean Filters: Place the filters in a dishwasher for thorough cleaning, or wash them by hand with hot, soapy water.
- Reinstall Filters: Ensure filters are completely dry before re-inserting them into the range hood.
8.2 Cleaning Internal Oil Collector
The internal oil collector should be cleaned regularly to prevent grease buildup.
- Remove Collector: Gently slide out the internal oil collector located behind the baffle filters.
- Clean Collector: Wash the oil collector with hot, soapy water.
- Reinstall Collector: Ensure the collector is dry before sliding it back into its position.
8.3 Exterior Cleaning
Wipe the exterior stainless steel surfaces with a clean cloth and a non-abrasive stainless steel cleaner. Avoid using harsh chemicals or abrasive pads that could scratch the finish.
9. Troubleshooting
Before contacting customer support, refer to the following common issues and solutions:
| Problem | Possible Cause | Solution |
|---|---|---|
| Range hood does not turn on | No power supply; Circuit breaker tripped; Loose wiring | Check power cord connection; Reset circuit breaker; Consult a qualified electrician |
| Low suction power | Grease filters clogged; Ductwork obstructed or too long; Incorrect installation height | Clean or replace filters; Check ductwork for obstructions; Verify installation height (24-30 inches) |
| Lights not working | LED bulb faulty; Loose wiring | Replace LED bulb; Check wiring connections (consult technician if unsure) |
| Excessive noise | Loose parts; Obstruction in fan; Improper ductwork installation | Check for loose screws or components; Remove any obstructions; Ensure ductwork is properly installed and sealed |
10. Warranty and Customer Support
Your Awoco RH-S10-36 Range Hood comes with a 1-Year USA Limited Parts Warranty. This warranty covers free parts, repair, or exchange within one year from the date of purchase for manufacturing defects.
For technical assistance, troubleshooting, or warranty claims, please contact Awoco customer support. Refer to your purchase documentation or the manufacturer's website for the most current contact information.
ETL Certified: This product meets safety standards for electrical products in North America.


