1. Introduction
This manual provides detailed instructions for the assembly, operation, and maintenance of your MELLCOM 26' x 10' x 6.6' Greenhouse. Please read all instructions carefully before beginning assembly and retain this manual for future reference. This greenhouse is designed to provide a protected environment for plants, extending growing seasons and offering shelter from adverse weather conditions.

Figure 1: Exterior view of the MELLCOM 26' x 10' x 6.6' Greenhouse.
2. Safety Information
- Proper Anchoring: Ensure the greenhouse is securely anchored to the ground using all provided stakes and ropes. In areas prone to high winds, additional anchoring may be necessary.
- Ventilation: Always ensure adequate ventilation, especially during warm periods, to prevent overheating and mold growth. Utilize the roll-up windows and doors.
- Snow Accumulation: In regions with heavy snowfall, regularly clear snow from the roof to prevent structural damage. The frame is reinforced, but excessive weight can cause collapse.
- Sharp Objects: Keep sharp objects away from the PE cover to prevent tears and punctures.
- Assembly: Assembly requires at least two adults. Follow all steps in the correct order.
3. Package Contents
Verify all components are present and undamaged before beginning assembly. If any parts are missing or damaged, contact customer support.
- Heavy-Duty Galvanized Steel Frame Components (various poles and connectors)
- Transparent Polyethylene (PE) Cover
- 12 Roll-Up Side Windows with Mesh Netting
- Large Zipped Roll-Up Door
- Tethers and Single-Sided Tape for Cover Attachment
- Ground Stakes and Ropes for Anchoring
- Assembly Hardware (bolts, screws, etc.)
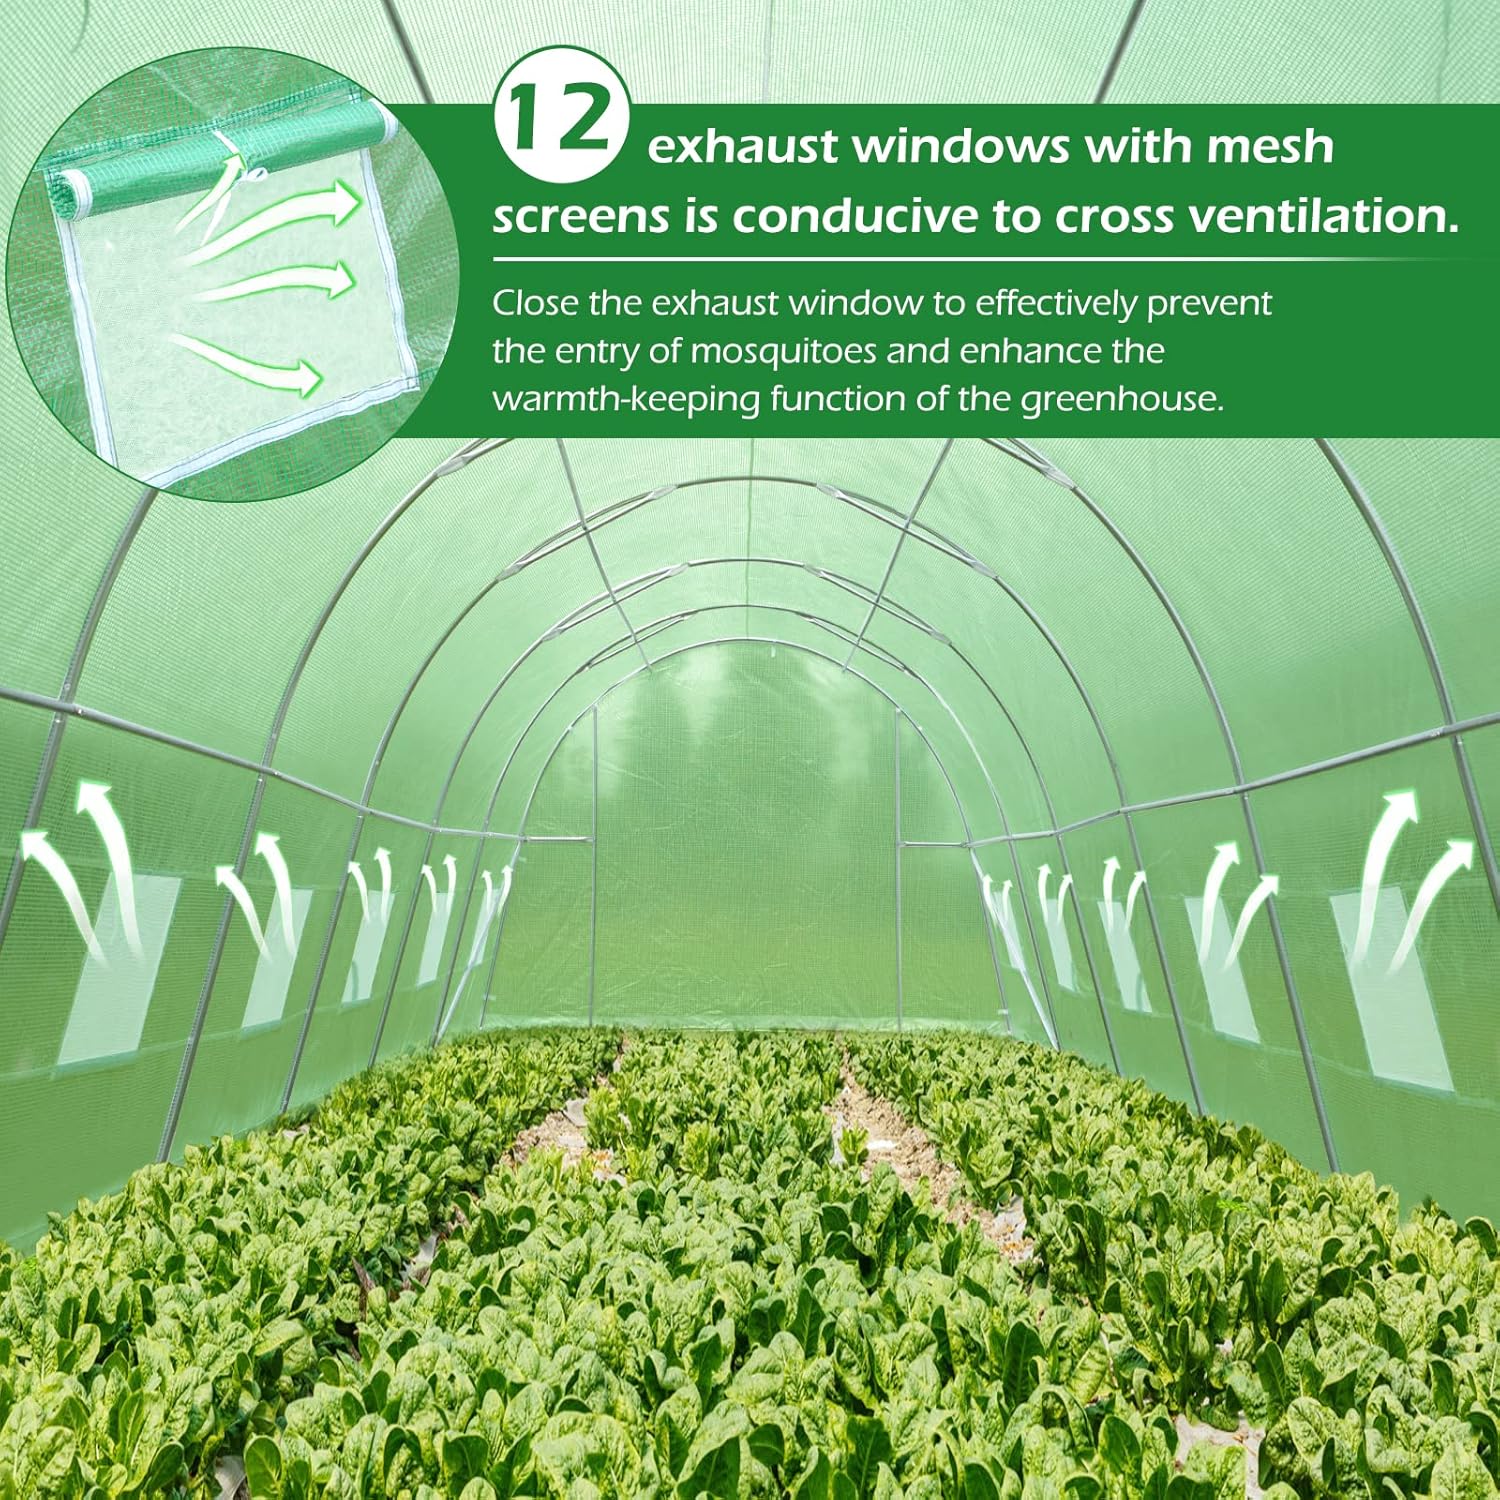
Figure 2: Key components of the greenhouse, including the PE cover, frame parts, and securing elements.
4. Setup and Assembly
Follow these steps carefully for proper assembly. It is recommended to have at least two people for this process.
- Assemble the Base Frame: Connect the floor supports and horizontal supports to form the rectangular base. Ensure all connections are secure.
- Install Vertical Supports: Attach the vertical poles to the base frame. Ensure they are correctly oriented.
- Attach Curved Supports: Connect the curved roof supports to the vertical poles, forming the arched structure.
- Add Diagonal and Horizontal Bracing: Install the diagonal supports and additional horizontal bars to reinforce the frame's stability.
- Drape the PE Cover: Carefully pull the transparent PE cover over the assembled frame. Ensure the cover is centered and aligned with the door frame.
- Secure the Cover: Use the provided Velcro straps and ties inside the greenhouse to secure the cover to the frame. Ensure the cover is taut to prevent flapping in the wind.
- Install Door and Windows: Ensure the large zipped roll-up door is properly aligned and functional. The 12 roll-up windows should also be secured.
- Anchor the Greenhouse: Use the ground stakes and ropes to firmly anchor the greenhouse to the ground. For added stability, consider burying the extended side of the cover with soil or weighting it with bricks/sandbags.

Figure 3: Detailed view of the reinforced frame structure, highlighting key connection points.

Figure 4: Interior perspective showing the frame, roll-up windows, and ties for securing the cover.
Assembly Video Reference:
Video 1: Quictent Greenhouse Assembly Guide. This video demonstrates the assembly process for a similar tunnel greenhouse, providing visual guidance for connecting frame components and installing the cover.
5. Operating Instructions
- Ventilation: The greenhouse features 12 roll-up side windows with mesh netting. Roll up these windows during warm weather to allow for cross-ventilation and prevent excessive heat buildup. Roll them down and secure them during cooler temperatures or adverse weather.
- Access: The large zipped roll-up door provides easy access. It can be rolled up and secured at the top to remain open for extended periods.
- Climate Control: Monitor the internal temperature and humidity. Adjust ventilation as needed to maintain optimal conditions for your plants.
Figure 5: Close-up of the roll-up side windows with mesh netting and the zippered door for ventilation and access.
Product Feature Video Reference:
Video 2: VEVOR Walk-in Tunnel Greenhouse Overview. This video showcases various features of a tunnel greenhouse, including its spacious interior, ventilation options, and durable construction, which are similar to the MELLCOM model.
6. Maintenance
- Regular Cleaning: Periodically clean the PE cover with mild soap and water to ensure maximum light transmission. Avoid harsh chemicals that could damage the material.
- Frame Inspection: Regularly check all frame connections and bolts to ensure they remain tight and secure. Tighten any loose bolts as needed.
- Cover Inspection: Inspect the PE cover for any signs of wear, tears, or damage. Promptly repair small tears with appropriate repair tape to prevent them from enlarging.
- Zipper Care: Keep zippers clean and lubricated to ensure smooth operation. Avoid forcing stuck zippers.

Figure 6: The durable PE cover offers UV protection, is waterproof, and provides resistance against snow and small animals.
7. Troubleshooting
- Problem: Poor pole alignment during assembly.
Solution: Ensure all poles are fully inserted into connectors before tightening. If holes do not align, slightly adjust the insertion depth of one pole until alignment is achieved. Do not force connections. - Problem: Zippers tearing or becoming difficult to operate.
Solution: Avoid excessive pulling or forcing zippers. Keep zippers clean and apply a silicone-based lubricant if they become stiff. If tears occur, repair immediately with heavy-duty repair tape. - Problem: Water pooling on the roof or cover sagging.
Solution: Ensure the cover is pulled taut during installation. In areas with heavy rain, consider adding additional internal supports or ropes over the top to help shed water. Regularly check and adjust tension. - Problem: Greenhouse instability in windy conditions.
Solution: Verify all ground stakes are fully inserted and ropes are securely tied. For increased wind resistance, bury the extended edges of the cover with soil or place heavy objects like bricks or sandbags along the perimeter.
8. Specifications
| Feature | Detail |
|---|---|
| Brand | MELLCOM |
| Model | 26' x 10' x 6.6' Greenhouse |
| Product Dimensions | 312"L x 120"W x 79.2"H (26'L x 10'W x 6.6'H) |
| Item Weight | 88 Pounds |
| Frame Material | Alloy Steel (Galvanized Finish) |
| Cover Material | Polyethylene (PE) |
| Number of Doors | 1 (Roll-Up) |
| Number of Vents | 12 (Roll-Up Side Windows with Mesh) |
| Color | Green |

Figure 7: Diagram illustrating the dimensions of the MELLCOM Greenhouse.
9. Warranty and Support
For warranty information and customer support, please refer to the documentation included with your purchase or contact MELLCOM directly. Keep your purchase receipt as proof of purchase.
MELLCOM Customer Support: Please visit the official MELLCOM website or contact their customer service for assistance with product inquiries, missing parts, or warranty claims.


